bookmark_borderGarden Owl

Several years ago, I ordered something from the Lee Valley tool company and they included a sheet of gift wrapping paper with the order. On the inner surface of the paper were plans for a decorative owl you could make. I was looking through some stuff around the workbench the other day, and I found these plans. I’ve had some surplus half-inch thick pressure-treated plywood sitting around, and been wondering what to do with it. So, these two thoughts clicked together and I decided to get that round TUIT spinning.

Lee Valley Garden Owl

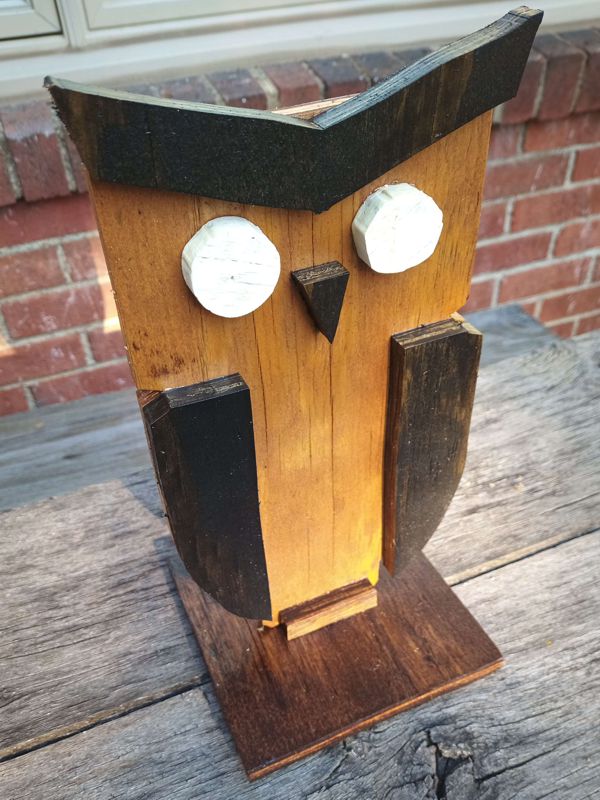
After using the band saw to cut out the pieces according to the pattern, I sanded the pieces to remove the fuzzy edges, then applied some oil-based stains that I have sitting on the shelf, and some white paint. Next, I glued the pieces in place and put in some 23 gauge headless pins to add a little mechanical stability, especially at the base where it’s an edge-to-surface butt joint. The next day, I sprayed it with a couple of coats of polyurethane, and that was pretty much it.

This is more of a craft project than a serious woodworking project, but it was a fun way to spend a few hours in the shop. Not everything has to be serious. My wife thinks it is cute, but it doesn’t really keep the doves off the patio. I’m hoping it might keep them from flying up into the windows, though.

Except for the band saw and the spray finish, this would be a good project if you are trying to keep a handful of youths busy for a while. Some of the smaller and rounder parts are a pain to cut, but it’s not precision work, so you can kind of fudge it. The gluing and painting could be done by anybody of any age and skill level. If things come out a little crooked that just adds character. The only vital joinery is where the base attaches to the owl.

If I make another one, I might use the router to round over the front edges of each piece to give it a slightly softer look. I like the way the stain gives the parts definition, and cover up the greenish hue of the plywood, without covering up all of the the grain and making it just look like plastic. I’ll have to see if there is enough surplus for one or two.

bookmark_borderBox for 1 Lantern

A while back I made a Lantern Storage Box to hold the six wooden frame lanterns that I made for camp. I had previously made a couple of lantern storage boxes to protect a couple of large frame lanterns, but this smaller cypress lantern had no box in which to be stored. Now it does.

Lantern Atop its Box

Anyway, it’s just an empty box, made of plywood. These were some of the last medium-size plywood bits I had around the shop. If I want to do more quick projects like this, I might have to start buying new plywood, despite the current inflated prices. The hardwood rim provides some reinforcement, and gives you something to grab as a handle.

Empty Lantern Box

There’s just enough room inside to insert this particular lantern. The lantern actually sticks up a little past the sides of the box. I just didn’t have four pieces that were tall enough. You might even notice that the thicknesses of the sides are not even the same. It hardly matters.

Lantern in its Box

Once you are finished placing the lantern in the box, you can add the lid. The lid is tall enough that it rests on the handle rails instead of on the legs of the lantern. It’s not a very tight fit. Normally, I wind up making lids too tight-fitting, but this one is kind of loose. I might add some kind of closure so that the lid does not fall off if the box gets tipped over.

Closed Lantern Box

I put some polyurethane on the outside of the box, to protect the lantern if the roof of our storage trailer leaks or the box gets left out in the rain.

bookmark_borderBook Risers for a Friend

A fiend of ours contacted me about making some book risers. This firend has just moved to a new house that has some built-in bookshelves that are deep and tall, which is nice for hardbacks but inefficient for paperback. My solution is to stack books vertically and sideways.

My solution, with edge tags

Not everybody like this solution, though. They like to be able to see at least a portion of all the spines, even though it is less efficient.

What most people want

To achieve this, though, you need some kind of riser. I know people who use foam blocks, or cardboard inserts, but plywood is way stronger and more durable, so this friend contacted me.

Risers being painted

Here they are being painted matte black in the driveway. They are basically just open-bottom boxes. There is an extra support piece in the middle, just to keep them stable. They are made from half-inch plywood, with simple butt joinery, glue, and 23 gauge pins. Two different sizes, one for paperbacks and one for trrade paperbacks. They are clear-coated to keep the black from rubbing off, and felted on the bottom to keep from scratching the shelves. They are not perfect, but since once they are in place it is possible that nobody will ever see them again, that’s probably OK.

bookmark_borderLantern Storage Box

I’ve only made three of these lanterns so far, but I intend to make six, so eventually I will need something to transport and store them all in, or they are going to get pretty beat up. So, another box.

Lantern Box, Closed

This was also yet another exercise in using up surplus materials from other projects. I wound up having to use a piece of MDF for the lid, because that was the biggest piece of anything I had left. The edges are off-cut from 2-by-4 lumber from when I was making pole by cutting square pieces from 2-by-4. It awfully satisfying to use up some of that stuff.

Lantern Box, Open

You can see that the extra height of the lid makes it easy to get the lanterns in and out of the box. There’s an extra half inch in each direction, so the lanterns fit snugly but not tightly.

The whole thing is finished on the outside with spar polyurethane, especially the MDF on the lid, to give it a little more water resistance than a cardboard box. I glued some blocks of wood to the bottom to serve as feet, so it won’t be resting entirely in any puddles.

Basically, the whole thing is constructed with glue and nails form the nail gun. The bottom is thicker plywood to make it bottom-heavy, and the rim on the body both supports the lid and reinforces the corners of the box. This is a design and method I’ve used before with some success.

A lot of the sizing of pieces can be done while you’re building. For instance, I make the body of the box, then I measure the outside of the top before cutting the pieces for the lid. That way the lid is sized to fit the actual box, and not just my best hope.

The whole thing is kind of rough, because it’s not supposed to be anything special. You can see in the photos that I didn’t even sand off the mill markings.

bookmark_borderHexagonal Propane Box

We have a small propane-fueled grill that spends all summer out on the patio. Eventually, we decided that it wasn’t super cool to have a tank of propane just sitting out in the rain and sun, so I decided to build a storage box.

6-sided 3-leggad Storage Box for a Propane Tank

The box is mostly made from exterior-grade 3/8″ plywood. It’s hexagonal, which is more work, but actually uses less wood. I’m especially happy that I was able to keep track of all the pieces and their orientation, so the face grain of the plywood flows around the corners nicely.

The floor and lid of the box are 3/4″ plywood for durability. The edges of the lid are made from pine 1-by-4. Once you have the blade angled over to cut the 30 degree angle for the sides, you can use that angle for the lid edges, too. The 3 legs are pieces of 2-by-4 cut into my standard karabitsu leg shape on the band saw.

There is a large hole cut in one side of the box for the propane hose to pass through. A couple of smaller pieces inside block most of the hole and secure it once the tank is in place.

Open box showing the hose arrrangement

There are also some hols drilled in the bottom to allow any leaked propane to escape. I glued some nylon mesh over the holes to keep bugs from crawling inside.

The whole thing is finished in heavy-duty oil-based polyurethane. I had though about painting the box, but after I saw how interesting the grain was, clear satin it was.

A little closer up

It will also come in handy in the winter. We can clean up the grill itself and store it in the garage, but you really should not bring propane tanks inside like that. With the polyurethane I used, this thing can probably just sit outside on the patio all winter.

bookmark_borderStorage Box for the Coronet of a Duchess

Some of you may remember that, earlier this summer, after inventorying the large selection of surplus plywood in the shop, I went on a bit of a storage box kick. Starting to feel like I was getting pretty good at making these simple boxes, I offered to make boxes for anything for which my friends might need a storage box. The only person (so far) to take me up on the offer is a friend of ours who is a Duchess in the SCA.

The title of Duchess is typically given to those who have been Queen two or more times. Those who hold Royal titles in the SCA (from Baron on up) are entitled to wear coronets that signify their rank. Sometimes, but not always, these come with a box. Sometimes, this box is too nice to be carted around, even though you want to take the Coronet itself to the event so that you can wear it to court.

Anyway, she sent me the rough dimensions of her coronet, and I added an inch to each of those dimensions to allow for a half-inch of padding all around. I did not feel that my standard lauan plywood box was sufficiently nice for this use, so I dug into the supply of birch-face plywood and birch scants that my wife bought for a project long ago.

The Duchess’ Coronet Storage Box, in Birch

It’s just a simple lidded box. The interior is roughly 10″x12″x5″ It is assembled using butt-joinery, glue, and 23-gauge pins from the nailer. Inside and out, the box is finished in blonde shellac. The table saw blade left some scorch marks on the ends of some of the boards, but other than that I am pretty happy with it.

Birch Storage Box, Open

It should be pretty useful for the coronet, or whatever else she might choose to store in there.

bookmark_borderKanmuri-bako

About two years ago, when I was preparing to be elevated to the Order of the Laurel, I was searching everywhere to try to buy a Kanmuri. The Kanmuri (which translates as “crown”) is the correct piece of headgear to wear with the Bunkan Sokutai that was to be my elevation garb. I eventually found an antique store in Japan that was willing to sell me one, however, theirs was in Thailand and would need to ship directly from there. I wound up picking it up at the post office the day before we went up to Pennsic. Since then, it has lived in a cardboard box, which was not the best place for this antique hat. Finally, I was able to make a couple of boxes to store and protect the pieces of the kanmuri.

Closed

That’s what they look like closed. They’re just simple lidded boxes made from plywood and finished with shellac. I have a stack of smallish plywood scraps from the last 20 years of larger projects, so this project was also an opportunity to use up some of that.

Open

Here they are with the lids off, so you can see the kanmuri pieces nestled cozily inside. On the left is the “pillbox” portion with its upright and pin (All three pieces are attached on this kanmuri.), and on the right is the tail. There’s a lot of empty space inside the tail’s box, but I wanted the box to help maintain the proper shape of the tail, and I wasn’t up for trying to make a proper bentwood box.

Assembled

In case you’re unfamiliar with the kanmuri as an object, here’s what it looks like when all the pieces are assembled. The cord drapes over the pin and ties under your chin to keep the hat in place. You can see that this kanmuri is not in the best shape. I’ll embark on a restoration project eventually,