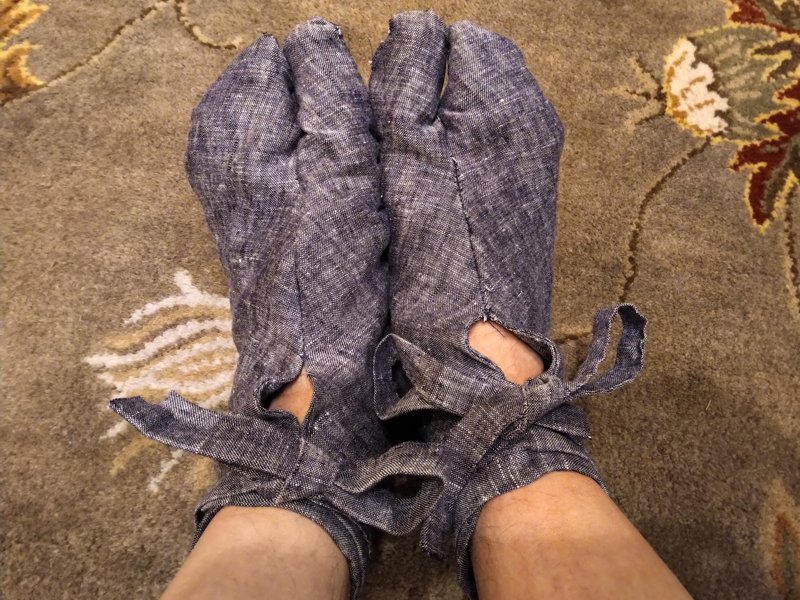
It’s not even half-way through the year, and I already have this year’s tabi foot coverings finished.
Tabi in blue linen
For those of my readers who are not familiar with this tradition, I started sewing my own tabi a few years ago to go with my Japanese garb. They are usually made from leftover fabric from garb projects, but it’s just regular fabric, so they tend to wear out pretty quickly. I found that if I make a pair a year, I can keep ahead of the curve and always have at least a few pairs of tabi that are not worn out and shabby looking. Usually, I wind up finishing a year’s tabi in January or February of the following year. Not this year! Free time and your wife hosting local sewing circles can do that.
These are made from the blue linen I used for the hippari top I made for the field clothing outfit from this past December. They’re sewn entirely by hand, including attaching the himo ties, which I normally do by machine. This was not a decision to be a stickler about it, just that I was sewing these to have some sewing to do while being social, so why not stretch it out a little bit?
These are apparently the eleventh or twelfth pair of tabi I have made for myself. Scary. Maybe the next pair will be impractically fancy. We still have some really nice silk brocade sitting around.
Quite often, things sit on my project “to do” list for a season or a year until I’m absolutely sure I still want to make that thing. This project entered my list just two months ago, but it was such a motivating idea that I jumped right in on it after completing the smallest karabitsu. I bought all the lumber and other materials at Home Depot, and used almost all the power tools in my shop, so this is nothing that took great talent, uncommon materials, or specialty tools. Probably the only “talent” that made this project possible is the ability to plan, and the ability to follow plans.
Anyway, here it is. It’s an end table (or side table, whatever) in the “Arts & Crafts” (or maybe “Craftsman”) style. Made from red oak, stained a slightly darker brown, and finished with amber shellac.
Arts and Crafts End Table
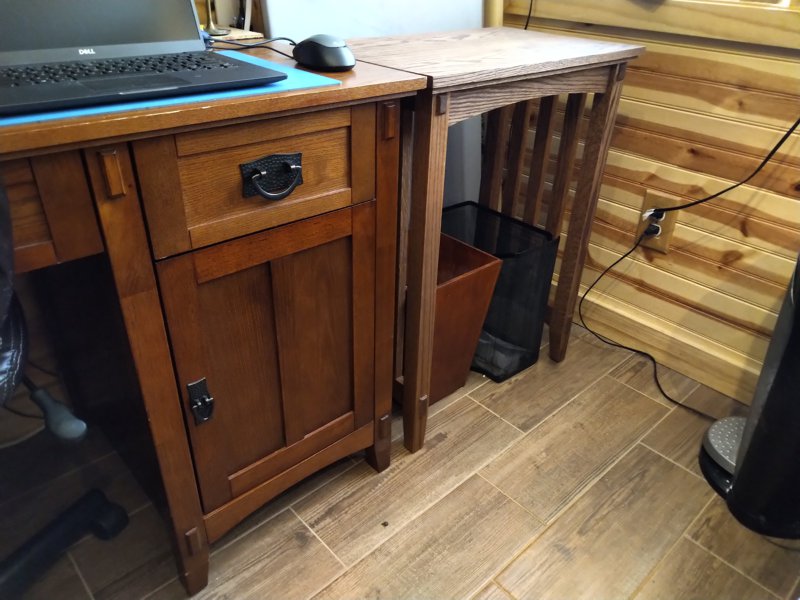
The exact style is important because I wanted this table to go right at the end of my desk, and match the look of the desk as closely as possible. I have a file cabinet at the other end of the desk, and it came from the same furniture collection, and I though that having two match each other and a third not match would be visually jarring. They don’t even sell this desk any more, so buying an end table from this collection was not going to happen. What the heck, I’m a woodworker, right? Let’s just make one.
Table before finishing, next to desk
The only problem with that is that I have never made real furniture like this before. Years ago, I made the stereo cabinet, but I kind of winged it. I had to make a bunch of decisions about how such a thing even should be made, because the desk itself is mostly fakery. For instance, the ends of the “through tenons” that you can see on the desk are glued on. They are not even end grain! The “tenon ends” just under the surface of the desk are taller than the horizontal members of which they are supposed to be the ends. My tenon ends are really the ends of the horizontal members. My mortises are really full through-mortises. The ends of the vertical “ribs” really are tenons that fit into blind mortises in the horizontal members. The “inset molding” beneath the surface is not just routed onto the underside of a thick piece of wood, it’s a four-piece frame of 3/8″ wood that attaches the frame to the underside of the surface.
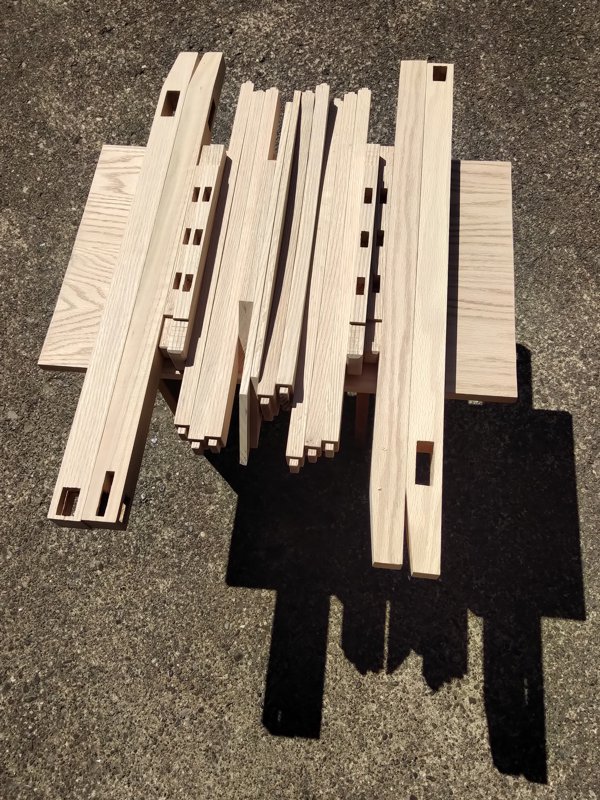
When you do this much planning on a project, though. You start to think about the project as a bunch of parts. It becomes very important that the pieces match the specification, and that each match the quality requirements of the project. However, it’s still just a bunch of pieces.
The pieces of an end table
Then, as the project progresses, things start getting more coherent. The first swipe of the staining pad and a stick of lumber starts to look more like a table leg. The pieces start getting assembled, and suddenly there is a piece of actual furniture. It’s almost magical. Suddenly it’s furniture!
The unfinished table after dry-fit assembly.
Then you add two coats of shellac (three on the top surface) and write a blog post, and suddenly the project is complete!
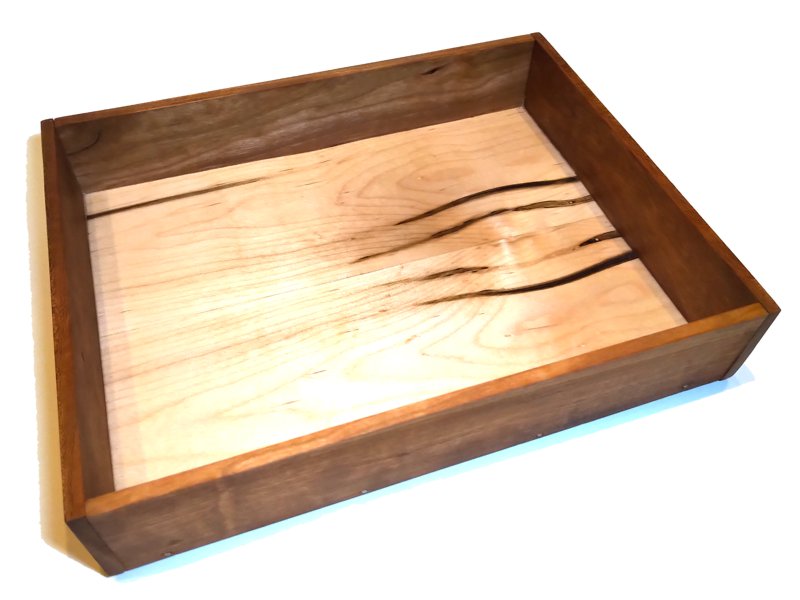
Just in case you are under the impression that everything I do is always perfect, here’s a little project I had to make because I messed up my first try on the Sake Cup Box project. Sometimes I kind of “wing it” on projects, making decisions based on dimensions that are are penciled on cardboard boxes or post-it notes instead of sitting down to draw up formal plans and doing calculations. As you might expect, sometimes this bites me in the butt.
I made this box bottom, then when I tried it out with the dividers to check for size, I realized it was too small. I set it aside while I started over on a new box bottom, kept it aside while I made a lid for the Sake Cup Box, then I made a lid to fit this “surplus” box bottom instead of smashing it to bits in frustration.
Surplus Box Bottom
This time, the top of the lid is made from more strips of cherry, edge-glued together. I am getting tired of seeing this big stack of cherry scants in the shop, so this was a good way to use up a handful of them. The walls are also cherry strips, but I was able to get better glue joints this time, so there is no metal hardware. Hopefully, the whole thing doesn’t wind up smashed to pieces at some point.
Cherry Surplus Box
The floor is maple, resawn and bookmatched, but as this was my first try it is much more uneven than the floor of the Sake Cup Box. In a way, it’s a good thing this one was unusably small because the bottom it’s definitely not as nice.
The whole thing got the same walnut oil finish as the Sake Cup Box, because why not, so it also spent the last month in the drying closet. I’m no entirely sure what I’ll use this box for, but I am sure that I will use it for something. It’s big enough to hold 16 tama and some braiding supplies, and since it obviously matches the Cherry Marudai, maybe that’s what I will use it for.
It spent a month in the furo, and now it’s ready to show off. This was one of my big projects last month, and it has been on my to-do list for a while.
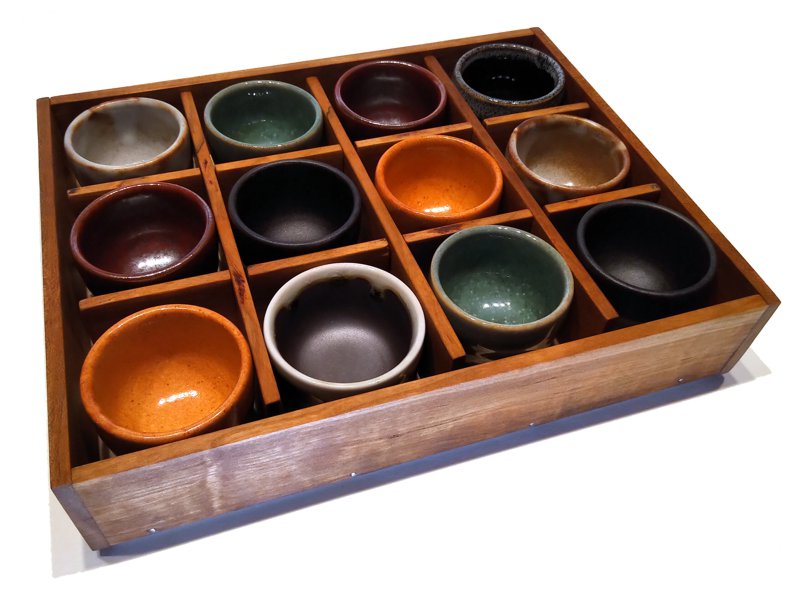
Back at the SCA 50-year anniversary event, we purchased a dozen sake cups for a very good price from a merchant. Since a dozen is one box of cups, the merchant threw in the box so we could safely transport the cups home. This was just a cardboard box, so we have been keeping the cups in a plastic bento box ever since. The cardboard dividers between the cups got destroyed at Pennsic last year, so I made some new dividers from cherry, but still sized to fit in the plastic bento. Now, I have made the final box.
The Sake Cup Box
The top of the lid is made from some rough-sawn lumber I salvaged from Mr. Arimoto’s workshop during the restaurant furniture project. The walls of both the lid and the box body are made from off-cut cherry strips from making maurdai. I was having some trouble gluing the strips to the lid and floor pieces, so all the joinery is secured with brass escutcheon pins. This should also make it a little more durable. It’s finished with food-grade walnut oil, which is why it had to spend a month in the drying cabinet. That oil takes a really long time to cure.
Here’s what it looks like with the lid off:
Sake Cups in Box, with Dividers
The dividers are neither glued together, nor are they glued in. If I need this box for something else later, they will lift right out. The floor of the box is some resawn and book-matched maple that I had in the shop. I didn’t have enough or thick enough cherry left over. It started as 4/4 (roughly 1-inch thick) maple, so I resawed it to roughly half-inch thickness, then sanded it smooth and even.
Empty Sake Cup Box
I am really super-happy with the way this came out. It is significantly larger and heavier than the old plastic box, but it is also significantly classier.
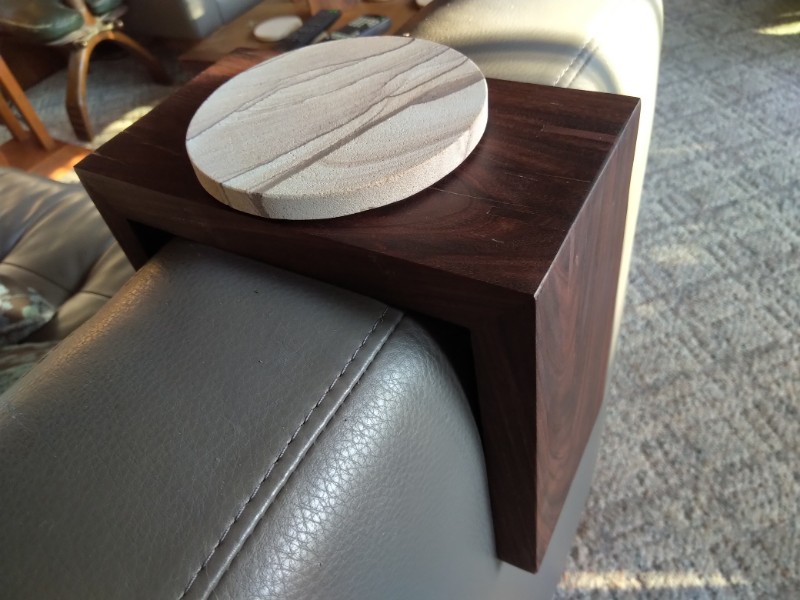
Some months ago, in the beforetimes, I made an armrest coaster from walnut. This was nice, and well received, but we decided that another one would be handy. The local Rockler store was getting ready to move, and they had all their exotic lumber on sale. They had this rosewood board left, and Sharon loves rosewood, so into the basket and onto the todo list it went.
Rosewood armrest coaster
There are some cracks in the wood, and i tried filling them, with only limited success. It should not effect the structure, though. Most things about the construction were the same here, except I had to cut my own splines. I should have done that on the band saw instead of on the table saw. A bit of tape to keep the splines from falling into the saw after cutting made this much safer. The gluing went a lot better this time than last time. I guess I was more patient and more practiced. Anyway, here’s what it looks like in situ:
Coaster on armrest
A couple of doses of boiled linseed oil to seal the wood, and it’s ready to use.
Back in October of 2016, when I was in Japan for the TV show, I had a few “free” days in Tokyo when they weren’t shooting video and I could go do whatever I wanted. One of these, I walked from my hotel near the Shiba Daimon Gate up to the Tokyo National Museum, a distance of some three or so miles. One of the displays in the museum that day was a collection of wood and lacquer items. Within that display was a small collection of masu measuring boxes from the 15th century. Ever since that day, I’ve been wanting to recreate at least one of these boxes.
Masu in the TNM
Most people here in the West are familiar with masu as the wooden sake cups one sometimes receives with cold sake in sushi restaurants. That size, is a 1 goumasu. Five of the six masu in the TNM were 1 shoumasu. They have ten times the capacity of a sake cup masu. A thousand gou is a year’s supply of rice for one person, called a koku. A shou of rice is about the amount a person might buy in the market for a family.
The way a rice merchant would use a masu is to dig into the rice bushel with the box, and lift out a mounded boxful of rice. Then, drag a rod across the top of the box to level off the measure, much in the same way a baker uses a metal spatula to level off a measure of flour. ! shou of rice is about 1.8 liters, usually described as “about a half gallon”.
Here’s a better picture of just one of the masu in the museum:
Probably the best masu in the collection
This image shows some vital details necessary for recreating this kind of 1 shoumasu. The bottom is not captive within the walls, it is applied and extends to the full footprint of the box. This one shows significant wear, rounding off the bottom edges. The joinery at the corners is simple, more or less “box” joints, but with the huge half-height “fingers” I am used to seeing on boxes from this era. Interestingly, the joints “chase” around the box, and all sides are Z-shaped. The joinery is secured with two pegs per finger. The rim of the box is covered in copper strips. These strips keep the top edge of the box from being worn down by the rubbing of the leveling rod. the copper strips appear to be nailed on.
Anyway, it’s taken me some time to get around to completing my masu. First, I had to calculate the measurements needed to achieve the 1.8 liter volume. If I planed down some cedar boards to half-inch thickness, my walls needed to be (amusingly) seven inches long and three inches tall. I’m told that the actual volumes of the masu in this collection vary significantly, but whatever. I started working probably two years ago, ut the planed boards sat on my workbench until recently. I even got some sheet copper and cut it into strips, and that sat waiting too. My copper is about half as thick as the strips in the museum masu, and I think that the walls of the boxes may be thinner, but I do what I can. I was able to cut all the joinery by hand, and hand-drill the holes for the pegs using a yotsume kiri gimlet. I glued everything together with rice-paste glue, which may or may not be authentic, but is certainly closer than if I’d used wood glue.
Anyway, here’s my masu with its measuring rod:
I was even able to get copper-plated nails to attached the strips. It feels so good to finally complete this project after all this time. This kind of common object is the kind of thing my SCA persona would have been familiar with as a mundane object in the marketplace, so it helps me complete the mental picture of what his world was like. I can now hold in my hands something I’d previously only seen behind glass in a museum.
A furo is a “drying cabinet”. It’s where you put urushi lacquered objects to keep them warm and humidified until the lacquer has fully cured. Depending on the type of lacquer, this could take a number of weeks. In my case “furo” is actually short for “furnace room”, which is a nice warm room in the house that also contains the hot water heater.
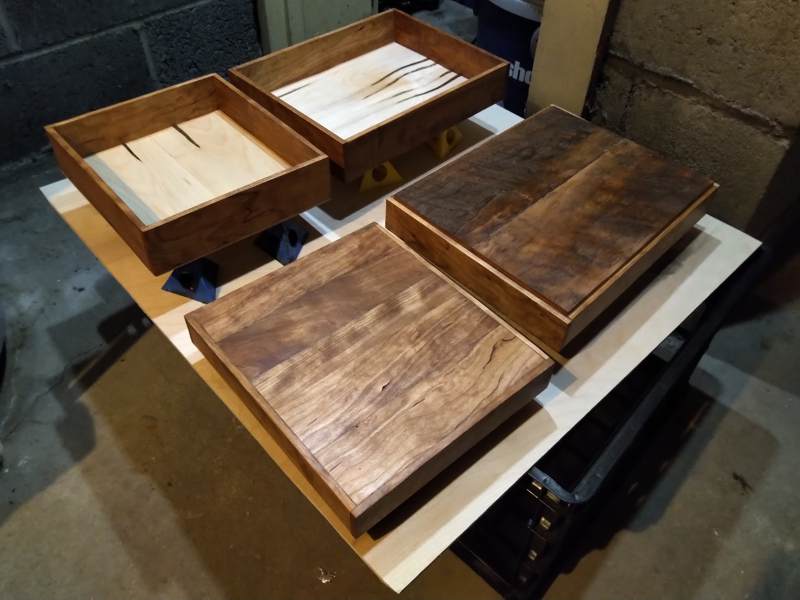
I’ve been working on a couple of wooden box projects, and I decided to finish them with walnut oil. Walnut oil is a drying oil (like boiled linseed oil), but it contains no chemical drying agents like BLO does and is food safe. The down side is that it takes about a month to cure, so I can’t show these boxes as finished projects for some time.
Boxes in the furo
Both boxes are constructed primarily of 1/4″ cherry scants. These are off-cuts from trimming down the legs of the two cherry marudai I made. The floors of both boxes are bookmatched resawn maple. The floor of the smaller box is the result of trying to make the larger box and having it come out a little small due to lack of planning. The lid of the smaller box is more 1/4″ cherry that has been edge-glued into a single panel. The lid of the larger box is 3/4″ rough-sawn cherry salvaged from the scrap pile at Mr. Arimoto’s shop. Once the oil went on the raw surface of the cherry, the whole thing went deep and beautiful.
I’m going to try to resist the urge to peek in on them constantly. We’ll see how they look in a month.
With some surplus wood from the mysterious woodworking project, I made this little phone tray to mount in my car. I got tired of never having anyplace I could put my phone down where it would rest face up so I could glance at maps or whatnot.
Tray mounted in car
The tray, made entirely of 1/4″ cherry, is sized to fit my phone, and has a small cut-out for a charging cord. The wood is sealed with some shellac. The tray is clipped to the e-brake lever, which maybe isn’t the safest thing, but is certainly safer than balancing the phone on my knee while I drive.
Underside, showing clip
The clip (I don’t even know where this clip came from, It was in my bin of miscellaneous hardware. I suppose it’s for holding a broom handle.) is screwed to a block of walnut, and the block is attached to the underside of the tray using “Command” adhesive strips. This is so that if I ever want to, I can replace this mount with something else, or re-use this clip on a tray sized for a different phone.
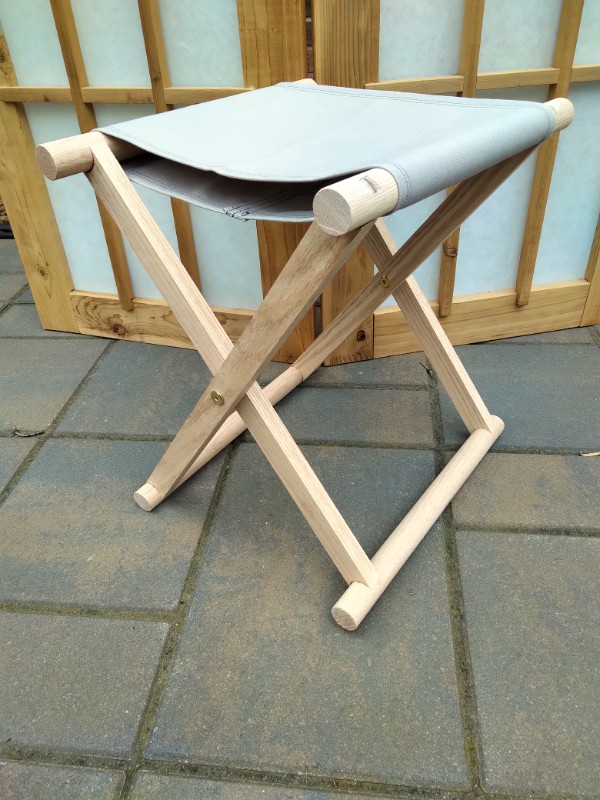
Last Pennsic, a friend asked me if I could make a shogi for her like the ones I have made for us. I said yes, because I had some things I wanted to try. I tried out a new method for the leg joinery, and a new method for sewing the seat fabric, earlier this year. I bought some new hinge hardware back before the virus shutdown, so it was time to get cracking. I started in earnest a few days ago, and I finished it up today.
Shogi #6, for Caellin
Now, if we ever have another SCA event, this stool is ready. If you zoom in on the picture, you can see that I used the same wedged through-tenons with curved shoulders that I used on the previous shogi. The only real difference is that I bought some connector bolts to use as the pivot hinges where the legs cross. There is also a bronze bushing in there to make sure the hinge works smoothly. All this special hardware was a little pricey, but I think it will be worth it in the long run, and even thought the hexagonal recesses in the bolt heads look a little modern, I think the hardware gives the completed stool a much more finished look.
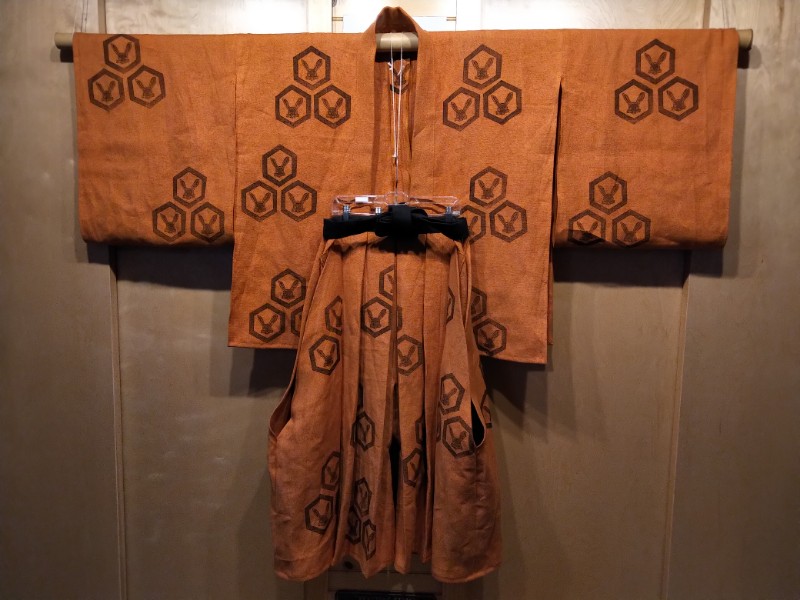
A while back (more than a year ago, probably) I was browsing the online collections of the Metropolitan Museum of art, and I found a hanging scroll called “A Nenbutsu Gathering at Ichiya, Kyoto“, which is an excerpt from the “Illustrated Biography of the Monk Ippen and His Disciple Ta’a”.
Now, I am not a big fan of the Pure Land Buddhism favored by Ippen, but I was instantly drawn to a figure in the middle foreground. Not only is he wearing a bright-colored hitatare, it’s a daimon hitatare decorated with a triple-hexagon motif (my registered badge is hexagonal), and I look kind of like him with a beard and narrow stature.
This has been the reason for me buying bright orange linen at Pennsic, me learning to carve wooden printing blocks, and me spending hours practicing printing and actually printing yards and yards of fabric.
Behold, my daimon hitatare:
Hitatare top and matching hakama pants, front
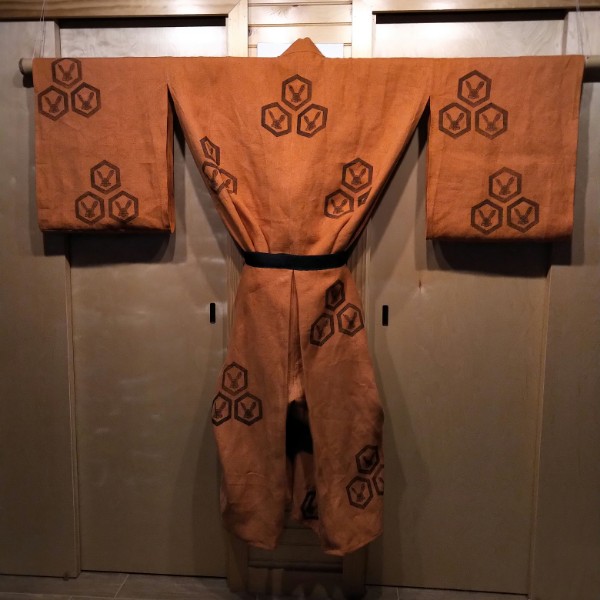
Hitatare top and matching hakama pants, back
The outfit still needs some finishing touches, but I am so happy with the way main construction went on this garment that I thought I would post some photos. I still need to make a samurai eboshi hat, and a fan if I want to complete my recreation of this guy from the painting. I am torn about adding the kotsuyu and sodetsuyu knots to the garment. I know they should be there to make a proper daimon hitatare, but they are not visible in the painting.