Inro
Japanese Medicine Cases
August & September 2005, plus August 2006 below
August & September 2005, plus August 2006 below
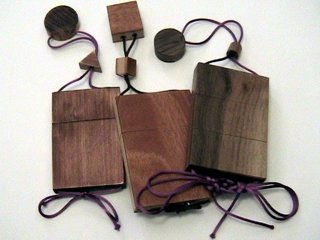
Traditional Japanese clothing does not have any pockets. Items were often carried in sleeves, or in the front of the kimono between the overlapping layers. Also, pouches or other objects were often hung from the waist belt. In Japanese, things that hang from your waist are known as Sagemono. Inro are a specific type of sagemono used to carry medicine or tobacco. They usually have several compartments, but the compartments can be open to each other to create larger compartments. The compartments stack, and are held together by cords that tie below the inro and run vertically within the edges. The Inro is held closed by an ojime bead that pulls the cords together at the top. At the top of the cording is a netsuke. The netsuke is a toggle, often quite intricate, that holds the inro cords in place above the obi or waist ties.
After becoming interested in inro at Pennsic in 2005, I decided to try my hand at making some so I'd have something to carry money and cards in that wasn't a cloth pouch. My woodworking skills are improving, but my woodcarving and artistic skills are nonexistent, so rather than the ornately carved or decorated inro I've seen, I decided to simply stick with the simple beauty of wood.
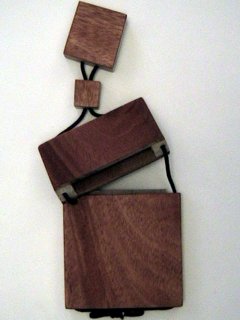
Basswood is easily available in craft stores and comes in a variety of thicknesses and widths. This inro is made mostly of basswood, as I figured it would be good inexpensive way to test out the concepts. The ojime is also made from basswood, but the netsuke is just cut from the end of a 1.25" wooden rod. The body of the inro is about 4"x23/4"x5/8".
After construction, I stained the outside with "Red Oak" stain. The wood is way too soft for staining, so it got a very uneven coloration. The faces are made of 1/16" wood, so they are also very thin. This helps make the box very small and light, but I hope it doesn't break.
The cord is about a yard of nice silky trim cord I got at the fabric store. It's purple!
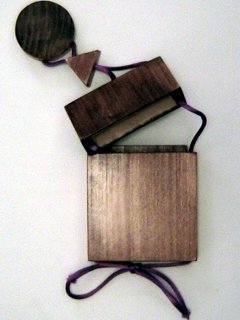
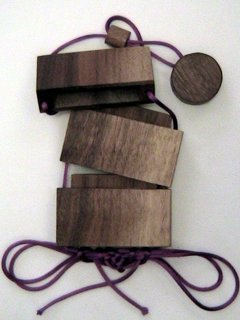
Way back during the dollhouse-building revival of the mid-1990's it was easy to get craft wood in other varieties than basswood and balsa wood. I still have some pieces left over from back then, when I made the "LaminIce" Icehouse pieces, so mahogany was my choice for nicer facing materials after I finished the first inro. Actually, this inro was completed first, since I was able to skip the staining step. It's easier to see the layers used in construction, too. The ojime and netsuke have a similar layer construction, but the basswood center is somewhat thinner. I hadn't gone to the fabric store for cord, yet, so this has a shoelace for a cord. I could replace that, but it actually looks OK.
The box itself is about 41/2"x3"x3/4". this is a little larger than the first inro, but it's much sturdier.
This is the first inro I made all of one type of wood, and the first with multiple pieces in the main body. I went to a woodworking store for some thicker, nicer wood, and came out with this great walnut. The ojime and netsuke are cut from the same walnut, and I rounded them myself on the band saw. The cord is about 2 yards of the purple trim cord I used before, but the greater length enabled me to tie a more ornate bow.
This inro is almost exactly the same size as the mahogany inro, though the height of the lining pieces that hold the compartments together is greater to compensate for the instability of the shorter sections. The vertical channels for the cord were much easier to drill on this one, since the sections were much shorter.
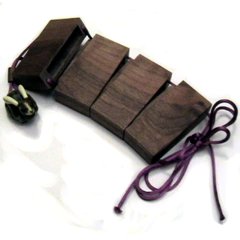
I'm not sure why I made this inro, but it came out nice. It's essentially the same as th previous inro, but with four sections instead of three. I guess I thought it would be important to make a longer one. I started this inro soon after the first three, but it sat uncompleted on my workbench until July.
I put this cute bunny netsuke on it. It's a reproduction of a museum piece that I bought out in Portland, Orgeon.
The varieties of wood I used varied widely, but the types of pieces I used were very similar between inro. Each inro had front and back facings of 1/8" or 1/16" wood, a center of 1/2" wood, and linings of 1/32" wood at the joins.
Get the best wood you can afford, as the materials you start with greatly affect the quality of the completed piece. Woodworking stores have good selections that have already been cut to the thicknesses I used, and in "gourmet" woods. Larger hardware stores will usually have 1/2" wood, but not the thinner pieces. For the very thin woods, craft stores or hobby shops will have those, but maybe only in basswood. You can probably use wood veneer, but you realy only need a few inches, so don't go buying a huge pile of veneer just for this project. Don't use balsawood, it's just too soft and fragile.
I made my own ojime and netsuke, but these things can be acquired fairly inexpensively. If you don't have a good bead store in your area, most craft and fabric stores can sell you wooden shapes you could drill out and use. For fancier netsuke, you could drill holes in a small figurine or something. If you're any good at carving, you could obviously do that instead.
Obviously, this process will only make a simple inro like the ones I made.
First, cut two rectangles of facing wood and one piece of center wood. I made my rectangles 3" wide because the craft wood was already that wide, so I just had to cut it to length. I made my rectangles 41/2" long because I liked that width to length ratio, and I wanted something that was easily divisible by 3 for the three-section inro.
Measure a 3/8" margin around the inside of the center piece and mark it in pencil. You could probably make it thinner at the top and bottom, but 3/8" is best for the sides unless you're really good with a drill. This margin is the outline of your inro's interior.
Drill out the four inside corners of the interior margin, then use a coping saw or scroll saw to connect the holes and make your center rectangle into hollow retangle. Clean up the edges of this now, as the inside will be impossible to sand later.
Spread wood glue on the front and back of the center. Try to use a super-thin layer of glue, just enough to stick. If you use too much, it will squirt out around the edges in the next step.
Press the front and back rectangles to the front and back of the center. Clamp this assembly together and let it dry for several hours at least. Overnight would be best. If some glue squeezes out, clean this of now with a damp cloth.
This is a good time to start working on your ojime and netsuke. The hole in the ojime should be about 3/16" in diameter and should go all the way through the bead. The holes in the netsuke should be 1/8" in diameter, and do not go all the way through. You want two holes that join up inside, either in the back of the netsuke, or in the bottom. Unless you're carving these, sand both pieces smooth.
Once the glue is dry, sand the whole outside smooth with 220 grit sandpaper. A belt or disk sander would be best, but hand sanding would work fine. I also use sanding to round off the corners a little bit so the body is softer.
If some glue squeezed out and dried on the outside, you might need to sand extra hard, or even cut off a thin layer of wood with a saw. That will make your box walls thinner, so try to avoid this, of course.
If you're making a three-section inro, mark a line across the inro body 1/3 of the way down from the top, and 1/3" up from the bottom. If you're making a two piece box, only draw the upper line.
Cut the inro on these lines using a saw. You could use the same saw you used earlier, or a miter saw for best acuracy. I used my band saw because the blade is very thin. Keep track of the way these pieces fit together!
On the ends of each piece, mark drill points 3/16" in from the left and right, and centered front-to-back. These are the channels for your cord.
Drill down through each piece using a 1/8" drill bit. A drill press and a steady hand will be very helpful here. This step is easier in the three-section inro as the pieces are shorter. In a two-section box you might need to drill down from the top and up from the bottom, hoping that your drilling is accurate and the holes meet up in the middle.
Once you're finished drilling, stack the pieces and make sure you an see light down each hole. If not, try to clean things out without busting into the interior or out through the exterior.
Cut a number of strips 3/4" tall from the thin (veneer or 1/32") wood. It's best if the grain goes across the short axis of these strips. You might be able to just cut these strips with a razor knife or scissors. If you can't get this super-thin wood, you can probably use card stock, but that oviously won't be as nice. Mark the strips 3/8" of the way down.
Measure the inside of one side of the top of one of the joins. Cut a strip so that it just fits into that edge. Glue one half of the strip below the line you marked, and press it into place inside the join.
I chose to make fairly simple beads for these, basically I just made geometric blocks and drilled them.
Ojime are basically regular beads, with a hole that goes all the way through. For my 1/8" cords, I usually drill a 1/4" or 3/16" hole through the center of a small block and maybe round it on the saw.
Netsuke usually have two holes in the bottom that join together somewhre inside. I made some larger blocks and drilled two holes into the bottom of each at 45 degrees. I needed to use a wire to thread the cords through the netsuke when I was finished.
I've also made some slightly more decorative netsuke by tracing a piece of clipart onto the wood, then cutting out that shape on the band saw. I've made a few bunnies for myself, and a couple of cats for Sharon.
For most of my pieces, I either used Minwax wipe-on polyurethane or spray polyurethane. Spray dries at lot aster, but the wipe-on lets you make sure you coat all surfaces. Each pieces received two or three coats, with sanding between coats to keep things smooth.
Be sure to finish each piece separately, and be careful finishing the joint areas, or things will stick together, and all your careful work will be for naught.
Start by putting the netsuke in the middle of about a yard of cord. Thread both ends through the ojime, then thread each end down through one side channel. Underneath, tie both cords into a decorative bow.
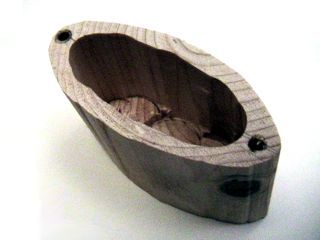
If I had a real wood shop and a lot more experience, I could probably cut each section of the inro from a single block of wood, and engineer them to join smoothly. I'm experimenting now with drilling down through a block of wood with several large bits, but I think I will still have to line the joints with thin wood. Here's a prototype I made out of a piece of 2x4:
Inro don't have to be made of wood. If I can get access to pottery equipment through friends, I might be able to make ceramic inro and netsuke.
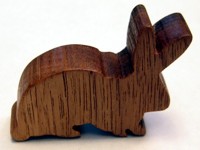
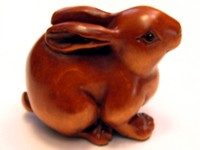
Below are some examples of netsuke that I have used on my inro. The first is a bunny I cut from 1/2" walnut plank. The approximate cost to me for this netsuke was less than a dollar in materials and maybe a few dollars in labor. The second is carved boxwood netsuke of the kind that is commercially available through bead vendors and gift shop operators. I've seen these being sold for anything from $20 to $50 each. The last is a cast resin (plastic) reproduction of a museum netsuke. It looks very nice, and it's great for costuming or display. This repro only cost $20, but I imagine an actual carved ivory (or bone) netsuke similar to this would cost more than $100, and an antique ivory netsuke similar to this could cost hundreds of dollars.