Collapsible Wooden Stool
Japanese Woodworking Class Project

August & October 2009
August & October 2009
I took a woodworking class in August of 2009. The class was actually scheduled for the day after we went up to Pennsic, but I decided it was totally worth driving back to town for it. The class was taught by Tadao Arimoto, who I met a few months ago through a mutual friend. He is a Japanese-born woodworker who was trained in modern design and traditional Japanaese methods before he moved to the United States. He's been very helpful to me in the past, and since the class was specifically intended to teach woodworking with hand tools (almost all my work to date had been with power tools), this was too good an oppourtunity to miss.
The project was to build a collapsible stool from Russian pine planks. The seat has a hole in the center and four half-dovetail mortises underneath. The legs have matching half-dovetail tenons at the top, and dovetial mortises on their inner surfaces. The crosspieces have half-dovetail tenons at each end. Once you put everything together, you push a peg through the hole in the seat and between the crosspieces, forcing them apart. The dovetials on the crosspieces pull the legs together, and the dovetails on the legs pull the top down. The whole thing wedges together into a stable unit. "Then," says Mr. Arimoto, "you sit on top so nobody can pull your peg out."

We used Japanese pull-saws for all of the sawing, and woodworking chisels of various sizes for the shaping. That was the plan anyway. About halfway through the class Mr. Arimoto told us that if we didn't have all of our mortises chiselled out, we should use the drill press to remove most of the wood and then clean up with the chisels. I did half of the mortises entirely by hand, and the other half using the press, although all of the dovetail cutting on the mortises had to be done by hand. I also cut the through-hole using the press. I cut all of my tenons by hand, though.
This project was maybe a little optimistic for an eight-hour class, considering that some of the students were novice woodworkers. The finished project has 8 mortises and 12 tenons! The design is terrific, though, and I certainly learned a lot. The most important thing I learned is that many of the problems I've had over the years are from trying to use Sharon's chisels that have never been sharpened.
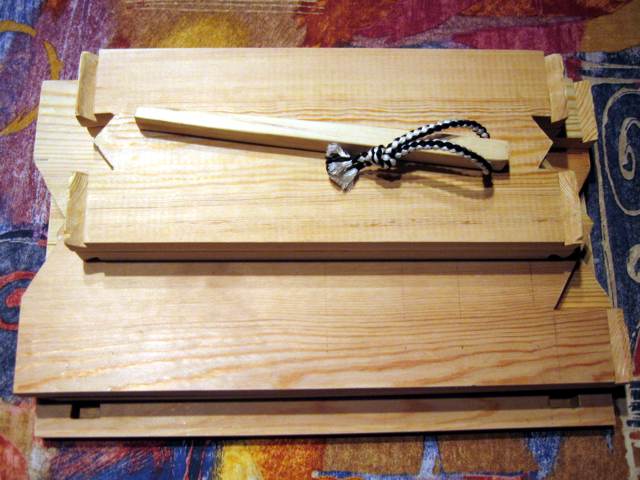
My project still needed a little bit of tweaking after the class, to get the tenons to fit the mortises correctly. After pracicing for a couple of months with chisels, I finally completed it at the end of October. Before that, the peg wouldn't fit all the way in, and stuck up through the hole. This made the stool uncomfortable to sit on, but more difficult to fall off of.
I made a second one in February of 2011.

Instead of the pine we used in class, I used poplar. I also started with 1x12, 1x10, and 1x6, to make it with less cutting. I had to plane some of the parts down to width, but I think if I make another one, I will simply alter the design to use those standard lumber widths.
My hand-cut joinery is a lot tighter this time. I'm better with the chisels and more careful to clean out the mortises, and match them better with the tenons. It's still not perfect, but it's much better. Of course, it took me much longer than the first one did. I probably put in about 24 hours of work across three weekends.