 |
Hitatare Kamishimo Sugataby Ishiyama Gen’tarou Yori’ie |
 |
|
This hitatare kamishimo sugata is a fancy outfit (sugata) for men where the top and bottom outer layer garments are made from the same fabric (kamishimo) with the "primary" garment being a hitatare. 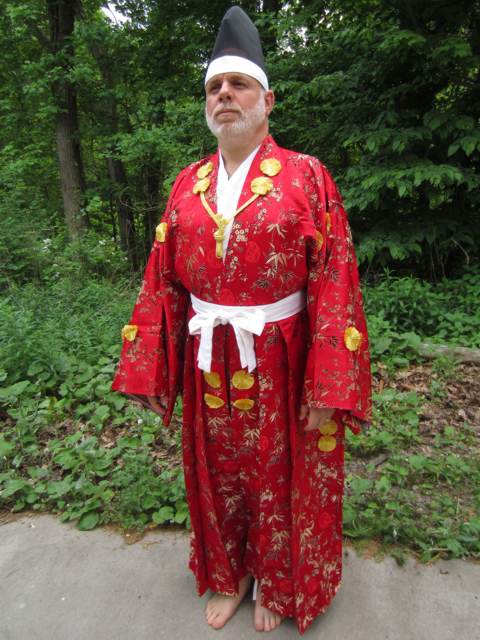
This outfit, or "sugata", consists of:
Both the hitatare and hakama are embellished with "kikutoji", hand made from gold silk yarn, which also reinforce the seams where they are attached. The hitatare is secured with handmade "munahimo" chest ties of hand braided silk yarn. The head band of the eboshi and waist ties of the hakama are made from a plain-weave white silk broadcloth. I constructed this outfit for His Majesty Sir Thomas Byron of Haverford,
to wear during his reign as the 38th King of Æthelmearc.
About this projectThe hitatare is more of a "type" of garment than a particular garment. In clothing terms, I consider the hitatare to be a "jacket-type" garment. Examples exist throughout most of Japanese history from the Heian period (794 - 1185 C.E.) through the Momoyama period (1573 - 1600 C.E.). Starting in the Edo period (1600 - 1868 C.E.), it's function appears to have been filled by the "haori" jacket. The Costume History in Japan website shows examples of simple hitatare worn by commoners in early period, heraldic hitatare worn by members of the warrior class as everyday garb in mid-Period, and formal hitatare sugata worn by courtiers in late period. This hitatare sugata is based on one shown in the Kure "red book", which can be dated to early Period by its embellishment with "kikutoji" (chrysanthemum flowers) instead of "kotsuyu" (little knots). Several aspects of the hitatare serve to separate it from other upper-body garments for men.
I chose to recreate the layers of this outfit, using the listing of layers determined by Master Hiraizumi (aka Baron Master Edward of Effingham) on his Sengoku Daimyo web site. These are listed as "juban, kosode, matching hakama and hitatare". To match the look of the original garment from the Kure red book, I made the matching hakama and hitatare from silk brocade that I purchased mail order. The fabric I purchased is not an exact match to that in the photographs, but it matches overall color and seems to have the same weight. It should be noted that the photos also show the white himo (ties) at the waist that I recreated. In period, these garments almost always had white waist ties, but this usage is restricted in the SCA, which makes it a pleasure to sew for a knight and get a chance to "do it right". Completing the garment are the habaki (aka: kyahan) shin guards. Several of the exemplar photos show the hakama worn with the legs tied up to just below the knee. This is a more martial look, and has obvious advantages in the field such as keeping the hems out of the wet grass. To cover the shins, especially if leg armor is to be worn, the properly dressed bushi (warrior) needs habaki. This name is the same as is given to the collar of copper at the base of the sword blade where it joins to the hilt. This are made from the same fabric as the main garments, with plain white silk bands to secure them. Most sources credit the kikutoji as being seam reinforcements, with the stitching that applies them serving the same purpose as bar tacks or rivets on jeans. While this may be the case, some of them are not attached in areas that particularly need reinforcement, so I tend to regard them more as embellishments. This outfit requires twenty kikutoji, twelve for the hitatare and eight for the hakama. I made these by making 2.25" pom-poms from 250 plies of lace-weight silk yarn, and then flattening them with an iron. The exemplar shows all white kikutoji, but Their Majesties have requested more gold colors in their outfits. In later period exemplars, these kikutoji are replaced by small knots of cord called "kotsuyu". On versions of the hitatare for commoners, these embellishments are not used. The munahimo (chest cords) were braided from the same silk yarn as the kikutoji so that they would match as shown in the exemplar. I braided these by hand on a marudai (round briding stand) using a 9-strand kumihimo pattern known as "shige uchi". As I have noted in other documentation, period braids (such as those on armor) are often seen to be flat braids with a twill structure. In period, these were most probably braided using a loop-manipulation braiding technique referred to as "kute uchi". I have been practicing for several years this method of recreating those braids using the slightly more modern marudai methods. For comfort, I made the juban (undershirt) layer from linen. The base layer garment is always plain white. In period, the juban would have most likely been made from another bast fiber fabric like hemp, but flax linen is more easily acquired and this layer is meant to be semi-sacrificial, absorbing sweat and body oils to protect the brocade. The middle layer kosode was kept light so that His Majesty might survive wearing the outfit in real world conditions. Her Ladyship Hara, who was making a matching women's outfit for Her Majesty, had purchased some sage green silk for the middle layer of that outfit, and although this layer is not visible in the exemplar, I chose to use the matching silk. Cutting the FabricJapanese looms in period were only 14 to 16 inches wide. To construct garments from modern fabric, it helps to cut "panels" approximately 15 inches wide from the fabric, finish any raw edges to create false selvedges (I use a serger) and then begin cutting them to length. for the outer garments, the brocade was 30 inches wide, and since several parts of the garment call for identical panels to be sewn together side by side, I did not cut panels. Where this seam should be very visible, such as at the sleeves and in the middle of the back, I did sew a false seam for show. For the hitatare itself, you will need to cut:
For the hakama no hitatare, you will need to cut:
Constructing the HitatareInstructions for sewing kosode and hakama are available elsewhere. I always begin by ironing the neckband. If you wait until you need it, the progress of sewing grinds to a halt while you fold and iron the neckband. Start by folding the neckband piece into thirds along the long axis, right side out, and iron this as sharply as possible. Open the folds and fold in the ends about 3/4", iron that sharply, and then re-fold the neckband. Fold this in half along the short axis, and iron a crease marking the middle of the neckband. Fold the body panels in half the short way, and iron sharp shoulder creases into them. If you cut the body panels apart, sew them together from the shoulder crease down to one end to create the center back seam. Lay the folded and conjoined body panels down, back seam on the table, and front up. Measure out from the center at the shoulder fold, the full width of the wearer's neck. That is, if the wearer's neck is 7 inches wide, measure out 3.5" on either side of the center seam. Cut out along the shoulder fold, from the center to the ends of this line. Cut straight down along the two halves of the front from the ends of this line at the shoulder fold, down to what will become the hem. You may wish to finish or treat this cut edge to prevent fraying. Note how with the neckband folded in thirds, there is an outer third, an inner third, and a middle third. Unfold the neckband and pin the center mark of the neckband at the center of the neck opening, right sides together, with the edge of the outer third along the cut edge of the neck opening. Pin the edges together, from the center mark out to a quarter inch past the ends of the cut. Sew a quarter-inch from the edge along the pinned line. Now bend the neckband 90 on each side of the neck opening, and pin the neckband along the two edges of the neck opening, right sides together. Sew a quarter inch seam down from the bend to the crease on the neckband where you turned the edge in. The neckband will not reach all the way down to the hem. Turn a narrow hem along the edge of the neck opening to finish the exposed cut edge of the neck opening. This need only reach from just above the end of the neckband down to the bottom hem. Fold 3/4" of each outer long edge of the body, and iron sharply to mark where the edge hems will go, but do not sew these down at this time. If you cut the sleeve extension pieces away from the sleeve pieces, sew one extension to each sleeve along the long edges. After sewing, fold 3/4" of each long edge of the sleeve, and iron sharply to mark where the edge hems will go, but do not sew these down at this time. Pin the edge of each sleeve against the shoulder of each body panel, matching shoulder creases, right sides together. Measure five or six inches down from the shoulder crease in both the front and back, then sew along the crease you ironed in the edge of the sleeve along this measured line. You can now hem the remaining outer edges of the body. Fold the sleeves along their shoulder creases, wrong sides together, to line up the bottom ends of the sleeves. Sew these edges together, wrong sides together, in a narrow seam, then create a French seam by turning the sleeve inside out and sewing a wider seam to encapsulate the edges. Do this for both sleeves. You can now hem the remaining inner edge of the sleeve, and the entire outer edge. Iron both parts of the neck band seam allowance towards the neck band. Fold the neck band along the established long creases so that the seam allowance is hidden between the layers, the first crease is now the edge of the neck band, and the second crease is now inside the garment, roughly along the seam that attaches the neckband to the body. Pin the folded neckband in place, and tack it in place either by hand from the inside, or using a machine technique like "stitch in ditch" to hide as much of the top stitching as you can. Tack the entire length of the neckband, starting at the center of the back and working your way out to the two ends. Hem the bottom edges of the body panels to complete the garment. Attach one end of each munahimo four or five inches down from the shoulder to the front the garment, where the neck band joins the body, one on either side of the front opening. When wearing the garment, tie the two munahimo together into a single overhand slip knot, such that the tassel ends are sticking up. Attach the kikutoji at the points shown in the exemplar, including at the center back. ReferencesKure, Mitsuo Yohei H. Izutsu Baron Master Hiraizumi Tôrokurô Tadanobu no Ason (Anthony J. Bryant) |


Please view other notable items in Ishiyama's Wafuku portfolio.