A very good friend of ours was elevated to the Order of the Mark yesterday for his years of excellence with thrown weapons and related service. Hara and I made this hitatare sugata for him to wear for his elevation. Hara found the wonderful silk brocade online, and she made the hakama. I made the hitatare and the braided embellishments.
Silk Brocade Hitatare
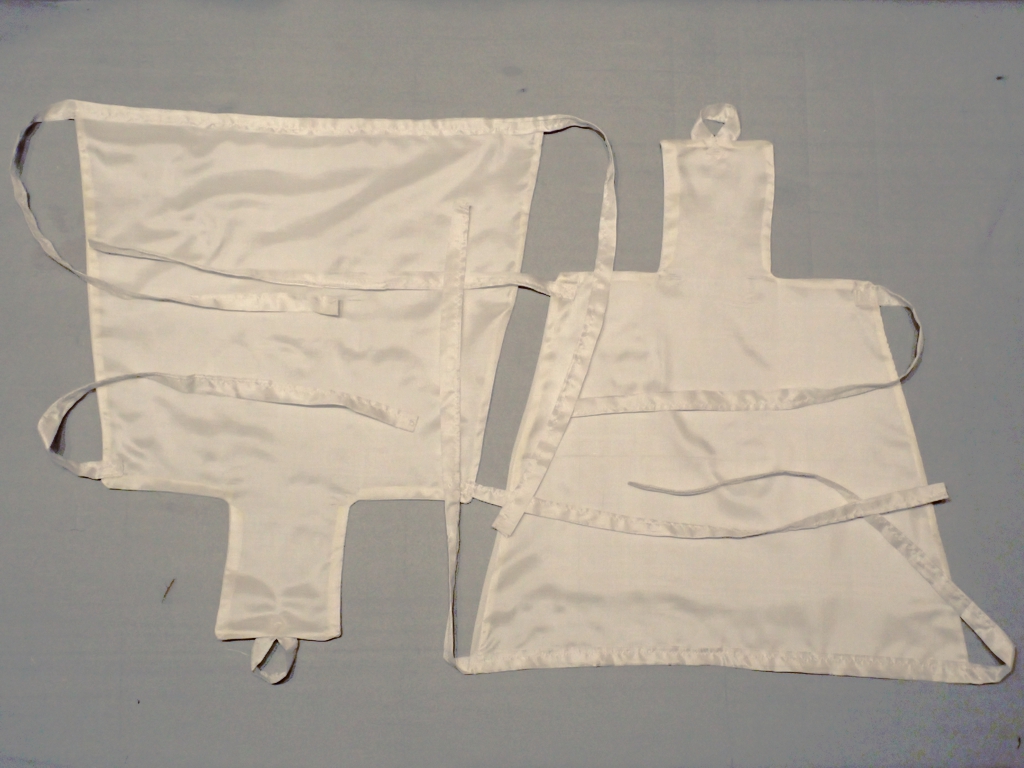
I also made the white tekkou bracers from some excellent white silk, and lined them with white linen.
White Tekkou (Bracers) from Silk
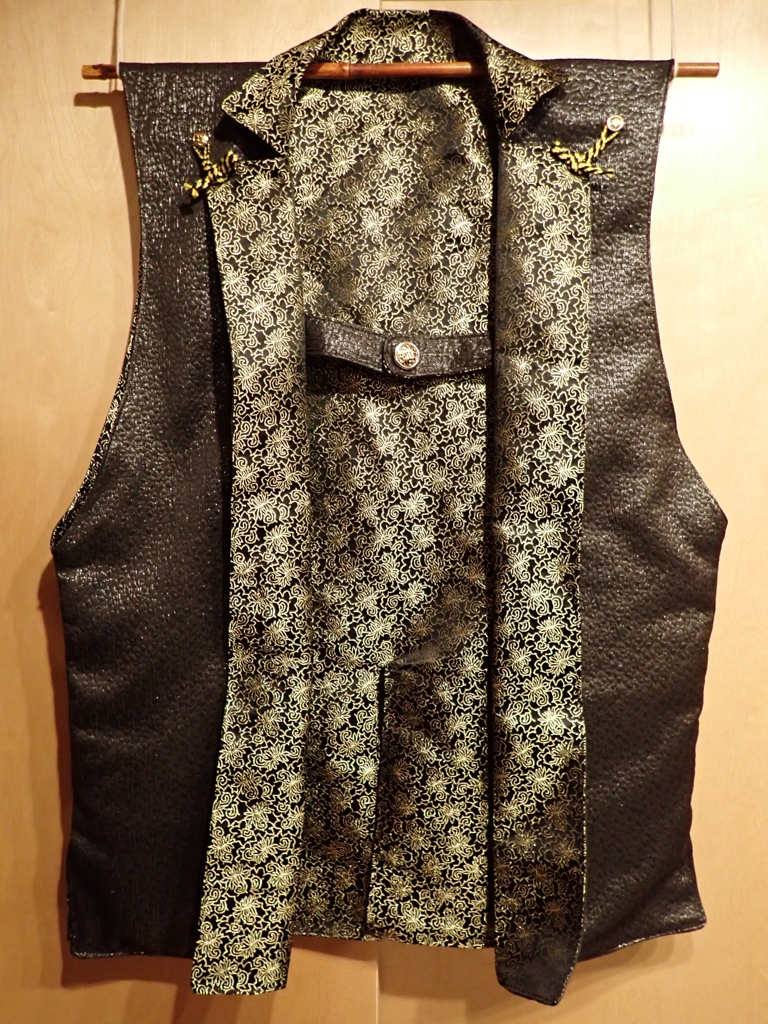
I also made the jinbaori arming jacket. Hara bought the lining, and Alime bint Yorgi found the shell fabric. We might later replace the buttons with new buttons shaped like the Mark badge.
Jinbaori Front
On the back, I embroidered a Mark badge onto some of the extra lining fabric, then turned the edges under and sewed the square down to the center of the back.
Jinbaori Back with Mark Badge
This is some of the shiniest, most extravagant garb I have ever made. It was my special pleasure to make these garments for Kuma because I was otherwise prevented from attending his elevation.
Ottmar Liebert & Luna Negra, The Hours Between Night+ Day (1993)
Ottmar Liebert & Luna Negra, Euphoria (1995)
Ottmar Liebert & Luna Negra, Opium (1996)
Vangelis, Chariots of Fire (2024)
Yo-Yo Ma, Japanese Melodies (1984)
The Dune soundtrack is a perfectly fine extension of the Part 1 soundtrack. Amelia is an album-length presentation of the acts around the last flight of Amelia Earhart. It’s interesting but maybe not “entertaining”. The Bad Fire is very interesting because it came with a bonus CD of the demo versions of each of the tracks on the album. These demos are much more raw and a lot closer to the less “produced” sound of Mogwai’s earlier albums, and I think I actually like them better than the final versions. I found the Rendez-vous and Powaqqatsi in a discount bin someplace and could not pass them up. Michael Riesman is the conductor for the performance, but of course Philip Glass composed all of the music. Audio Vertigo is a heavy-hitting album, and an excellent showing from Elbow. I was leafing through the bin at the Goodwill, and found this whole stack of Ottmar Liebert albums. These are all great, and if you have not heard Ottmar Liebert’s German take on Spanish guitar music, you should look him up. I spent like $10 for five hours of music. We already had a copy of Chariots of Fire, but who knows if I’ll ever see another one. The Yo-Yo Ma album was a gift from Sweetie, and it’s a fascinating take on these traditional tunes. A Chinese guy playing Japanese music on a European instrument is a great expression of cosmopolitan art and performance.
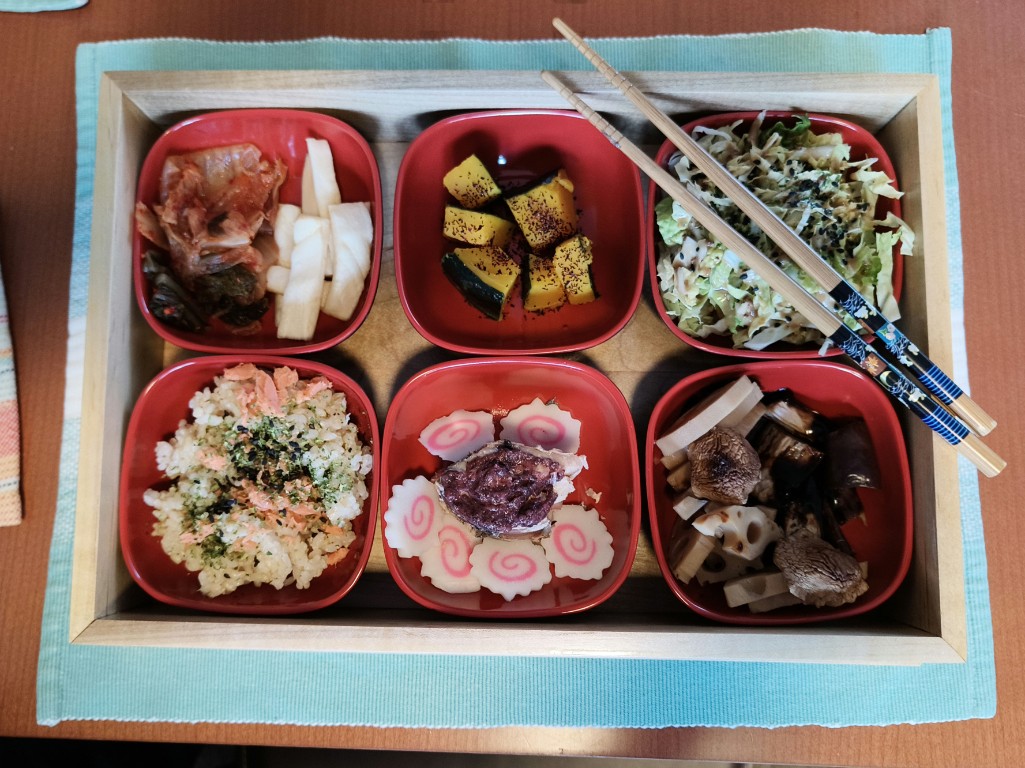
I actually served myself lunch in the dish bento the other day. Here’s what it looks like:
Maple Bento with Dishes of Food
Starting in the upper left, I had:
Kimchi (from a jar) and pickled radish (home made)
Simmered kabocha squash with dried shiso sprinkle
Shredded fresh napa cabbage with sesame dressing
Rice with flaked salmon, sesame seeds, and aonori
Mackerel (from a tin) with plum sauce and naruto maki kamaboko
Marinated poached lotus root, roasted japanese eggplant, and shiitake mushrooms with black bean sauce
Lots of food, to be sure, but mostly vegetables, fruits, and grains. I don’t always have this much variety, but sometimes I go a little overboard when I’m grocery shopping. Such hardship, I know.
A while back, probably a year or two ago, I bought six small-ish (4 inches across) “Black/Red” melamine dishes from one of the Asian markets here in Pittsburgh. See, the problem with most bento is that the tray inside is so big that you can’t actually fit it in the dishwasher. I figured that if I got a few small dishes, then made a box to hold them, I could use the collection as a bento box. Once I’d used the dishes to hold lunch “courses”, I could pull them out and line them up in the dishwasher rack.
Dish Bento from Maple
Here is what the box and lid look like with the dishes inside. You can see that the lid has a little lip around it, but it is basically the same construction as the body, only slightly larger. The corners are mitered, and the surfaces (lid surface, body floor) are rabetted to fit into dadoes in the lip/sides. There are no fasteners in the box, just glue and finish. I did most of the cutting and mitering on the band saw, and did the rabbets and dadoes on the router table.
Dish Bento Body with Dishes
The body interior is just a little bit larger and deeper than the bowls themselves. The interior is about 12.125″ by 8.125″ and 2 inches deep. The maple is 0.375″ thick, so it is sturdy enough to hold the densest of lunches.
Dish Bento Body
The panels that make up the floor and lid surface are actually “book matched”. I started with a 7/8″-thick rough board, then re-sawed it into two thinner boards using my band saw. Then, a few passes through the planer to smooth it out. That’s why the grain doesn’t match up exactly, because my wavy resaw cuts meant more grain was lost to the planer.
Dish Bento Lid
The entire box is finished with “General Finishes” brand ‘Wood Bowl Finish‘, which used to be marketed as ‘Salad Bowl Finish’. This is an oil-based urethane finish intended for food contact. They have taken care with the solvents so that once the finish is cured it is non-toxic and as safe as they can manage. It is much less stinky than the polyurethanes I tend to use, and it dries very hard like lacquer. Due to the (intentional) loose fit of the panels in the edges/walls, the box is not water-tight, but the wood is thoroughly sealed.
Following up on the discovery that the IKEA Skogsviken tray was the perfect size to hold the new Titan 2 phone, I was finally able to make something I have been thinking about for some time: a tripod mount for my phone. I could have made one out of wood, but I only had square tuits around. Also, in my experience, small wooden boxes and trays are far more fragile than similar plastic objects. The opportunity to give this idea a try with only a $3 plastic tray at risk was too good to pass up.
Titan 2 and modified Skogsviken tray
First, I cut a hole in the tray at the location of the subscreen, cameras (there are two cameras on the back), and LED flash. The best way I found to do this was to drill several holes through the plastic to create the opening, then use wood chisels to straighten up the edges. This also meant removing one of the “feet” from the back, this tray can no longer be placed securely on the Skogsviken towel bar.
Titan 2 ans Skogsviken tray with tripod mounting plate.
Next, I made a mounting plate by cutting a square of 3/8″-thick wood, drilling a hole in it, and inserting a 1/4″x20tpi tee nut. Then, I attached the plate to the back of the tray using a couple of 3M Command strips. These removable adhesive strips should come in handy for whatever object holds the next phone.
Titan 2, in tray, on a tripod
That’s it! Just screw the tripod to the mounting plate and slip the phone into the tray for stabilized, repeatable shots. I can use either the front camera or back cameras. I can also use the tray with some smaller “pocket” tripods I have to make a fancy desk stand. These kind of tripod mounts for phones can cost quite a bit of money, and they normally need to “grip” your phone at the sides in some kind of clamp. I much prefer this easy tray arrangement.
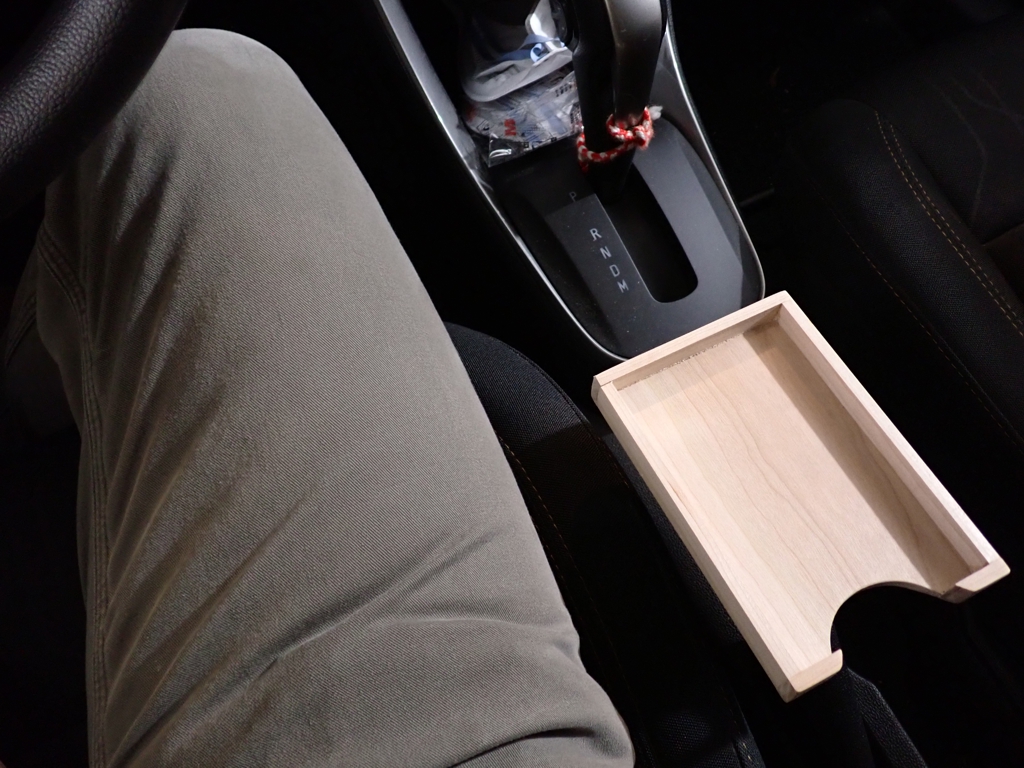
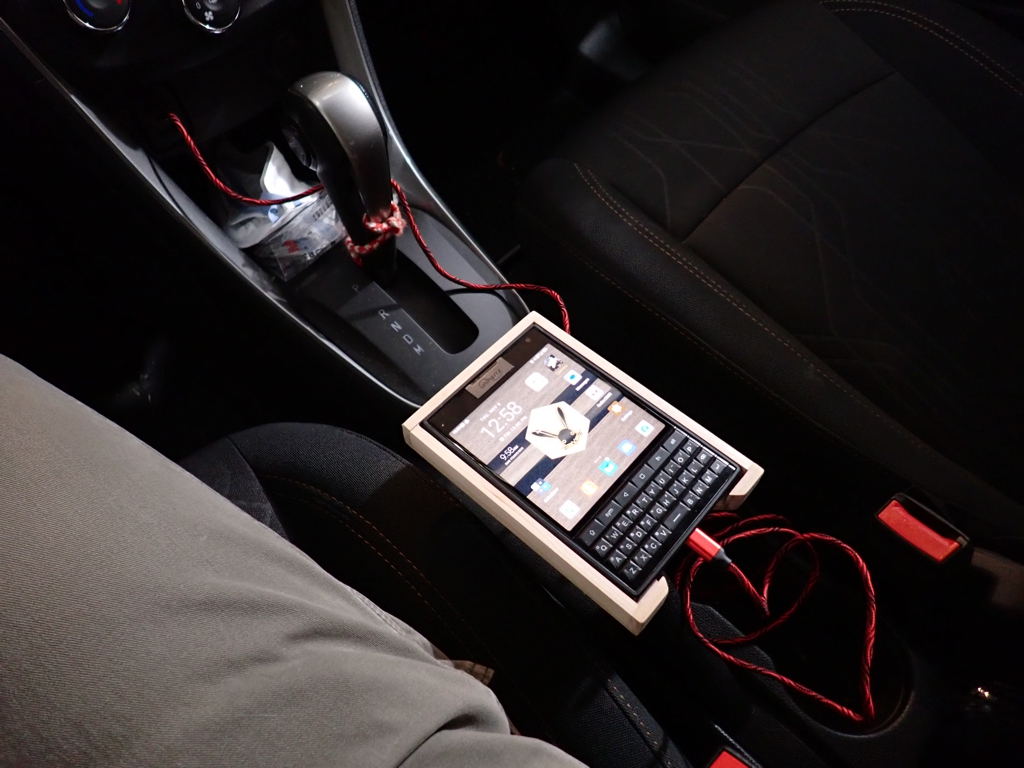
Since I have a new phone, and it is not the same size as the old phone, I needed to make a new phone tray.
New Phone Tray from Cherry
I made this from some 1/4″ cherry I had around after doing some re-saw work on a thicker cherry board from the Alben Sawmill. The sides are just tall enough to hold the phone, and the assembly is glued and pinned together with no fancy joinery. I left it all unfinished so it can age naturally in the sun. The cut-out at the bottom enables me to plug in a USB cord if I need to charge the phone or connect it to the Android Auto system. It also makes it possible to grab the phone and lift it out of the tray when needed. Can’t press the side buttons, but maybe that’s a good thing?
Phone plugged in via USB
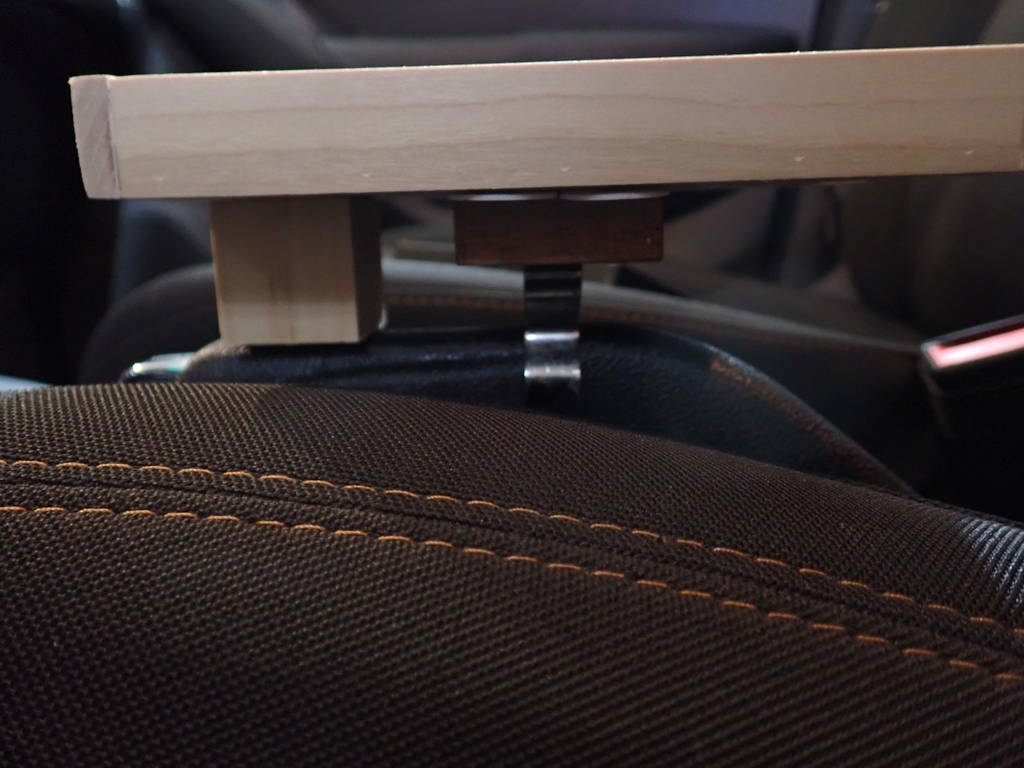
Underneath the tray is a metal clip that attaches the tray to the parking brake lever. The clip is screwed to a wooden block that is attached to the tray with removable adhesive strips. The other wood block keeps the tray level, which was a problem with the old tray that I fixed this time.
Mounting System for the Phone Tray
If you need a tray for your Unihertz Titan 2, but you don’t have the time or ability to do woodworking, you can get this perfect fit plastic tray at IKEA for $3. You will have to figure out a mounting system yourself, however.
I just upgraded my phone, and I could not be happier. Anybody who knows me well knows that I have never owned a smartphone that did not have a physical QWERTY keyboard. I have been using pocket computers since the Palm III in 1998, and I got so sick of not having a keyboard for typing that when smartphones became a thing I bought the best QWERTY phone I could at the time (2010), a Motorola Backflip, and went all in on Android. Palm had already abandoned their original PalmOS and my ~12 years of history, so I migrated what I could and re-typed the rest. I knew that Apple would never give me the kind of device I wanted, and my best chances were with Android.
Who knew that Blackberry would be convinced as well? When the Blackberry branded Android devices became available I had exactly what I wanted. Quality hardware and an open software environment. The Priv is still one of my favorite phones ever. It was a thin, lightweight device with a slide-out keyboard, a great battery, and a gorgeous screen.
The only problem was, the hardware was too fragile for my clumsy habits. I broke two Priv screens and a Key 2 LE before Blackberry would stop licensing their name. When Unihertz came out with their Titan Slim, I had already been waiting extra-long for an upgrade. The original Titan was legendary for its rugged design but its hardware and OS were a little aged. The Slim was a better in almost every way Key 2, with a serious battery and a protective case right in the box. I did not trust them for the Kickstarter, but I have been very happy with my retail purchase for the last 3 years.
When Unihertz announced the Kickstarter for the Titan 2, I was somewhat torn. My ideal plan would have been simply a new model of Titan Slim. I really did want a 5G phone, though. I signed up on the second or third day of the Kickstarter after it was clear they were going to reach their goals. I watched them blow through their stretch goals and prove “the market” completely wrong about keyboard phones. There is plenty of demand for niche hardware, as long as you are not trying to dominate the market. If you are just trying to make phones that a reasonable number of people want, you can probably stay in business. Heck, most of the phones that Unihertz makes are not “for me”, and that’s OK. I don’t need to ridicule them for following a slightly different path, because I have met people who are very happy with the oddball Unihertz phones they have bought. There are already so many “not for me” phones in the world that a few more, even if they are from a company I have grown to trust, do not signify a personal betrayal. The Titan 2, it turns out, is very much “for me” and is basically the phone for which I have been waiting.
With Titan Slim
The Titan 2 is significantly wider that the Slim/Key2 form factor, but it is noticeably shorter. It is also thinner than the Slim, closer to the Key2 in thickness. The new 3.5″x4.5″ footprint means that it does not fit all of the 3″x6″ infrastructure I have had in place since 2018, but it is a small price to pay for the benefits.
The benefits are of course the wider screen and keyboard. The increased size of the keyboard means that the keys are much larger and easier to hit. My Slim’s keyboard has noticeable wear because it was easier to hit keys with my nails than my fingertips. I am typing this whole blog post on my Titan 2 just to demonstrate that it is a comfortable experience.
The wide, high resolution display is comfortable and attractive as well. Some people are put off by its square aspect ratio, but remember that I spent almost 10 years using square screens on PalmOS. Remember that I spent another 6 years using QWERTY phones where the keyboard was only available in landscape mode. Even when I was transferring my data to the Titan 2 and I was physically switching back and for the with my old Titan Slim, the tall skinny display on the Slim began to feel awkwardly narrow and confined. Typing and viewing pages on the wider screen is just more comfortable. If I run a terminal emulator I can get a shell window that is a very natural 79×32 characters, only 1 column narrower and 8 rows taller than the standard 80×24 terminal. Graphics are sharp at about 450 dpi, and I dim the backlight to about 25℅ in most lighting. Even with the on-screen typing suggestions, toolbars, and other interface annoyances, there is still plenty of room to work.
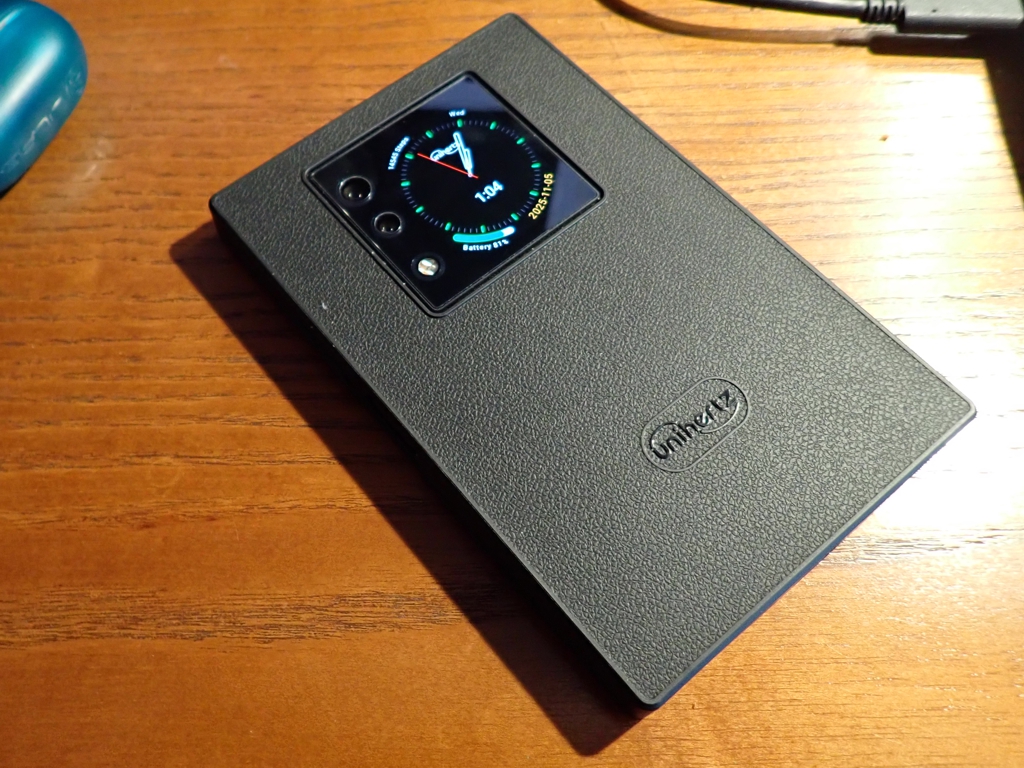
Back, Showing Sub-screen
The sub-screen on the back is a little silly, and I would probably be just as happy without it, but I am getting used to having it. Imagine having a smartwatch embedded in the back of your phone and you will get the idea. It is a bit easier to use the subscreen for a quick time check or notification display, especially in a dark room. You can also use the sub-screen as a viewfinder for the camera, peek at media player status, or show a compass. You can actually use the sub-screen to interact with any application on your phone, though the interface may be awkward at small scale and full compatibility is not guaranteed.
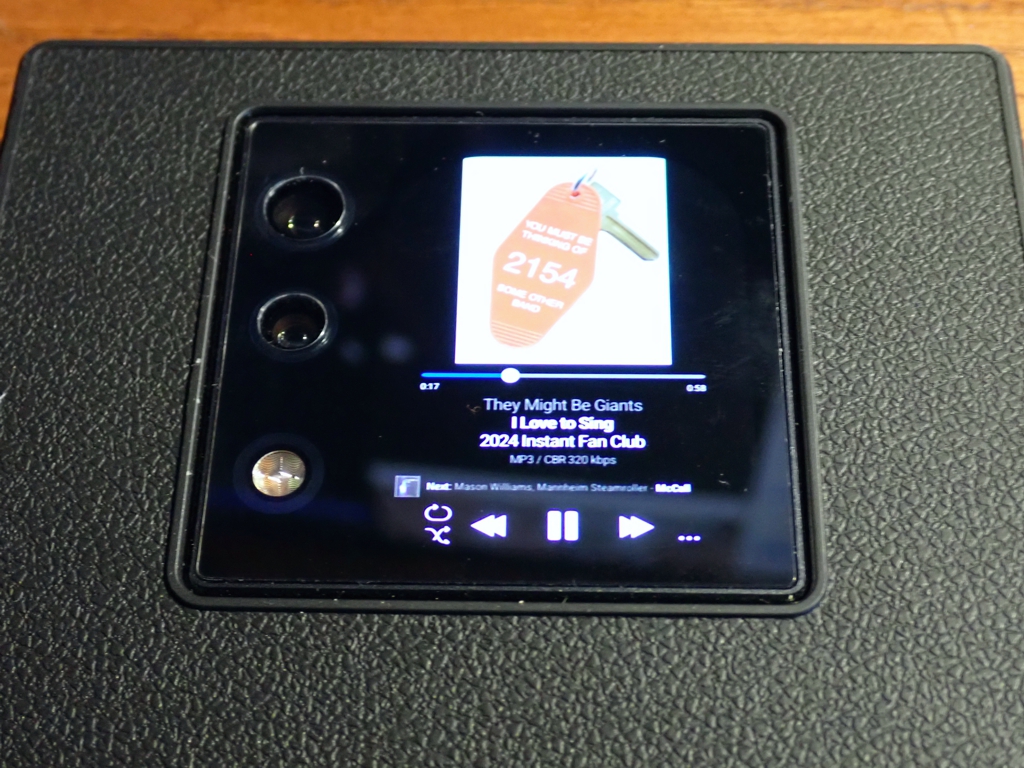
Subscreen with Foobar 3000
I would like to address one last thing. Too many reviewers have classified the Titan 2 as a “Blackberry Passport clone”. The first Titan may have been intended to fill the Passport niche, but it became its own thing and has its own place in the hearts of its owners. The Titan 2 is an updated Titan. That is what it was intended to be, and that is what I think it succeeds at being. It is a communication device that fits in your pocket, although it may need a slightly wider pocket than you are used to.
A while back, I bought myself a pair of overalls. Sometimes, especially when it’s hot, wearing pants with a waistband is uncomfortable, and I usually have to wear a belt with pants, which makes it even more uncomfortable. These overalls had a couple of narrow tool slots on the thigh, and several more on the front bib. I took to carrying around markers, pencils, etcetera in these slots, then started acquiring more tools that were narrow enough to fit in them. Pen-knife! Penlight! Scissors! Soon I had more tools than I had slots, and some of my overalls (by now I was up to three pairs) had fewer slots. I needed a way to organize these tools in my dresser and maybe even pack them for travel. Time to make another tool roll. I went into my fabric stash and found a suitable piece of canvas left over from the Natural Shop Coat project, and got to work.
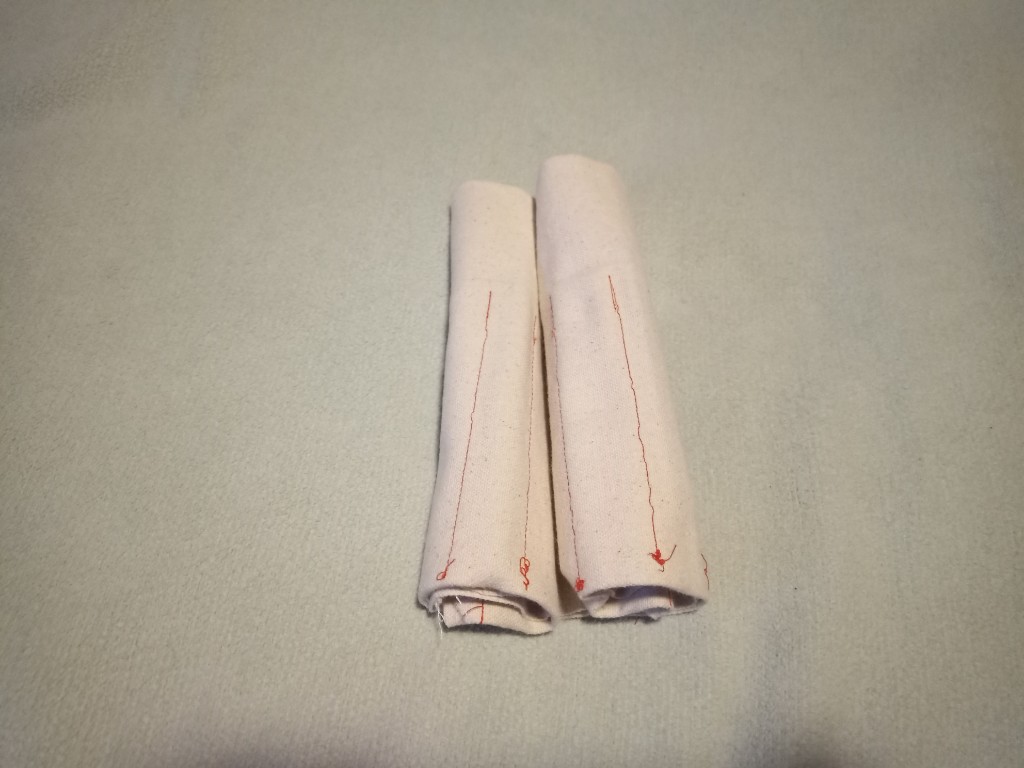
Tool Roll Closed
Here’s what it looks like all rolled up. You can see that I did not make any effort at all to hide the stitching. I don’t see why I would bother.
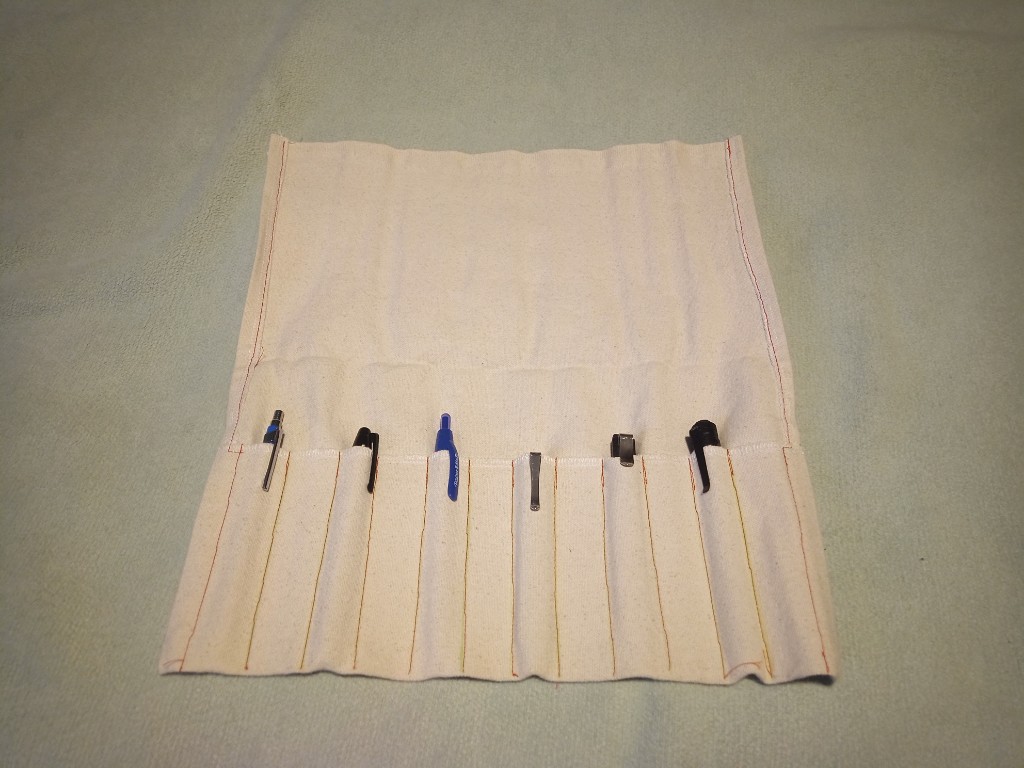
Tool Roll Open
Unroll it and lift the flap, and you can see six tools filling half of the twelve slots of the roll. I could also put a craft knife, metal ruler, screw driver, and some other things in there if I want. There’s even room if I acquire more tools. I think the rule is that the tool has to have a pocket clip. I had to add a pocket clip to the scissors so they would qualify.
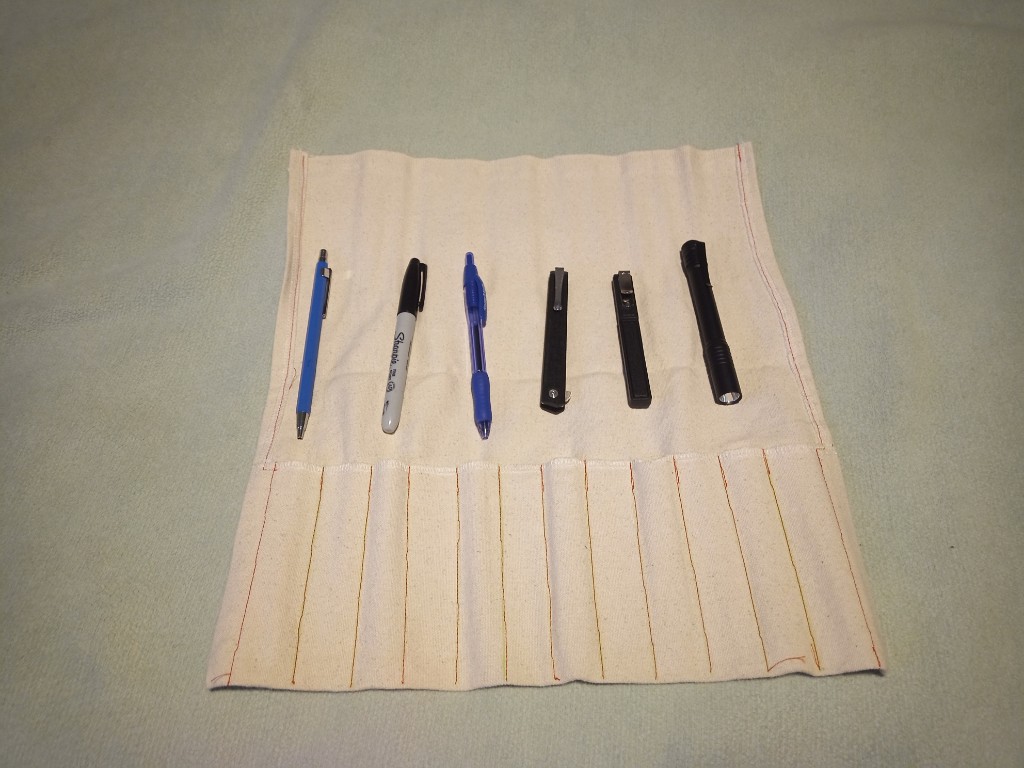
Tool Roll with Tools Shown
Here are all the tools I have in there right now: drafting pencil, marker, regular pen, folding knife, scissors. flashlight. See how handy this kit is?
Oshizushi is any kind of sushi that has been pressed into shape, similar to the way that onigiri rice balls are pressed to form the rice into a hand-holdable mass. When I was in Toyama back in 2016 for the TV show, Yokkaichi’s mother made masuzushi as part of a large festive dinner. Masuzushi is a specialty of Toyama, and it is an oshizushi made in a round press. The press is lined with bamboo leaves and layered with rice and then fresh trout before it is pressed into a solid “cake” of sushi. The masuzushi is then cut into wedges like a regular cake and served. This dish is so iconic to Toyama that you can buy it in the train station as a souvenir.
Anyway, in order to make oshizushi of any kind, you need a press. I have a plastic press for making onigiri, but it is not good for making anything other than the triangular rice balls. The best presses are a kind of bottomless box, with a lid that slides inside like a piston. It does not have to be super-solid since you’re only applying finger pressure, but it should be fairly sturdy. The open bottom enables you to place the box (“hako” or “bako“) onto a sheet of nori or other flat surface, fill it with rice and other tasty stuff, then insert the lid and compress the ingredients into shape. You can then lift the box from the surface and use the lid to push the oshizushi out the bottom.
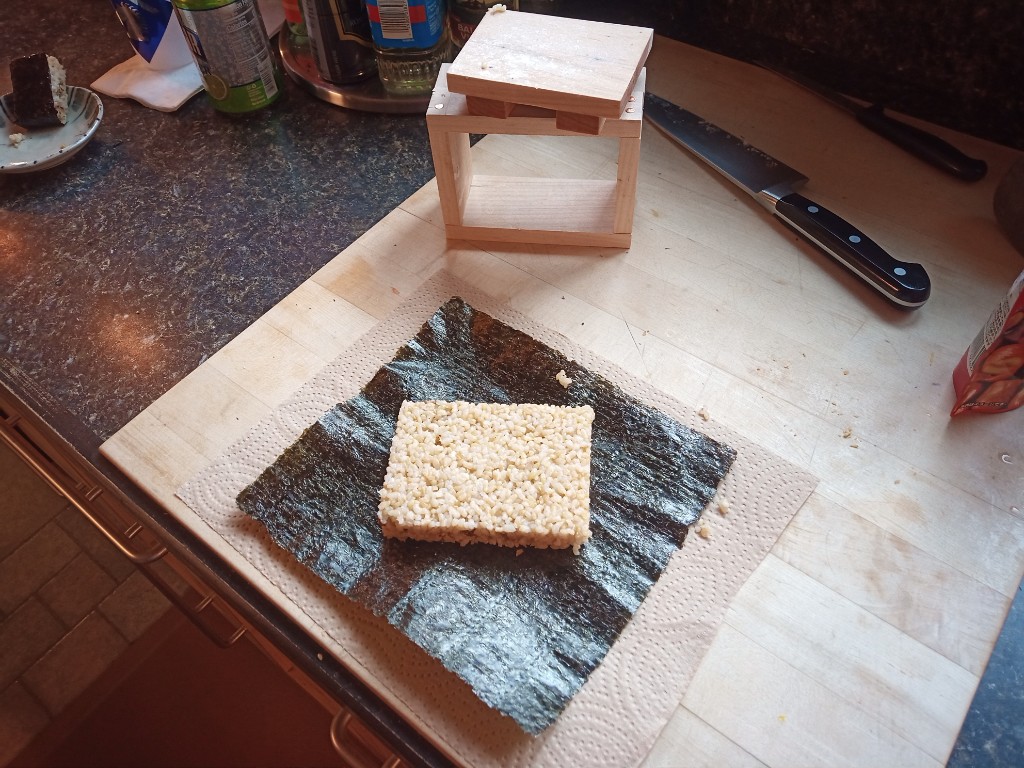
I made my oshizushihako from some maple I bought at the Alben Sawmill and machine-planed down to 5/8″ thickness. The corner joints are the large-fingered box joints that I see on most medieval Japanese boxes, and since I didn’t want my food to contact glue I secured the joints with copper nails. The piston lid is a flat piece of maple that is roughly 3″ x 4.24″ to follow the 1 by 1.414 ratio that is commonly seen in Japanese woodworking. This is also a good size for making onigirazu “rice sandwiches”.
Pressed cake of rice on a sheet of nori
Roasted chestnut onigirazu ready to serve
For best results, use hot freshly cooked rice and wet the box and lid thoroughly to keep the rice from sticking.


