Kumihimo Marudai
Japanese Braiding Stands

September 2008, October 2008, November 2008, January 2009
September 2008, October 2008, November 2008, January 2009
"Kumihimo" is the Japanese style of braiding fibers into cords. It basically consists of arranging threads on a braiding loom, then moving the threads in patterns. There are a few different kinds of looms, but the easiest to make (hence the easiest to own and use) is called a "marudai". A marudai is basically a round stool with a hole in the middle. Weighted bobbins of thread hang down around the round surface, and braid together at the hole. The completed braid passes down through the center.
I got curious about this style of braiding because I've needed cords for many of my Japanese projects and had to settle for whatever they have at the fabric store. I tried out a simple braid using a CD as a marudai, and it came out awful enough that I decided to make a real one.
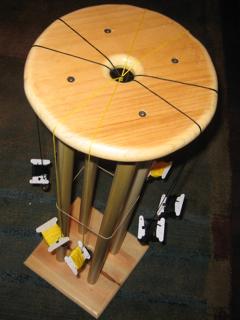
This one is made from a couple of pieces of scrap wood from the basement, a few pieces of dowel, and some screws. It's finished with a water based polyurethane/acrylic, and not stained or decorated in any way. It's about 2 feet tall, and the circle is 8 inches across with a 1 inch hole in the center.
The square "base" of this marudai also has a hole in it, and can also be used as a braiding surface if you invert the loom. This is supposedly better for braids that finish up flat instead of round since it helps keep the edge threads separate from the surface threads. My experiences have not been favorable. I find that it pushes all the threads to the center of each side, while on the circular surface he threads stay where you put them. Any future marudai I make probably won't have the hole in the square part, though a square base is traditional.
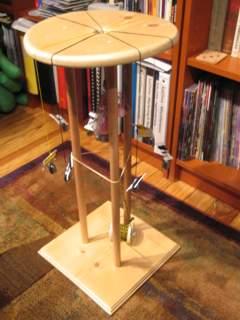
Once I made the first marudai and started getting into braiding, Sharon wanted to try it out, too, so I made a second one. The second one is about the same height, but it has an eleven inch top and only three legs. The larger top will help if I do any more braids with a large thread count.
Instead of making this marudai reversible, the square part is just a base. I tried out the "Roman Ogee" bit in my router to give it a nice decorative edge, though. I also sunk the screw heads, and covered them with plugs. It makes the top really nice, and smooth.
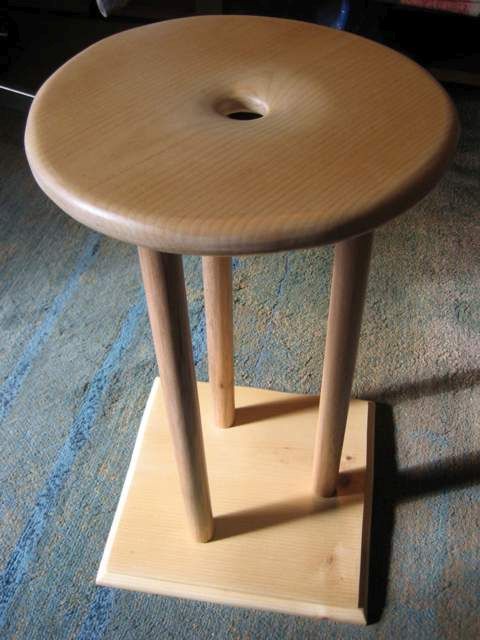
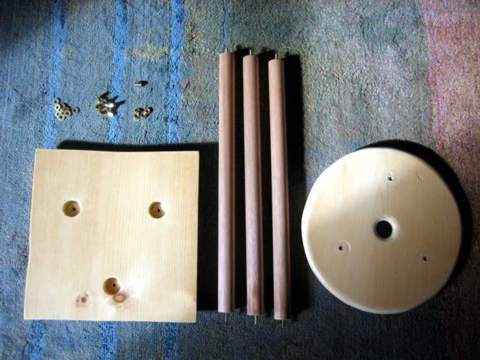
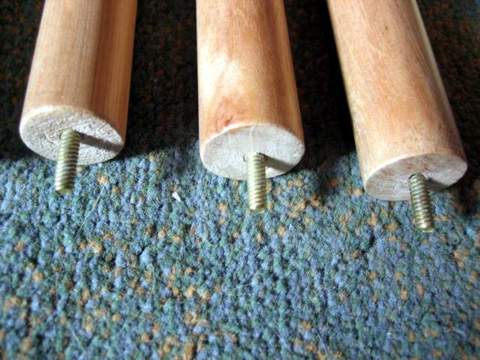
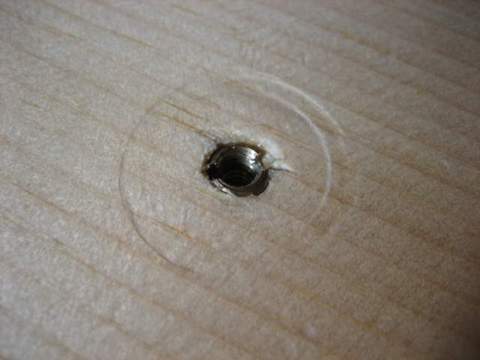
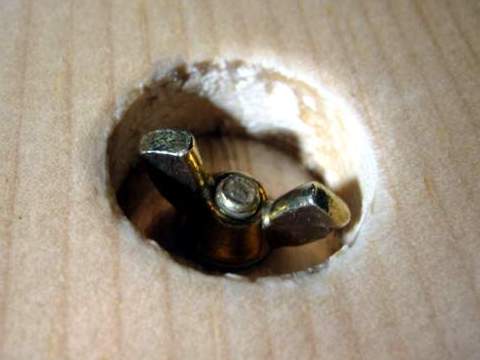
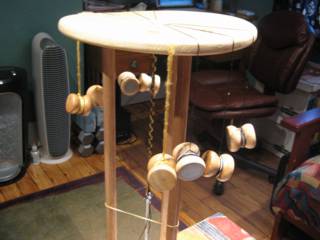
I also made this somewhat smaller marudai that can be disassembled. It's meant to be easier to travel with, if necessary. Not only is the head of the marudai a little smaller (about ten inches) than the second marudai, the legs are much shorter (about 15 inches). The legs also end in #10 hanger bolts. The bolts screw into brass inserts in the underside of the top, and poke through holse in the base where they are secured from beneath with wing nuts. When it's all put together you can't really tell it's not permanently assembled. The short height makes it easier to use if you're sitting or kneeling on the floor, or if the marudai is sitting on a tall table. I'm also planning to make a few extra sets of legs, so it's adjustable!


I was getting tired of apologizing for the sorry materials of my first three marudai, so I decided to make a nicer one. I went to the hardware store and bought some nicer wood (selecting the flattest piece I could find), and wound up with this furniture-grade item. It's the first marudai I've made for which I could justify charging what I've seen other marudai selling for.
It has a mirror 11" across and a center hole 1.5" across. The legs are about 23" tall and an inch in diameter.
Once I started talking to people about kumihimo, I started getting two questions fairly often: "Have you thought about teaching classes?" and "Have you thought about making marudai to sell?" Being able to say "Yes" to both questions means having more marudai, so I embarked on a program of making more marudai. Lots more marudai.
For the first batch, I made four, to see if the batch production thing would even work for me. Two of them came out nice, but two of them came out not as nice. I decided that the nicer ones would be for sale, and the not-as-nice ones would be "student marudai". They're all usable, and some of the flaws are minor, so this seemed like a good plan.
Since my success rate appeared to be 50%, I realized that if I wanted to be able to teach up to six students at a time, I'd need to make eight more marudai. Making eight marudai all at once was quite a production, but now I have a big pile of them. I can sell a few to cover costs, and still have enough to teach classes.


These marudai are all about 16 inches tall, with mirrors that are 11 inches across. All edges are rounded and all surfaces are smoothed and finished.

It's a roughly 24" tall marudai made entirely of poplar, with a linseed oil finish. It also has the same hardware as marudai #3, so it can be taken apart for travel. I managed to find a poplar board with some great grain in it, and the angles around the hole and base edges do wonderful things with that grain. The oil finish is great. I also tried using a router to cut the circle and bevel the hole, which worked pretty well.
I made this marudai on November 2009, and gave it to my wife as a present.
These marudai have their own project pages:
The wood for the top and bottom is just pine, cut from some scrap 1x12 I had in the basement. The dowels are 7/8" poplar dowels, chosen because poplar is cheaper than oak, and they were out of 1" dowels.
The screws are square-drive #8x1.5" wood screws. The finish is a base coat of Olympic water based sanding sealer followed by two coats of Minwax water based polycrylic finish.
The rubber band in the above picture serves no purpose besides marking the vertical center of the marudai, which is useful for estimating the length of working threads and completed braids.
With the exception of the attachment hardware I used to make this marudai portable, all the materials are the same as the other two marudai. The legs are made from a single 1"x48" hardwood dowel. The attachment hardware is all brass. I used #10x24x1.5" brass hanger bolts, #10 brass washers, and #10x24 wing nuts. The only place I can find the brass inserts is in those drawer thingies at Lowe's. The hanger bolts and wing nuts come from Home Depot.
The nicer marudai is made from poplar 1x12 and poplar dowels. It is stained with a water-based "rosewood" stain, and finished with a gloss polyurethane. The legs are attached to the bottom with screws, but the top is simply glued on to obviate screw holes in the top.
The tops and bottoms of all twelve of these marudai are made from the absolute flatest pine stock I could find. The legs are 7/8" poplar dowel. The marudai are assembled with no screws or other hardware, instead each dowel is seating and glued into a half-inch deep socket. All surfaces were sealed, sanded and finished. The finish is a water-based polurethane that should keep the surface smooth and easily cleanable.
As mentioned above, this marudai is made of poplar with a linseed oil finish. I removed the hardware from marudai #3 to make this one, since marudai #3 was pretty warped.
My bobbins (called "tama" in Japanese) are common embroidery bobbins of the kind that often come free with a big package of embroidery floss. Each is weighted with a metal (not lead) fishing weight through which I have strung a hook made of "safety wire". Most of my weights are 3/4 ounce weights, though some of the earlier weights I bought were 1 ounce.


Tama are supposed to be weighted wooden spools, but those are quite expensive and usually need to be mail ordered. The 3/4 ounce fishing weights are 4 for $1.50. Making the wire hooks took a bit of time, but the hooks are also useful to securing the thread to keep it from unwinding.
Somebody eventually did buy me real tama as a gift. It was a tremendous gift! The traditional tama are much heavier, at about the 3 ounce mark, and have introduced a new texture to my braiding.
I've also created a couple sets of wooden tama. These are shaped from 1.5" poplar dowel using either a 5/8" round router bit (for the first set of 8), or a 3/4" sanding drum (for the second set of 16). The first set is filled with short lengths of steel rod to bring the weight of each tama up to about 1.6 ounces. The second set is weighted with stacks of copper pennies to bring the weight of each tama up to about 2.1 ounces. While the cost of materials is very low (about $0.20 worth of dowel and $0.15 worth of pennies), making these is labor intensive so I can see why most online stores charge about as much for eight tama as they do for a marudai.


When I was getting started, I bought a big multi-color pack of cotton embroidery floss at the fabric store. This is the same stuff you'd probably buy a teenager for making friendship bracelets. A pack of 36 skeins (8.75 yards each) was $5. This stuff isn't fancy, but I wasn't sure how well this whole hobby would go, so I didn't want to invest in some nice silk floss until I got some experience.
So far, this has been a good idea. The variety has forced me to experiment with combinaions I might otherwise have neglected. I'm not upset if I have to throw some floss away. The braids come out pretty nice anyway. The fact that I have plenty of floss available encourages me to keep going and try new braiding patterns. I recommend this route for beginners.
Later, I branched out into yarns. You can get silk yarns, or just braid with anything. Thicker yarns are a great way to make thicker braids without increasing the complexity of the braid.
I've also tried braiding with nylon rope for strength, and strands of beads for beauty. More on those, below.
First, I cut the circle and square pieces from scrap lumber. Then, I drilled the holes in the center of each piece, and the screw pilots (with countersinks) for the legs. I edged the pieces top and bottom with a 3/8" roundover bit in the router to remove sharp edges that might catch threads. Finally, I sanded, sealed, sanded, and finished the surfaces. Finishing was easier with screws through the holes, since I could hold the screws while finishing one side, and use the screws to support the piece while I finished the other.
I started with two ~48" dowels, cut them in half to make four legs, then sanded the legs smooth. Then, I drilled pilot holes for screws in each end, and put screws in them. This enabled me to support the legs between two sawhorses by resting the screws on the sawhorse tops. This enabled me to finish the whole dowel at once, while keeping the things level while they dried. Again, each was sanded, sealed, sanded, and finished.
Once all the pieces were pre-finished, I assembled each marudai by driving screws through the tops and bottoms into the ends of the legs. The marudai were then sanded again and given a final coat of finish. If I didn't like the smoothness of the top, I wet-sanded just the top with ultra-fine paper and gave it one more coat of finish with a high quality brush.
For many of the later marudai, instead of using screws to attach the legs, I drilled sockets in the underside of the top and the upper surface of the base, and glued the legs into these sockets. This leaves the top surface of the marudai much smoother without having to plug screw holes.
The simplest way to make wooden tama is to start with some dowel that is already 1.5 inches in diameter and then carve a 1/4 inch deep channel all the way around the outside. The ways I can think of to cut this channel are:

I have used the second and third methods. For all of these, it's probably easiest and safest to cut the channel first starting 3/8" in from the end of the dowel, then cut 1.5" chunks off the end of the dowel. I found that using a 3/4" coarse sanding drum on my drill press was the safest and easiest way to go.
Once the chunks are cut, drill a hole most of the way down the axis of each. Fill this hole with something weighty. I found that copper pennies in a 3/4" hole add the right amount of weight with the least amount of work. Fourteen or fifteen pennies will make a roughly 2 ounce tama.
Once the tama are weighted, plug the hole to keep the weight in. For best results, use a dowel of the same wood that you used for the body of the tama. Plug the hole, then cut the dowel off flush with the surface.
Finally, sand each tama as smooth as possible. Round off all the edges and smooth out all of the surfaces, especially the curves on the inside of the channels.
One thing you have to understand about kumihimo is that it is not actually very difficult. You set up the threads in a particular way, then you execute the braiding pattern repeatedly until you run out of thread or decide to stop. Here's some video of me executing an 8 strand "Edo Yatsu" pattern with yellow and black threads
You can see that every time a thread is moved, it crosses over one or more other threads. As new crossings occur, they push old crossings to the center and create the braid. You don't move the threads into place by hand, you just move the threads and the braid sort of "happens" at the center of the hole. The finished braid is weighted, so as it gets longer it is pulled down into the hole. Here's a picture of the "active site" of a 12 strand flat braid:

Braid 00 (6 strand, 0'21", September 2008)
Just to see if I could do this at all, I tried a simple, flat braid using a CD as a marudai. It came out awful and uneven, but was close enough to an actual braid to convince me that I could actually do this craft, and that with better equipment I might get better results.
Braid 01 (12 strand, 6'4", September 2008)

This braid uses a 12 strand pattern that's similar to the 8 strand "Hira Kara Gumi" pattern. It takes six executions of the plaiting pattern for this braid to complete one repeat of the visual pattern and return the strands to their starting positions. Each repeat covers about a half inch of completed braid. So, to complete a foot of braid, you have to execute the pattern 144 times. I made approximately 6.35 feet of braid, meaning I did the pattern about 915 times (over the course of several days). I'm sure my friends who knit and crochet are snickering at my shock over that number, but my reaction is "Gah!".
This braid wound up replacing the store-bought cord on my drinking gourd.
Braid 02 (4 strand, 9'8", October 2008)

I decided to take a big step backwards here. How crazy was I to jump right in with a 12 strand braid for my first serious braid? Unused to complexity, I lost track of the threads a couple times, so the pattern actually changes over the course of the braid. It came out OK, but I now realize it was kind of silly. The result of that realization was the decision to make this 4 strand, 2 color braid. This braid is super boring after the complexity of the 12-strand, but it introduces some important theory. Plus, it's so long that it introduces the braider to how much time needs to be devoted to this hobby and builds up the arm muscles.
Braid 03 (8 strand, 5'8", October 2008)

Starting to work my way back up the ladder, I made this 8-strand braid using the "Edo Yatsu" braiding pattern. This braid has different results depending on the placement of colors when you start. I started with a "YY KK YY KK" pattern, which yielded this pleasing spiral. I used it to string an inro.
Although this color pattern makes the braid look like a twist-style rope, it is not. If you twirl it in your fingers, it does not separate into strands like a rope does.
Braid 04 (16 strand, 7'10", October 2008)

I decided that I had worked my way back up the ladder, so it was time for this 16 thread "Kongo Gumi" pattern. I thought this was going to be difficult, given the number of strands, but it's actually a very simple pattern. All threads move in the same direction, and you're basically just moving the end pair of threads each time. There is no "grabbing the middle pair out four and moving them in opposite directions" like with some patterns.
This pattern also moves very quickly. I timed myself at one point, and determined that I can complete 18 inches of it in one hour. This means that this entire braid was completed in about five and a quarter hours, though those hours were spread across about five days.
I really like the way the colors came out on this one. The colors variations within the spiralling bands seem to give this braid an irridescent quality, even though it's made of mundane cotton floss.
Braid 05 (8 strand, 1'1", October 2008)

Braid failure! I really wanted to try out this "Yatsu Rai" pattern, because I think the interlocked S pattern it produces is really cool. I discovered, however, after about eight inches of braid, that you really should be mostly sober while braiding. I lost track of the braid at some point and was unable to recover. Eventually I just put the threads into starting position and began again, figuring there would be a discontinuity, but the overall braid woul be fine. For some reason the restarted braid was not as clear or neat as the original portion, so I gave up.
The upper half of the braid, starting from the looped end, is the good part. See how clear and tight the pattern is? About three repetitons after the fold, you can see where the error starts, and there are a couple of sections where the apttern is messed up and I am trying to recover. Eventually, the pattern picks back up, but it's stretched out and indistinct. I don't understand why that is, but it wasn't worth continuing. Maybe I'll try this pattern again when I have more time and attention to devote to it.
Braid 06 (4 strand, 7'5", October 2008)

Went a little overboard today. First of all, I went to a local store that specializes in natural fiber yarns and I bought two balls of 100% silk yarn. (It was on sale, honest!) Then, I spent 3.5 hours straight making this braid, starting at 10pm. Yes, it was a wild Saturday night!
Braiding with with big thick yarn was very interesting. It seemed to go much faster than braiding with skinny embroidery floss. The final braid is thicker than the 8 strand braid #3 above, though not quote as thick as the 16 strand braid #4. This silk is excellent. In addition to having great color, it's super-soft and very squishy. The resulting braid is noticably stretchy. I'm going to want to make more braids with this stuff, which is good because I have yards and yards and yards of it. It might also be fun to mix it with thinner floss.
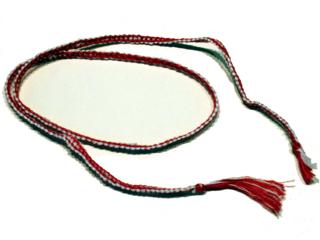
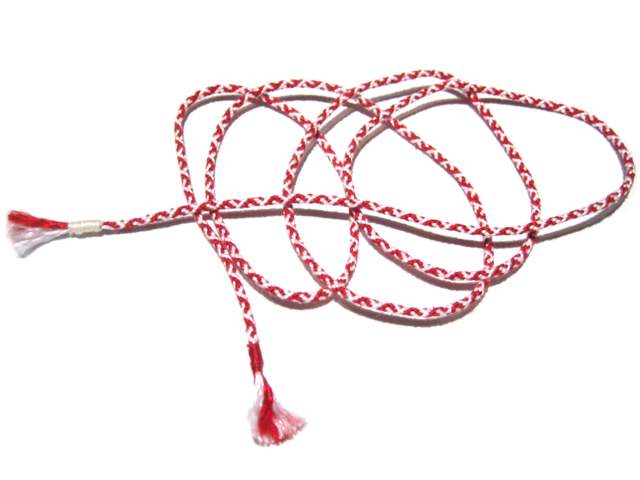
Braid 07 (8 strand, 9'10", October 2008)

This was pretty much an experimental braid. I was trying to achieve a braid that integrated a black & gold pattern and a red & white pattern. Black and gold are the colors of the Pittsburgh area and the SCA Barony that covers it. Red and white are the colors of Aethelmearc, the SCA Kingdom. I decided to try the "yatsu rai" pattern again, making the S-shaped blocks in my two color combos. That pattern is visible in the top part of the image.
Unfortunately, that pattern didn't work out so well. The colors made it impossible to see the pattern, and the pattern made it difficult to see which colors were grouped together. So, I changed the arrangement of the threads and tried again. By changing the combination to black & red with yellow & white, I hoped to conquer the problem. The resulting pattern was much more pleasing (see the middle of the photo), but not really what I was going for.
Then, I did it. The bottom part of the photo show clear blocks of black & gold and red & white, but the overall pattern is very integrated. The dark & light lengthwise stripes in this braid are also clear.
This braid was fun to make, with all the experimentation, but with the switches and all the transition periods in between where I was trying to figure out how to arrange the threads to get a particular pattern, it's not very attractive. I even split the combos down near the end to make two 4 strand braids in each combo, just for fun. This all was great, and now I know how to do the pattern I want, but it's not very useful on its own.
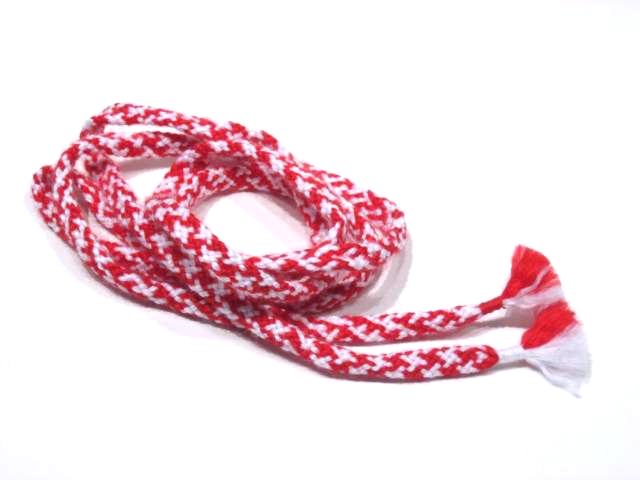
Braid 08 (8 strand, 3'6", October 2008)
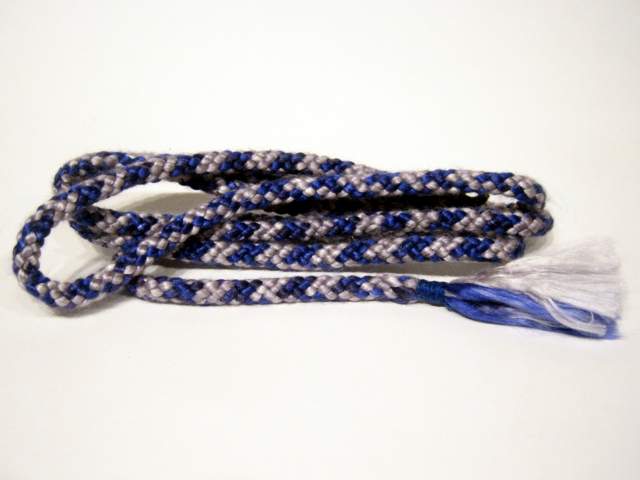
Once I finished up the exrimental braid, I was able to get back to the great silk yarn. Instead of experimenting within a single long braid, I decided to do a handful of smaller braids to find my favorite two-color version of the Edo Yatsu.
This "houndstooth check" pattern was the first result, the thread arrangement for this can be described as "XO XX OX OO". That is, if X is gray and O is blue, the #1 thread at roughly 11:30 o'clock is gray, the #2 thread at roughly 12:30 o'clock is blue, the #3 thread at roughly 2:30 o'clock is gray, the #4 thread at roughly 3:30 o'clock is gray, the #5 thread at roughly 5:30 o'clock is blue, the #6 thread at roughly 6:30 o'clock is gray, the #7 thread at roughly 8:30 o'clock is blue, and the #8 thread at roughly 9:30 o'clock is blue. Odd number threads are moving clockwise, and even number threads are moving counter-clockwise. Maybe that doesn't all make sense to you, but in the future I'll only give the X&O pattern.
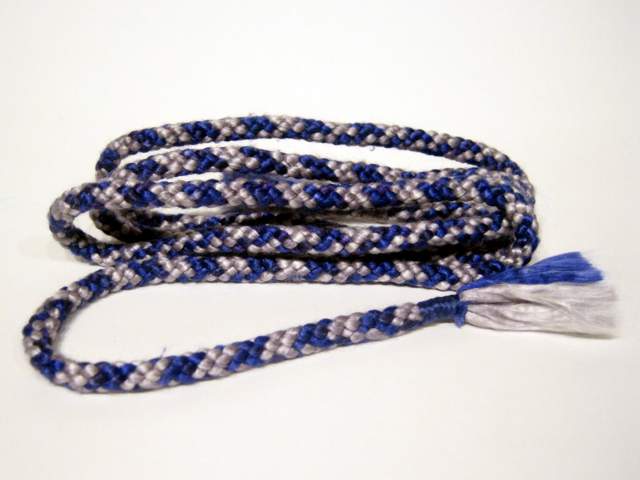
Braid 09 (8 strand, 3'8", October 2008)

A step back towards simplicity with this "OX OX OX OX" threaded "Checker" Edo Yatsu. Grey moves clockwise while blue moves counter-clockwise. I call this checker, but you could also view this as lengthwsie alternating stripes.
I've decided to do as many of these two-color variations of Edo Yatsu as I can think of. I'm not enough of a math person to calculate exactly how many there are. There are not strictly 28, since there are always going to be 4 X's and 4 O's, plus there's a certain amount of rotational symmetry. For instance, "XX XX OO OO" is probably the same as "OO OO XX XX". There's some software that would help me experiment with this, but so far I prefer to noodle on it myself.
I might wind up having to do this one again, since there are a couple of errors in it.
Braid 10 (8 strand, 3'7", October 2008)

I've done this "OO XX OO XX" spiral pattern before, for Braid #3. It's nice to see it in these colors, though. It also marks the last variation that I have a diagram for. The three I've done so far are shown on one of the many kumihimo web pages I've been reading over the past few weeks. All the ons you will see below are ones I've come up with on my own and decided to try out. That's not to say I'm the first to have ever done them, I mean people have been doing kumihimo for a long time, but I'm trying to work out variations for myself, as a way of understanding the structure a little more.
Braid 11 (8 strand, 6'10", October 2008)

Oops, I accidentally made this one twice as long as the others. I was wondering why it was taking so long to finish. Anyway, it uses a "XO XX XO OO" thread pattern, which creates a kind of Greek Key design that spirals down the braid. I think it's really cool. If you look at the pattern, you can see it's very similar to both the spiral pattern of Braid #10 and the checker pattern of Braid #9. This interlacement is mirrored in the design that is produced. The spiral pattern's odd and even bands are replaced with alternating "dotted" and "dashed" lines. Cool.
Anyway, I immediately cut this braid in half to create one braid that matches the others in length and an extra braid. This also involved unbraiding am inch or so from the end of each smaller braid to tassels. That's the first time I've ever had to unravel any of this fancy braiding after it's off the marudai. I had to get al this cutting and unravelling done quickly, before I lost my nerve.
Braid 12 (8 strand, 3'8", October 2008)
I was trying to make a braid with block of each color but it turns out that just looks like houndstooth check. It's basically the mirror image of braid #8, which I think is very strange. It's not what I was expecting at all. I started with an "XX XX OO OO" pattern, which I thought would give me something very different from what I actually got. I guess I still don't understand this as well as I want to. Oh well, that just means I have to keep trying.
The braid did come out nice and smooth, so I guess I shouldn't complain too loudly.
Braid 13 (8 strand, 4'3", October 2008)

I decided to take a break from all this round braid, and try out a flat braid with this great yarn before I used it all up on other things. This braid is a Yatsu Rai plait with an "XO XO XO XO" thread pattern. It's super-stretchy. This would make a great tie for something that needs a bit of elasticity. It's about three quarters of an inch wide, so it would make a great strap for tying a box shut or maybe as a shoulder strap for something.
If I manage to get more of these colors, I should try this braid again with a the thread pattern that yields the S braid. Something tells me that would look really really great.
Braid 14 (8 strand, 3'9", October 2008)

Back to the round braid, but this is the very last braid using the blue and grey silk yarn. Not bad, eight braids from two skeins of yarn, over 29 feet of braid. I paid less than $30 for the silk, so less than a dollar a foot for materials and I've seen braids selling for ten dollars a foot on Etsy. If I can ever bring myself to sell braids, this might be a pretty lucrative hobby.
This particular braid uses the eight thread Edo Yatsu pattern again, this time with an "OO OX XO XX" thread pattern that gives a great "Interlocking E" spiral that I really like. I think this is my favorite pattern visually so far, and the fact that I figured it out myself instead of just following somebody's web page makes it extra-special to me.
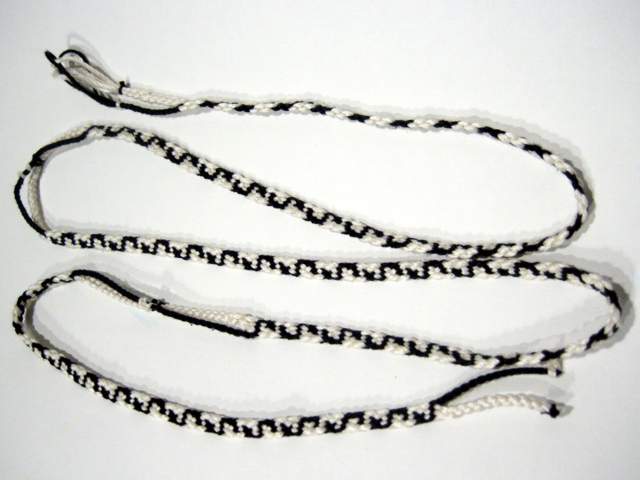
Braid 15 (8 strand, 2'5", November 2008)

One of the reasons I started doing kumihimo was to occupy the "down time" at day long (or longer) SCA events. I completed this entire braid during the Amethyst Invitational Tournament; setting up the threads during breakfast and tying everything off during court. It's a Yatsu Rai "S Braid", which uses a "XO OO OX XX" thread pattern. I used silk yarn from the knitting store. The white yarn is glossier and thicker than the black, which gives this braid an interesting texture. I decided to use this braid as a chin strap for my sando gasa hat.
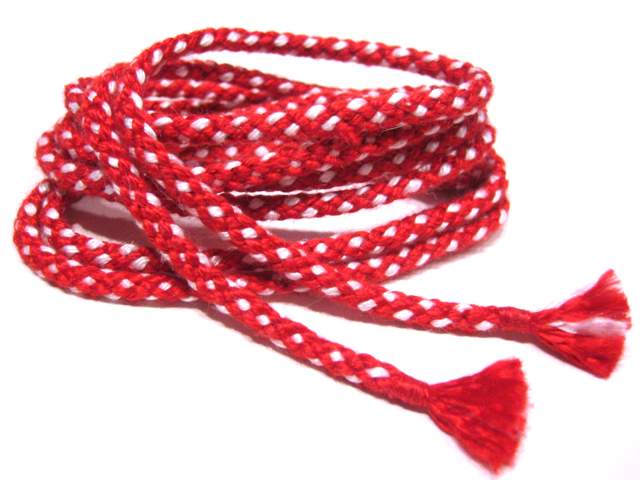
Braid 16 (8 strand, 19'6", November 2008)

While making the previous braid at an SCA event, I noticed that kingdoms and baronies often give out awards that are sometimes referred to as "danglies", that is, they are represented by a badge or medallion that hangs from a cord. It occurred to me that maybe making some cords in the baronial colors, and giving them to the barony for use with baronial awards would be a way to put my apparent obsession to good use.
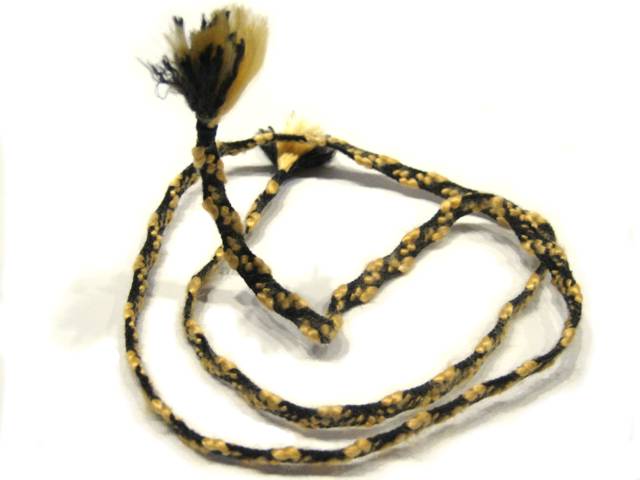
So, here's the result. I used eight full skeins of cotton embroidery thread, according to a thread pattern of my own design which I wil refer to as the "Barony Braid". I did this as one long Edo Yatsu braid with thread pattern "YY KK KY KK". Once it was complete, I cut it into six award cords and whipped the ends into tassels. This meant that almost a foot of braiding was combed out. Now I know better. Anyway, I will give these cords to the Baron and Baroness when I next see them and I'm sure they will go to good use.
Braid 17 (8 strand, 3'2", November 2008)
I liked the new chin strap on my sando gasa so much that I decided to get rid of the store-bought braid I was using for the harness and do it entirely in silk braid. I used the same two silk yarns as braid 15, four black and four white. Most of this braid is Yatsu Rai S braid in a "XO OO OX XX" pattern, but the ends of each section are split into black and white Maru Yotsu sections to create ties for attaching the harness to the support basket, and the pieces of the harness to each other.
These "break out" sections were fun and challenging. I basically had to do two braids at the same time on a single marudai. Once the braid was complete, I tied off the aplit sections and cut the braid into three pieces to make the harness. So far, it's working very well.
Braid 18 (8 strand, 4'10", November 2008)

Once that braid was long enough, though, I still had a bunch of yarn left on my bobbins. I basically spent the next few days just playing around with 4 black and 4 white threads. I switched between different braids and thread patterns, trying out some of my Edo Yatsu patterns on Yatsu Rai braids and vice versa. I also did some 8-thread Kongo Gumi braiding, and made up some new braids that I don't have names for.
This was great fun, and it also gave me a sampler I can use to show off my craft to others. I carry this braid around in my pocket, not just for showing off, but also because it can be pretty handy to have a hank of cord in your pocket. I used it multiple times on a recent vacation for holding a water bottle or camera.
Braid 19 (8 strand, 2'0", November 2008)

At about this time, I manged to get ahold of some gold yarn of the same type as the blue and grey yarn I was using earlier. I was so happy with the texture of the black and white braids that used yarns of two different gauges, I wanted to try a braid two wildly different gauges. I decided to use 6 black threads and only 2 gold threads in a simple Edo Yatsu braid. The black threads did a good job of keeping the gold threads separate from each other in this "YB BB YB BB" braid, creating a braid with a great knobbly texture. It's not very long, since I started with only a yard for each thread, as a trial. This braid will probably hold knots really well, so I'm sure I'll do something like this again.
Braid 20 (8 strand, 3'2", November 2008)

I was so happy with that braid, I wanted to do another. This time, I tried a "YB YB BB BB" thread pattern while keeping to the 6 black and 2 gold Edo Yatsu. Keeping the two gold threads closer together gave this braid more of a twist feeling, with the two bands of gold bound tightly around a core of black. I started with more yarn this time, so this braid should also be a little more useful.
Braid 21 (8 strand, 3'2", November 2008)
The types of silk yarn I've been able to find in stores have been really great, but finding exactly the colors I want has been kind of a challenge. I made a guess and stopped by a store that specializes in needlepoint supplies, and hit the jackpot. Silk needlepoint thread is kind of expensive, but it comes in a very nice pallette of colors and is meant to provide fine detail.
This silk braid in my "Interlocking E" Edo Yatsu pattern uses 4 red, 4 white strands of Silk needlepoint thread in a "RR RW WR WW" thread pattern. The resulting braid is about two thirds the diameter that a similar braid would be using cotton embroidery floss. I could double or triple each thread for a thicker braid, and the color selection should enable me to match most fabrics or create customized braids in somebody's personal colors, whatever they might be.
Braid 22 (8 strand, 2", December 2008)

Most of my braids have been "for art's sake", with only the vaguest idea of practical use. This one was born of use, and designed with that in mind. I have this red/black checked fleece jacket that I've had for about twenty years. It's holding up pretty well, but in all those years it's never had a zipper pull. I decided to braid a swanky zipper pull for myself, because I knew it wouldn't take very long.
I decided to use 4 red and 4 black strands of silk needlepoint thread. The bulk of the braid is Yatsu Rai in a "KR KR KR KR" thread pattern to create vertical stripes, but one end is a closed loop of Maru Yotsu braid in a "K R K R" pattern. This is accomplished by tying the middle of the four bundled threads and doing a few inches of Maru Yotsu, then looping the remaining threads together and starting in on the Yatsu Rai. After a few inches of that I switched to a half inch of Edo Yatsu to feed through the center of some alphabet beads.
The closed loop nature of this braid will hopefully give some people a second or two of pause, and it adds a bit of frilly newness to this old jacket.
Braid 23 (16 strand, 3'1", January 2009)

This braid uses cotton embroidery floss and a 16-strand version of the Hira Kara Gumi plaiting pattern. There's no particular thread pattern, but I used four different colors of brown. The colors started in the position "1111 2222 3333 4444", but as this was my first time with this pattern they got pretty mixedup over the course of the braid. I was trying to make a wider flat braid, but instead I wound up with a thicker one. The Hira Kara Gumi plait is an annoying one to begin with, but doing it with twice as many threads made this braid a long, hard slog.
The subtle variation of color is nice, and the heaviness of this braid is great, but Idoubt I'll try this again with some really good reason.
Braid 24 (16 Strand, 6'5", January 2009)

So sick was I of the previous braid, that I did another 16 strand Kongo Gumi even though I consider this a very easy plaiting pattern to do. This version uses that great combed silk yarn in blue and white with gold accent strands. I didn't want to change the thread pattern once I'd started, but I wish I'd managed somehow to get the gold threads to create a visual anti-spiral. Maybe next time. I'm very happy with this braid otherwise. It's thick (like a half inch in diameter), soft, and slightly stretchy.
Braid 25 (8 strand, 1'7", January 2009)

I went to the library, and I checked out Jacqui Carey's Beginners Guide to Braiding: The Craft of Kumihimo. Since all six of the braids in it are 8-strand braids, I loaded up the marudai with "BW GS BW GS" and tried out each pattern in turn: "square braid", "round braid", "flat braid", "honeycomb braid", "hollow braid", and "rounded flat braid".
I recommend this book, especially for beginners. It's only 64 pages but it's a detailed guide with lots of color photos and step-by-step information. This braid is short, but it should be helpful for showing people shape variants and figuring out thread patterns.
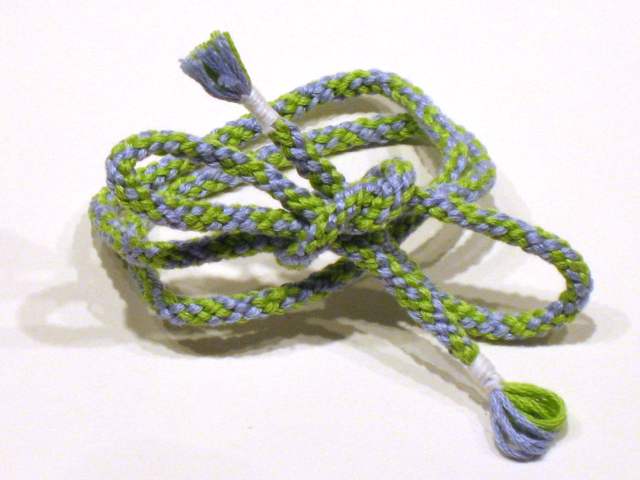
Braid 26 (12 strand, 3'0", January 2009)

Of the six braids in Carey's BGB, the most interesting new braid to me was the "flat braid". It's fast, easy, and only as thick as the strands you use. I didn't see any reason that the pattern couldn't be expanded to more threads, so I decided to try 12. The result was this "peas and carrots" colored braid. It's still flat, and a bit wider than it would be with just 8 strands. I bet you could do this braid with any number of strands that is divisible by four.
Braid 27 (16 strand, 2'3", January 2009)

The 12-strand version worked out so well, I decided to try a 16-strand version. I still only used a single skein of cotton embroidery floss per color, so this braid is shorter even though it is wider. The braiding pattern worked fine, though I had a difficult time keeping tensions even on all the threads, so the chevrons started to get a little lop-sided. It was a bit crowded, even on an 11-inch marudai, so I'm not sure I could try the 20-strand version without a larger, or at least wider, mirror.
Checking around, I find that the most common Japanese name used for this braid is "Hira Nami".
Braid 28 (8 strand, 4'1", January 2009)
The first braid that I made with this silk embroidery thread was so thin and fine, but not very useful. For this one, I doubled the threads so that each strand of this 8-strand Edo Yatsu braid is actually two threads. There's also an extra strand down the hollow core, to try to beef it out a little more.
While I was braiding this, I got an invitation to a birthday party, so I decided to give this braid away as a present. Even though it takes time to make, I felt silly giving a hunk of string as a present so I sewed up a little bag and used this braid as the drawstring. Somehow that made me feel a little less weird about it.
Braid 29 (8 strand, 6'10", January 2009)

One of the reasons I started braiding is so that I could stop buying polyester "rat tail" cord like this every time I needed a decorative cord. So, it's kind of sick to buy several yards of this stuff and braid it. It makes a nice shiny braid, but hideously expensive at several dollars a foot just for materials. Plus, the stuff Jo-Ann sells in their trim section is very stiff, so it doesn't even braid very well. I did this Kusari Kaku Yatsu "square braid" out of the BGB because it doesn't involve sharp turns.
Braid 30 (8 strand, 4'8", January 2009)
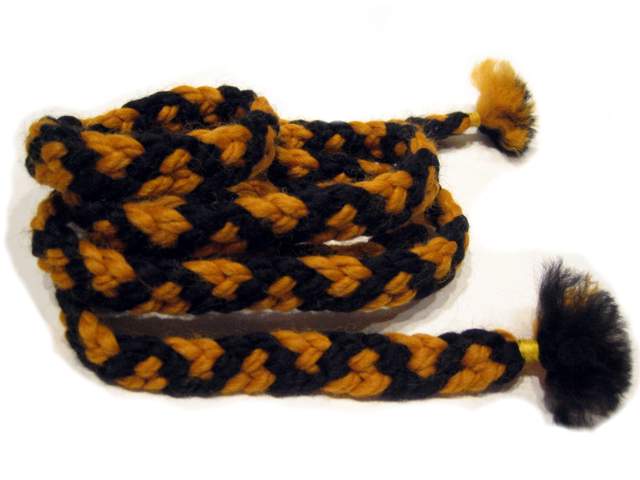
I had signed up to teach a class in kumihimo at an SCA event, and I wanted class attendees to be able to see my threads even if they were kind of far back from the marudai, so I went to the store and bought the thickest, chunkiest yarn I could find. I wound up with two skeins of Wool-Ease "Thick & Quick" Acrylic/Wool Yarn which is not the most period material, but is certainly visible.
This is the first braid I made with the yarn, an 8-strand braid using the Hira Kara Gumi "rounded flat" braiding pattern. The braid is huge and stretchy, about 3/4 inch across the widest way.
I used a "KK KG KG GG" thread pattern to acheive this nice zig-zag visual pattern There's a book by Rosalie Neilson titled, The Thirty-Seven Interlacements of Hira Kara Gumi. Ms. Neilson determined that there are 37 different two-color visual patterns possible with this braid, and published a book showing each pattern with its thread set-up. This pattern is on the front cover of the book, as well as page 25. Now I have just 36 more braids to go.
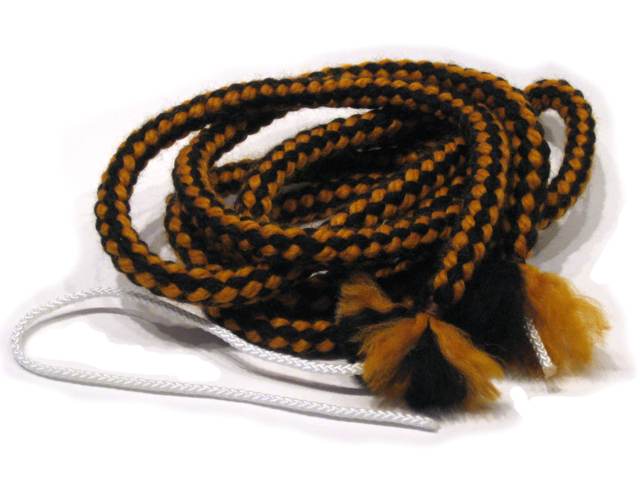
Braid 31 (8 strand, 8'4", February 2009)

I liked the doubled silk needlepoint thread, and I liked the Hira Kara Gumi pattern, so I decided to try combining the two. This "KK GK GG KG" pattern is page 32 of 37IHKG, so now I only have 35 more to go.
You may have noticed that this braid and the two preceding braids are all black and gold. The first two were done before the Super Bowl, and the third was finished later. Go Stillers! Superbowl champeens! These are also the colors of the local SCA Barony, coincidentally.
Braid 32 (8 strand, 7'3", February 2009)

I was about to teach a class in kumihimo, and dang, I couldn't find my BGB sampler braid anywhere. How could I reach a class without that? So, everything else went on hold while I braided a new one. I decided to use the combed silk yarn again, but make the sections longer this time, so each of the six main sections (Square, Round, Flat, Honeycomb, Hollow, and Rounded Flat) is about 11 or 12 inches long. I had some yarn left over at the end, so I added a section of Yatsu Rai, and a short section of one other pattern tht I don't have a name for but that everybody really seems to like.
The length of this combined cord makes it very useful. It could be a tasuke sleeve cord or something like that, so it could serve a practical purpose beyond just showing off my braiding skills. I later found my short sampler cord after it went through the wash. That one will live with my braiding supplies, but this long one is a real show piece.
Braid 33 (8 strand, 6'5", February 2009)

I was wondering how well this 40-pound test nylon line would braid. It, like the rat-tail cord, only worked well in the Kusari Kaku Yatsu "square braid". You can see how it pushed the polyester yarn off to the sides, making it more like a flat braid instead of a square. It's reasonably attractive, but its main purpose is to have an approximate test weight capable of holding my weight, in case I ever need a braid to save my life.
Braid 34 (8 strand plus core, 7'6", February 2009)
This braid is slightly more decorative than the last one, since instead of braiding with the nylon rope, I braided around the nylon rope. The Edo Yatsu braiding pattern is hollow, so it's easy to put a core of something else down the middle. I did this once before with an extra strand of silk in braid 28, but this one uses a length of 40-pound test nylon line at the core for strength. It would be more attractive if I'd used something besides the chunky Acrylic/Wool yarn, because the braid completely hides the core. You can see how using a more attractive braid around an even stronger core would be useful for making decorative cords that still have serious strength.
I made this braid as an example to show a class. Also, to use up some more of this chunky yarn. It's not very attractive.
Braid 35 (4 strand, 6'9", March 2009)

This was the first braid for the class I taught at the Mi-no-Hi festival with Sharon's help. I wanted to start out with a simple braid to show set-up and basic method, and this maru yotsu pattern is the simplest I know. I used the chunky yarn like I planned, and the smallest of my four marudai. We spent about an hour mostly setting everything up (With some additional help, thanks Raven!) before the class, but I left this one partially set up so the students (two students, but what can you do?) could see that part. I wasn't able to complete this one during the class, of course, but it survived the trip home and was finished later.
Braid 36 (8 strand, 6'7", March 2009)

This was actually the third braid I taught in the class, but I completed it second. It uses the yatsu rai pattern, which I like to teach alongside the maru yatsu pattern to show how a minor change in the braiding pattern can yield a very different braid shape. It's not in Carey's BGB, so it also gives students a little something they can't get elsewhere as easily.
I used a "KG KG KG KG" thread pattern, which yields this thin stripy braid instead of the distinctive S pattern for which this braid is mostly known. For the S pattern see braid 5 and braid 17.
Braid 37 (8 strand, 6'4", March 2009)

This is the last demonstrator braid from the Mi-no-Hi class. It started off as a simple edo yatsu braid in a "KG KG KG KG" color pattern, but I decided that was boring me, so I switched through a few color variations until I settled on a houndstooth check pattern of "KG KK GK GG". The houndstooth check pattern is really starting to grow on me. At first, it was the kind of thing that pops up when you're trying to do something more interesting, but over time I have come to appreciate it for its pleasing staccato regularity. This is a good pattern when you really want the colors to hang in big patches instead of thin stripes.
Braid 38 (16 strand, 5'0", March 2009)
There was actually one more braid at the class, but Sharon finsihed it up so I don't count it as my work. It was a 16-strand kongou braid in red and white acrylic yarn.I liked the way the material braided, and now I have gigantic skeins of it, so I decided to do my own 16-strand braid. This one uses a braiding pattern similar to the 8 strand Edo Yatsu, but with twice as many strands.
I started out with that nice houndstooth check pattern (RR RR WW WW RR RR WW WW), but somewhere in the middle it devolved into a weird hybrid of the interlocking E pattern and the houndstooth. Apparently with the 16 strands you can acheive some interesting effects, but on my first full braid in this style it was flying blind.
I've grown inured to the truth that the first time you try a new plaiting pattern, you probably won't have the hang of it, and will probably mess it up. I used cheap acrylic yarn for this braid on purpose so I wouldn't be wasting good silk on my experimentation.
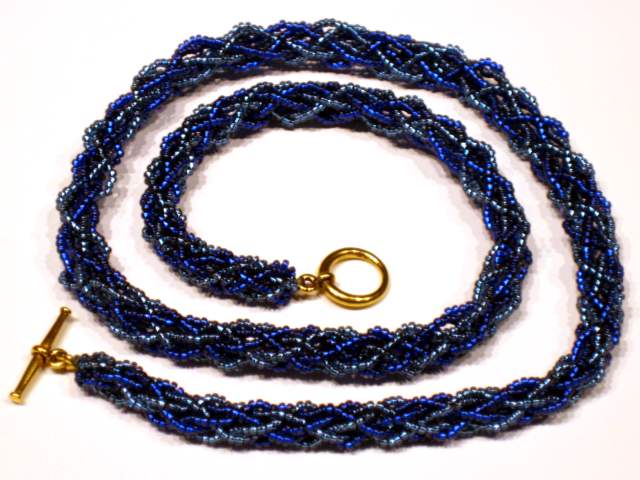
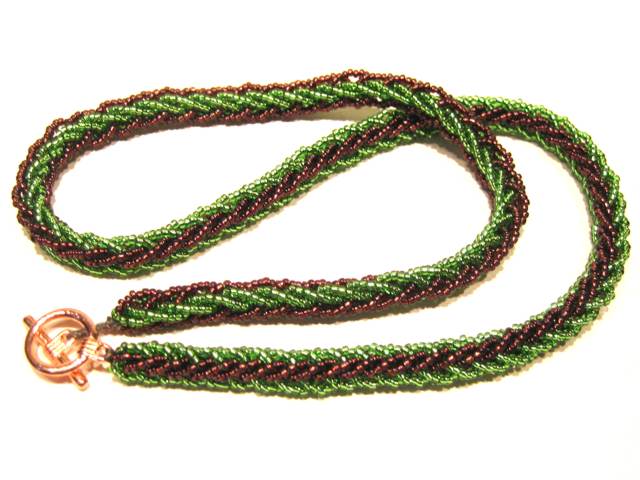
Braid 39 (8 strand, 1'2", March 2009)
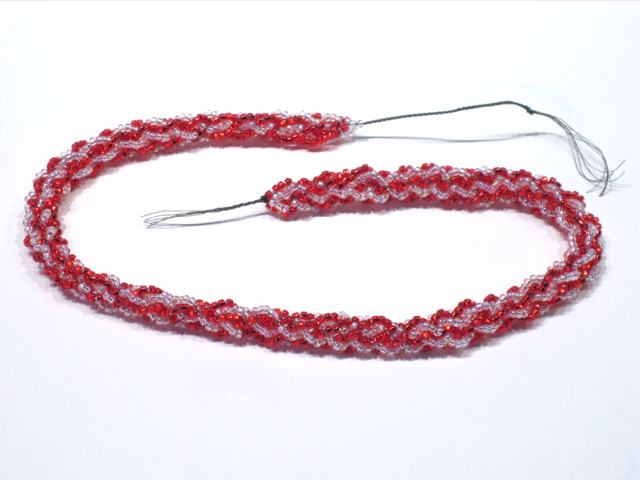
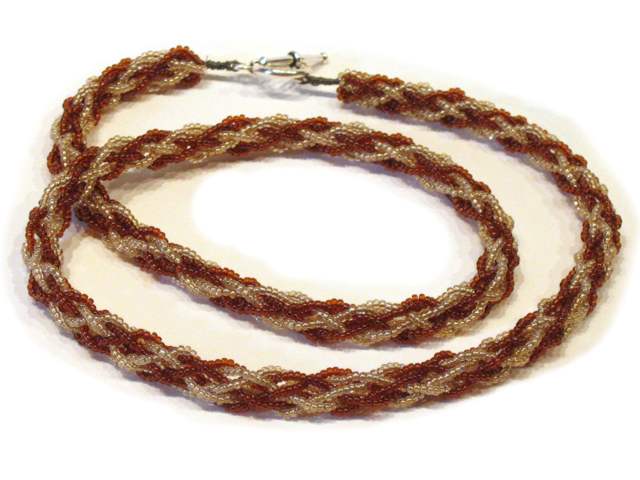
Somebody I know asked me about braiding with strands of beads. I had never tried it, and other people have mentioned it to me in the past, and I was walking past a bead store, and...
This braid has eight strands of tiny seed beads, strung on "Fireline" beading cord. It's kind of a pain to string hundreds of beads onto the line, and a constant pain keeping the line tension good while you're braiding, but it makes a very shiny and sinuous piece of bling. The tension is off in a few places, but I'm very happy with the braid over all, especially for a first try.
This braid is about 14" long and about 3/8" in diameter, and uses most of two vials of beads. I added some findings and chain to the ends of this braid so that it would be useful as a necklace.
Braid 40 (8 strand, 2'0", March 2009)

This is an "8 tama" braid, plaited using eight bobbins. The four white bobbins had two strands of whote silk yarn on them, and the four black bobbins had three strands of black silk on them. This was an attempt to balance out the white yarn being thicker than the black yarn. It worked, but the braid is fairly chunky.
One of these days, I should write up this plaiting pattern. I haven't seen it in any of my books, and I may have invented it. When I show people the sampler braid (#18), they often remark on it.
I added some of those little rubber-ring-and-bead thingies at the ends to make this braid useful as an eyeglass cord. The starting end actually has the yarn looped through the ring, so there's no way to get that off without cutting. The other end has the yarn looped through the ring before it's bound with the whipping.
Braid 41 (8 strand, 1'10", March 2009)
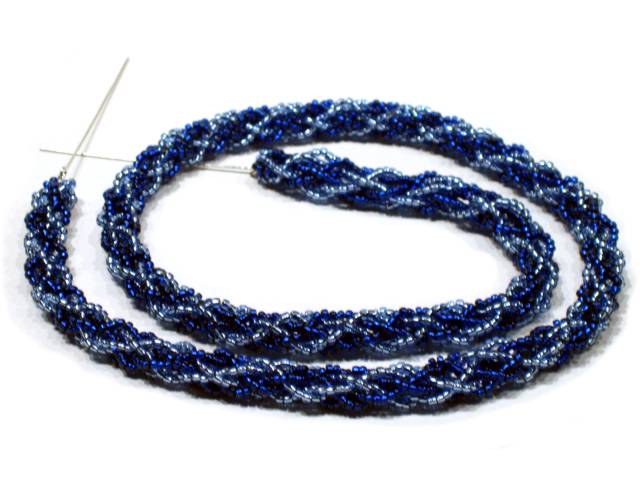
As I mentioned above, the first time I try something new, things often go wrong somehow, and this no longer bothers me. However, if something goes well the first time I try it, I usually try it a second time to demonstrate my success is repeatable. If nothing goes wrong the second time, I'm a pretty happy fellow.
Once again, I made eight strands of seed beads on Fireline, then braided them together. I started with more beads, so this braid is about eight inches longer than the first bead braid. I also used a different color pattern, "BB LL BB LL". After this picture, I added some findings to turn this braid into a necklace as well.
Braid 42 (8 strand, 0'8", March 2009)
Took a class, actually took a class in braiding with beads, at a local bead store. I knew what the standard technique was supposed to look like, but my attempts to recreate it were awful, so I wanted to have somebody show me what I was doing wrong. It turns out that the main thing I was doing "wrong" was using a marudai, as most of the techniques use a braiding disk. So, taking the class showed I just need different techniques or something.
The underlying braid is an 8-strand Kongo Gumi round braid of "S-Lon" beading cord. Four of the strands are unbeaded, two are strung with 3 mm gold glass beads, and two are strung with 3 mm black glass beads. The thread pattern is "KG PP KG PP" where "P" is "plain". The standard technique has you only adding a bead when the strand is moving from the "2" position down to the "5" position, but the tension on my strands was not as great even after I upped the weight on each strand to 1.75 ounces, and I was going through cord much faster than I was going through braids. So, I started over and added a bead every time a beaded strand was moving. This gives my braid a double helix instead of a single helix and inspires me to find beads in green, cyan, silver, and tan, and encode something.
I also saw that Jacqui Carey has an entire book out with 192 pages of braiding with beads. I'll have to pick that up at some point.
Braid 43 (8 strand, 2'0", March 2009)
For my birthday, my mother in law got me a set of 8 traditional kumihimo tama. "Tama" are the weighted bobbins/spools used by serious kumihimo braiders instead of the home-made things I was using.
They weigh about 3 ounces each, which is four times heavier than the weights I was using. This puts a lot more tension on the threads, resulting in a tighter braid. Most of the literature I've seen has this the opposite way, so I don't quite understand, but I'm sure I'll have plenty of experimentation. Here's the first experiment right here:
Here's the first braid with the new tama. I used the Hira Nami flat braid pattern with two thick gold yarn strands and six thin black yarn strands. This yields a nice zig-zag pattern, and the braid is tight enough to be somewhat positionable.
Plied silk yarn and combed silk yarn Hira Nami "Flat Braid" BBBG GBBB Flat braid to try out new, traditional tama
Braid 44 (8 strand, Six 3' braids, April 2009)

I really need to catch up on documenting stuff. I've been posting braids to the blog here, but I haven't updated the Marudai page in months. I'm going to hold off making new braids for a bit while I get caught up, but I still even have a backlog of braids to post here. Today's braid is actually a st of braids.
These are six 8-tama braids, each about three feet long. They use the six braiding patterns from Jacqui Carey's "Beginner's Guide to Braiding". They all use the "WW RR WW RR" color pattern, which makes some of the braids more interesting, and some of them not as interesting. All of them are braided using needlepoint silk, with two threads on each tama. These will probably, some day, be donated to the Kingdom for use as award cords, but for now they are going to be examples, and possible part of a kumihimo A&S display.
There's also the possibility that I might be teaching a class or two in kumihimo in the near future, if I can work out some technical issues. Stay tuned.
Braid 45 (8 strand, 4'7", April 2009)
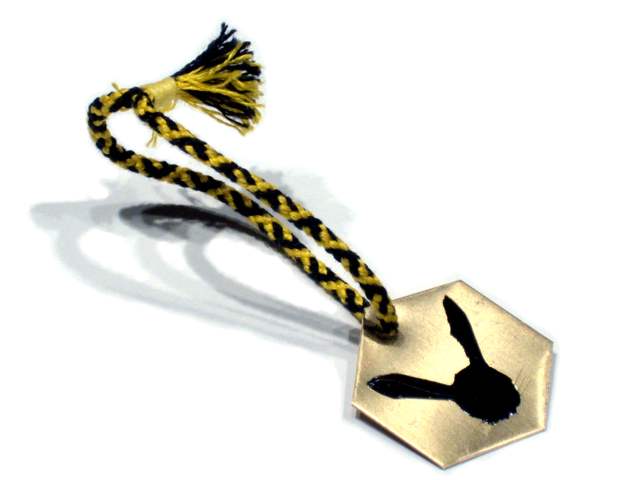
In the SCA, my "badge" is described as, "Fieldless, on a hexagon Or a rabbit's head cabossed sable". That's a fancy way of saying "A black bunny's head on a gold hexagon". That's a cute way of creating a "Honey Bunny" image. It's suitably Japanese, yet it can be expressed in Western terms, so I think it should be a good SCA badge. So far it's passed the Kingdom Heralds, maybe by Pennsic I'll be able to use it without worrying.
Another tradition is for artists and craftspeople to put items on display at events so others can see what kinds of things people are doing. Sometimes, this display is part of a judged competition, but sometimes it is simply a non-competitive display. In most cases, viewers will often leave "tokens" at displays they particularly enjoy. This is just meant as a "tip o' the hat" to the artisan for a work well executed.
So these are my new tokens. I've painted black bunny heads on nine brass hexagons, and attached short lengths of braid to each. The braid is an 8-strand Edo Yatsu braid with a nice "interlocking E" pattern in black and yellow cotton. The bunny was simply stencilled onto 1 inch wide brass strip, which I then cut into hexagons and drilled for the cord.
If you're an artisan or craftsperson in the SCA, and if I leave one of these tokens at one of your displays, please consider it an invitation to hunt me out at some point and talk to me about your work.
Braid 46 (8 strand, 2'0", April 2009)
Looks like I'm going to wind up making a bunch of these, as I keep giving them away as presents.
Once again, these are eight strands of glass seed beads on Fireline, braided with the edo yatsu braiding pattern. This time I used the "Interlocking E" color pattern (XX XO OX OO), which makes it very difficult to see what the actual pattern is in this braid. I think that's kind of neat. These colors together make this braid very warm.
Braid 47 (8 strand, 3'9", April 2009)

Here's a braid I made with my heavy 3 ounce tama on one of the best of the second batch of marudai.
This braid uses eight strands of combed silk yarn, 4 blue and 4 gold. As a little stylistic flourish, I braided the cords together in a 4-strand maru yotsu braid before doubling them over, so the braid has a braided loop at the starting end. The bulk of the braid uses the yatsu rai pattern, which I think is just a special name you use for yatsu sen when it makes this "S" pattern.
It's a pity we usually associate these colors so strongly with the Cub Scouts, since they go very well together.
Braid 48 (8 strand, 1'11", April 2009)
This bead braid is braided using a "Houndstooth Check" color pattern on the edo yatsu. See what I'm saying about the great patches of color this produces? You can also really see the colors travelling back and forth through the braid.
I also figured out why the tension is a little uneven on these bead braids. The start of the braid is always very tight, but it loosens up over the course of the braid. The reason is that the beaded strands have significant weight, which shifts from the outside to the inside while the strands get shorter and the braid gets longer. I need to start changing the weights as I braid, maybe starting with 3/4 ounce weights on the strands and switching to 1 ounce weights later on.
Braid 49 (8 strand, 2'6" + 4'6", May 2009)

Used the first set of home-made tama to braid some black and white silk yarn in the hira nami "flat waves" pattern.
My main goal was to make the 30" glasses cord you see in front, but I loaded so much silk on the tama that I wound up making more than four feet of additional braid.
Braid 50 (8 strand, 4'7", May 2009)

Here's a silk braid I did in brown and dark brown, using the hira nami flat braiding pattern and my second batch of tama
Instead of using yarn of multi-stranded floss for this braid, I actually did it more traditionally by buying a spool of silk thread and creating 8 strands of warp warp from 40 threads each of two different colors. Fun, but just as expensive as buying silk needlepoint thread, which is thicker to begin with and available in more colors.
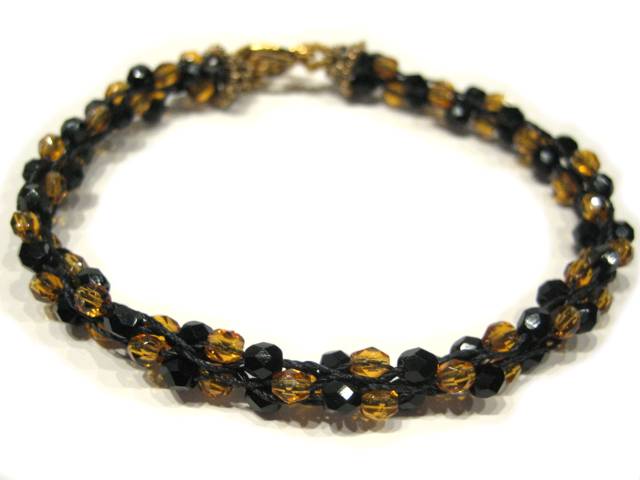
Braid 51 (8 strand, 1'11", May 2009)

I seem to have worked out most of the bugs in my bead braiding process. This braid is nearly perfect, if you ask me. It uses these great matte-finsih glass beads in black and metallic gold. Nearly everybody who sees this braid in person says , "Wow."
I used the edo yatsu round braiding pattern, like I normally do for these bead braids, with a simple "XO XO XO XO" color pattern. Instead of metal end caps, I made short loops of beaded Fireline at the ends to hold the toggle clasp.
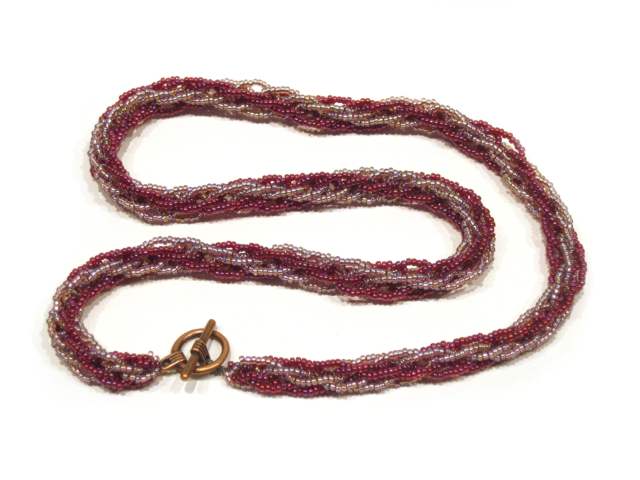
Braid 52 (8 strand, 2'0", May 2009)
I wanted to make a bead braid that combined the colors of red wine and white wine, but when you're looking at the tubes of seed beads at the bead store, it's difficult to tell how the beads will actually look once they're strung and braided. I think I got the right color beads for the 'white wine' part of this, but the 'red wine' beads are a bit too orange/brown, so together the colors look less like a wine flight and more like a rootbeer float. It's still pretty, and I like rootbeer floats, it's just not what I was actually going for.
Back when I wasn't working, I hatched the idea of teaching kumihimo classes to earn some money. There was some interest, and a few places invited me to submit class proposals. This pointed out to me that I didn't have any paperwork, and that if I wanted to take this idea seriously I should really put some together. I was going to need some curricula, background materials, and definitely some handouts.
It didn't take me too long to put the handouts together, but something was missing from them. They really needed some pictures of exemplary braids to go along with each set of instructions. I had plenty of braids, but only a few designed to be good examples for photocopied handouts.
Luckily, I had plenty of black and white silk yarn, and a scanner. The next batch of braids was all about making good pictures for the handouts.
Braid 53 (8 strand, 3'2", May 2009)

I'm not a big fan of this tsukushi braid, but it's in Jacqui Carey's book and has a braiding pattern that is very different from most other braids, so I can see why she included it.
Plied silk yarn
Tsukushi "beauty" braid
standard pattern
K W K W K W K W
Braid 54 (8 strand, 3'8", June 2009)

None of my previous work with yatsu sen was designed to show the vertical streams with such high contrast, so even though I have plenty of this braid I had to do one more.
Plied silk yarn
Yatsu Sen "Eight Streams" Gumi
Vertical stripes pattern
K W K W K W K W
Braid 55 (4 strand, 3'3", June 2009)

The maru yotsu braid only has four strands, so I used double the amount of yarn to beef it up for the pictures. Each white "strand" is 4 strands, each black "strand" is 8. It's as wide as the 16-strand braid below!
Plied silk yarn
Maru Yotsu
Vertical stripes pattern
K W K W
Braid 56 (8 strand, 3'4", June 2009)

Again, despite much work with the braid, edo yatsu, none of them were made for photographic simplicity. I also had to match the diagrams, so again with the vertical stripes.
Plied silk yarn
Edo Yatsu
Vertical stripes pattern
KW KW KW KW
Braid 57 (16 strand, 2'11", June 2009)

The 16-strand kongou isn't more difficult than the 8-strand that most people teach, but it's capable of my greater detail, so I wanted to include it. It also gave me a chance to use all 16 of my home made tama at once.
Plied silk yarn
Kongou Gumi
Simple spiral pattern
WWWW KKKK WWWW KKKK
Braid 58 (8 strand, 6'6" or so, August 2009)

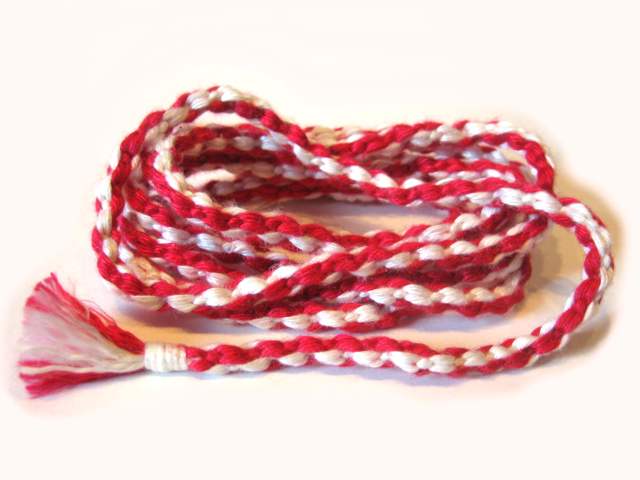
I started this braid with the intention of letting other people try out braiding, but then kind of got embroiled in it and wound up powering through to the finish. It's a flat yatsu sen braid made with red and white polyester yarn. I started with a "RR WW RR WW" pattern that should have made diagonal stripes, but at some point I let my running commentary to "students" distract me from where I was in the braiding. The strip pattern somehow got reversed! I was so intrigued by that that I decided to try and do it on purpose. I succeeded! So, I then spent the rest of the braid switching the stripes back and forth every six inches or so. This braid wound up holding one of the hanging lanterns that adorned the clan gate.
Braid 59 (8 strand, 1'9", August 2009)

One of the things that's much easier to get at Pennsic than anywhere else I normally go is leather lacing. I went to Spotted Pony Traders and bought four 72" laces made from what must be deerskin or calfskin leather since it's soft "like buttah" to make this braid. I started out doing a 4-strand braid to make the loop in the center. It was a royal pain to keep the laces from flipping around while braiding. Once I switched to the 8-strand edo yatsu to complete the braid, it became much easier to keep the laces flat while braiding, so the exterior is entirely the smooth side of the laces.
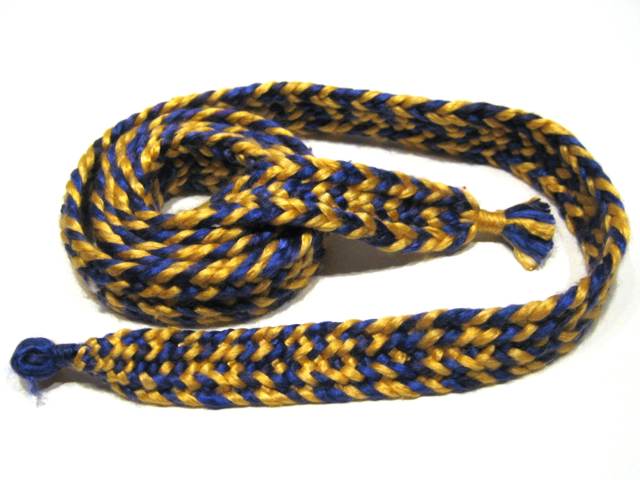
Braid 60 (8 strand, 4'3", August 2009)

I liked braiding the leather laces so much that upon finishing Braid 59 I went straight back to the merchant and bought eight more laces.
This braid also uses the edo yatsu pattern, but a different color arrangement creates the interlocking E pattern that I like. I'm not sure what this braid would be good for, but it was a fun experiment in materials. It is not a whip.
Braid 61 (11'7" plus another 6' or so, August 2009, 4 light blue, 4 white)
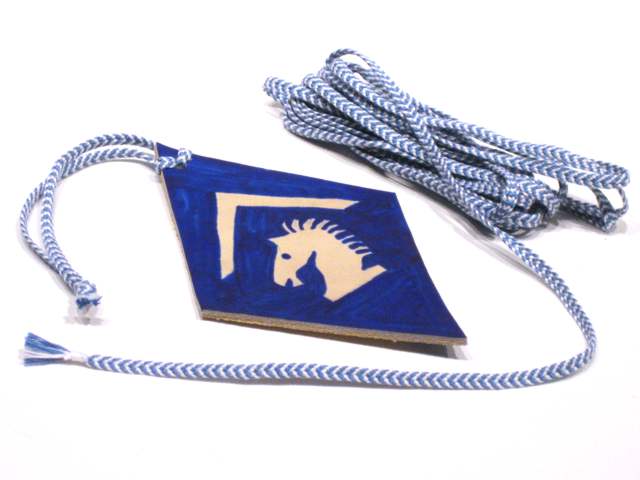
Started braiding this hira nami braid before Pennsic, actually, but wound up having to cut it off for travel, then restart it at Pennsic and take most of the rest of the week just finishing it. I used a "BBBB WWWW" color pattern to create chevrons to match the badges.
I also made a bunch of leather diamonds displaying the badge of our household ("One Knight Inne"), and this braid wound up getting chopped into shorter sections so we can wear these as household tokens. Our household, led by Sir Maughnus has existed for a dozen years and 13 Pennsics, which is pretty special. This years is also the 20th anniversary of Sir Maughnus' knighting, so these tokens were also a gift to him.
Braid 62 (2'2" plus 3", 4" and 8"; September 2009; 4 black, 2 red, 2 white)

I'm still looking for the best flat braid to use for lacing type purposes. Previously, I'd settled on the hira nami "flat waves" braid as a nice flat and wide braid that was easy to produce with eight bobbins. However, Sharon recently gave me a copy of Jacqui Carey's book, Creative Kumihimo, which has a flat braid type I'd never tried. Carey labels it "8G", but checking around I find that others call it the Shige Uchi "luxurious" braid.
Shige Uchi is essentially the same braid as the edo yatsu hollow braid, but instead of the threads crossing over at the top to make a round braid, they reverse direction! This "unzips" the round braid into a flat braid with a little bit of cupping to it.
As is usual for me with a new braid, I messed up a bit. First, I got a couple of threads crossed, changing the color pattern, and then later I accidentally switched back to the familiar edo yatsu pattern. I managed to unbraid all that, but just couldn't get the shige uchi running again. Instead, I switched through hira nami, yatsu sen, and hira kara patterns so that I could compare finished widths. My previous choice for wide, flat braid has been hira nami, but this braid is just a little bit wider. If I can just do better following the pattern…
Braid 63 (1'7", September 2009, 4 black, 2 red, 2 white)

More experimenting with the 8G Shige Uchi luxurious braid. This time, I used a "WK KK KR WR" color pattern, doubling the yarn for a wider, thicker braid. This braid is very wide and thick, and super soft from the great bamboo/silk yarn I used, but very short. A nice experiment, though, and I don't think I messed up the pattern at all.
Braid 64 (4'3", September 2009, 8 red)

Finally, we get to the heart of the matter. My experiments to find a wide and flat braid were centered around the lacing used to make Japanese armor. Not that I'm likely to make armor any time soon, but the question does come up occasionally of "what's the best braid to use for armor?" In my opinion, it's this one.
This shige uchi braid is fast to braid, and is the widest 8-strand braid I've been able to find. I did this braid all in red silk thread that I bought from a mail-order place in Japan. The thread came in a big skein like yarn does, and I measured it out on traditional-style bodai warping posts. This meant wrapping the thread back and forth between vertical rods to build up a bundle wide enough for braiding. Each strand of the braid has 40 threads in it! Yet, the completed braid is only about a quarter inch wide.
Based on the rough estimate of 100 yards of braid in a typical suit of armor, I'd need to get eight or nine more skeins of thread to make enough braid for armor. I'd also need to spend about a year braiding it since all the braids I've made in the past year of braiding add up to about 316 feet of braid. Like I said, not very likely to be done soon.
Braid 65 (4'3", September 2009, 4 red, 4 white)
Since I had such good luck with that Shige Uchi braid I found in Jacqui Carey's book, Creative Kumihimo, I decided to go digging through it for a new braid to try with no ulterior motive. This braid is 8N, and the best name I can find for it is Yatsu Nishiki.
The drawings in the book make this braid look more like a chain of interlocking links, but really its'not very chain like. I used a "WW RR WW RR" color pattern hoping to get a red and white chain out of it. I got a nice looking braid, but it doesn't look like a chain to me.
This braid is one of the most labor intensive I've ever done. It's an eight strand braid, but it has eight moves in the pattern, instead of the more common four moves. Nevertheless, it's a fast braid to make. I made this whole braid in the down time of a single day-long SCA event.
Braid 66 (1'11", September 2009, 4 black, 4 gold)
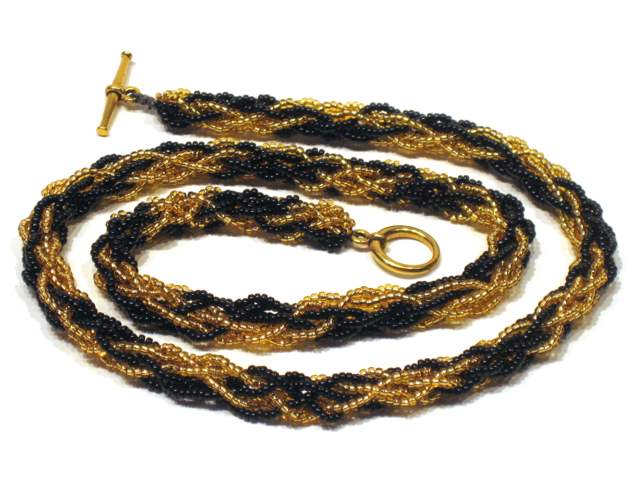
It's been a while since I've done one of these bead braids, but I still had two full sets of beads left over in my box of beading supplies. The last beaded necklace I did in black and gold came out so well, that I decided to do a new one, but this time in glossy translucent beads instead of matte opaque beads. I used the same "houndstooth check" color pattern of "BG GG GB BB" with the edo yatsu braiding patterm that I used for this other braid to create those large areas of solid color.
The tension on this braid seemed really strange, but maybe it was just that I was out of practice in this type of braiding. I'm happy with the way the braid came out and will probably wind up giving this one as a gift.
Braid 67 (3'5", September 2009, 8 blue, 8 white)

A bit of retrospection is followed by full-tilt progressive action. Lamenting my inexperience with 16-strands braids, I dove head-first into this great braid that also includes a brand new material.
The material is a hemp yarn. Hemp is a traditional Japanese fiber, so I wanted to try it out. I really like the royal blue hue of the blue yarn, but after I got the white yarn home I realize I had just bought a skein of string. It's the nicest string I've ever had, but it's basically string in color and texture. It braids really well, though. It isn't very stretchy, but it bends nicely and makes strongly defined "stitches" in the braid.
The braid is braid 16P from Jacqui Carey's book, Creative Kumihimo, and is essentially two overlapping edo yatsu braids. I did one braid all in blue and one braid all in white so I could keep them straight easily, but in the last couple of inches I switched the color pattern as an experiment and may do a whole braid that way. Basically you do one braid for four steps, then the other braid for four steps. This creates a tight braid at the center with large looping stitches on the exterior. The braid is solid underneath and knobbly on the outside. It seems very strong, too.
Braid 68 (3'9", October 2009, 4 black 4 gold)

A braid I started at the 2009 "Agincourt" SCA event, this was just a method to keep me busy for an afternoon. I started with only about six feet of yarn on each bobbin, hoping to get a braid about three feet long so I could donate it as an award cord while I was standing in the house of the Baron and Baroness. I probably could have finished it before the end of the day, but we were told that court was starting any minute, so I packed things away. Of course, court wasn't starting for an hour.
Anyway, this is more of the shige uchi braid, made with one strand of thick gold yarn per gold bobbin, and two strands of thin black yarn per black bobbin. I tried out a new color pattern to try to get something pretty out of this braid, but given the woven nature of this braid it's really difficult. It should make a nice cord anyway, given the soft materials.
Braid 69 (4'11", October 2009, 8 blue 8 white)

Wanted to try the 16 strand version of the edo yatsu again, and wanted to try out this stringy hemp yarn again, so it was time for this braid. The weave came out really uneven. Maybe the yarn is too stiff for this braid?
The braid is aggressively hollow, though. If you push a length together and untwist a little, the whole weave opens up like basketry. The stiffness of the yarn keeps the braid mostly ound, but it collapses if you push on it. If I did this braid again but with a brightly colored core, I bet the pressure from the inside would even out the weave a bit, and it would be quite eye-catching.
Braid 70 (2'0", November 2009, 4 blue 4 aqua)
Another bead braid to probably give away as a present. I have four of these "in stock" right now, but will most likely give away three of them before the end of the year. This one uses Blue beads and aqua beads in a spiral pattern edo yatsu braid. For some reason, this one came out very stiff, probably not enough weight in the counterweight.
The blue beads are really very interesting. Most of the seed beads have a silvery coating on the inside tht makes them sparkle. The aqua beads are like that. These blue beads have a green coating on the inside that gives them a color that gets darker as you look into them, much like deep seawater. This is a very watery braid.
Braid 71 (4�3�, November 2009; 2 red, 2 white, 2 blue, 2 gold)
 Silk needlepoint thread Creative Kumihimo 8H No particular pattern RB GW RB GW Tight square braid, made with more silk than I�d hoped to use
Here's a tight square (Carey Creative Kumihimo 8H) braid made using some silk thread I bought at Pennsic. Each strand is 24 threads, meaning there is a heck of a lot of thread in this braid. The tightness of this braid makes it only about a quarter inch across, though. In the picture, I've tied the braid into a decorative Chinese luck knot.
Braid 72 (4�7�, November 2009; 6 red, 2 white)
 Silk/bamboo yarn Shige Uchi No particular pattern RW RR RR WR Wanted to test out this color pattern
More exercise with the shige uchi (CK8G) braid. I was wondering how this braid would actually look with two strands white and six red. The book has nice diagrams to help you plan, but as with most things, the plan and the reality often come out very different. This one's nice, and as far as I know there are no errors or tension problems anywhere in this braid.
Braid 73 (2�1�, November 2009; 4 orange, 4 graphite)
 Seed beads on Fireline Edo Yatsu Stripes GO GO GO GO First braid made using bead spinner for stringing
For making my bead braids (Braids 39, 41, 46, 48, 51, 52, and 66), the part that takes the most time is stringing the hundreds and hundreds of tiny seed beads onto the line. People have been telling me for months that I need a "bead spinner", but since those things cost real money while a simple needle costs just a dollar, I have resisted.
Then, the craft store gave me a "40% off any single item" coupon, and the spinners really only cost $15, so I bought one of these Spin-n-Bead spinners. I bought the "Junior" model.
It is totally worth it. It cuts stringing time in half. If I'd spent the money sooner, I would have saved more than eight hours worth of my time. The last 150 beads or so still have to go on by hand, but most of them just fly up the needle. It's amazing. If you do this kind of bead stringing, I totally recommend that you get a bead spinner. This Junior model is big enough to hold a full tube of the beads I use, so I don't know if the larger spinner is necessary.
Braid 74 (2�1�, November 2009; 4 chartreuse, 4 silver)
 Seed beads on Fireline Edo Yatsu Spiral I SC SS SC CC Fastest bead braid I�ve ever done.
Braid 75 (1'6", December 2009; 8 black)
 Bamboo/Silk yarn Hira Kara Gumi Monchrome KK KK KK KK For the "between the toes" bits on a pair of geta
Braid 76 (2'1", December 2009; 4 chartreuse, 4 sky blue)
 Cotton embroidery floss, doubled Edo Yatsu Spiral I SC SS SC CC Same braid as Braid 74, but using floss instead of beads
This braid is made from two skeins of cotton embroidery floss. I doubled the floss to make the braid a little thicker and shorter. If you compare it to the beaded braid 74, you can see I was trying to compare the two materials. I used the same edo yatsu braiding pattern and the same color pattern. The two braids even came out almost the same length!
I think that doubling two skeins like this makes a nice thick braid that would be good for turning a large bead into a neckalce. You could pick two colors that match the bead and have a nice piece without much fuss. If I teach classes at a bead store, I think I'll focus on making braids that are about like this one.
Braid 77 (2'0", December 2009; 4 teal, 4 blue)
 Miyuki 11/0 seed beads (1017 and 20) on 10 pound fireline Edo Yatsu Houndstooth BB BB TT TT Special request bead necklace with sterling fittings
The request was for "bright blues and greens" and real silver findings due to metal sensitivity. I think I came through on those, though the braid is another edo yatsu.
Braid 78 (1'23", December 2009; 4 Dark Amethyst, 4 Amethyst)
 Miyuki 11/0 seed beads (313 and 1012) on 10 pound fireline Kongou Gumi Spiral DD AA DD AA Tried out a new braiding pattern with wonderful colors
Getting a little tired of the edo yatsu, I decided to experiment with braiding beaded strands using the kongou gumi braid. I like the way it came out, the way the strands all spiral in the same direction. Kongou gumi uses up a lot of material, so this braid is a little shorter than normal, though.
Braid 79 (1'23", December 2009; 4 Orange, 4 Green)
 Miyuki 5 and Toho 939 11/0 seed beads on 10 pound fireline Hira Kara Gumi 37IHKG page 19 OO OO GG GG Another braiding pattern tried with beads
Moving slightly flatter, I went for the hira kara gumi braid which Jacqui Carey describes as "rounded flat". This was a little weird, but it came out nicer than I feared it might. I love this orange color with the silver-lined beads, and pairing them with the green transparent beads makes a nice contrast.
Braid 80 (2'0", December 2009; 4 Black, 4 Gold)
 Miyuki 401F and 457 11/0 seed beads on 10 pound fireline Edo Yatsu Stripe KG KG KG KG Going back to the well, re-doing braid 51
Braid 81 (3'10", February 2010; 4 blue, 4 white)
 Hemp yarn Creative Kumihimo 8H Rings BW BW BW BW Trying this braid again, now with this yarn. Nice!
I used the 100% "string" yarn that I've used a few times before, and the square 8H braid from Jacqui Carey's Creative Kumihimo that I've used once before. I used my heaviest tama to pull this stiff yarn into line, which worked very well with this tight braid. To get the alternating stripes, it really was just a matter of making the odd and even threads the two colors I wanted.
Braid 82 (3'10", March 2010; 8 red, 8 white)
 Bamboo/silk yarn Edo yatsu, and 5" of Catherine Martin's 'keiruko no himo' Alternating colors, stippled gradient, rings Mostly simple 8-strand braid, but color changing with strands in center
The braid for most of this is just a simple 8 strand edo yatsu, but I had 16 strands of yarn on the marudai. Half of the threads are always in the center of the hollow braid, and thus are not visible. At first, I just alternated between the red and white threads. Then, I gradually phased in the red threads one by one, then back out again. I did some more alternating, then finished up with a 16 strand braid I've been wanting to try.
Braid 83 (3'3", March 2010; 8 red, 8 white)
 Combed silk yarn, doubled Keiruko no himo, which is Carey CK16T Rings pattern RWWR RWWR RWWR RWWR Wanted to do a whole braid with this pattern.
I wanted to try the keiruko no himo braid from the end of braid number 82 again, plus I got this new silk yarn.
First of all, this yarn isn't anything like the silk yarn I used way back when. The fibers are much shorter, so when the tama cause it to un-twist the yarn just frays apart. I used two pieces of yarn in each strand so that it wouldn't un-twist. Combined with the 16 strands of the braiding pattern this is one heavy braid. I managed to find this braid in Jacqui Carey's Creative Kumihimo as 16T. She points out that although the movements are a lot like the edo yatsu braid (CK8F), it has a twill pattern more like the square braid (CK8H).
Braid 84 (4'3", March 2010; 8 blue, 8 gold)
 Combed silk yarn Carey CK16X No named pattern BGGB BGGB BGGB BGGB Tried this new wide, flat braid with old silk yarn
After the difficulties I had with that other yarn, I decided to do another braid with the Maju Silk yarn I enjoyed so much in the past. It was a good excuse to try a new braid, so I pulled out my Creative Kumihimo and picked this 16 strand flat braid.
This braid is about four feet long and about an inch wide. It uses CK16X, which makes this nice, wide, heavy, stretchy braid. It's a fast braid, and I'm sure I'll use it again. I didn't have any problem with single strands of this yarn fraying apart, so I'm fairly certain the other yarn just uses cheaper short fibers.
Braid 85 (1'10", March 2010; 4 green, 4 purple)
 Seed beads on Fireline Creative Kumihimo 8H Vertical Stripes GP PG GP PG Trying the square pattern on a bead braid. Works great!
Another bead braid, but I tried the square kaku yatsu pattern and wound up with this wonderful necklace. It came out just amazingly sinuous, almost like one of those tight chains. These two colors turned out to go amazingly well together, too. They remind me of the little crocus flowers that poke up as soon as the snow finishes melting in the spring.
Braid 86 (4'4", April 2010; 8 black, 8 white)
 Plied silk yarn Creative Kumihimo 16X Quadruple U WBBW WBWB BWWB BWBW More experience with this great flat braid, 3/4" across.
It's another CK16X braid like braid 84, but using different silk yarn and a "WBBW WBWB BWWB BWBW" collor pattern. I started with 6 feet of yarn, and ended up with 4'4" of 3/4"-side braid.
I really like this braiding pattern. There's only one crossover, and the rest of the movements are easy to keep track of. Even though it has 16 strands, there are still only four moves per iteration, so it's not much more difficult than an 8-strand braid.
Braid 87 (1'9", April 2010; 4 each of Purple, Light Purple, Blue, and Light Blue)
 Doubled cotton embroidery floss Square 16, plus Unknown pattern from Rodrick Owen workshop Bulk is "Diamonds" pattern BPPB bppb BPPB bppb First braid from Rodrick Owen workshop
Here's the braid I did on Saturday in the workshop led by Rodrick Owen. It's a 16-tama braid, with each tama holding a doubled-strand of cotton embroidery floss.
The braid starts off with a true blunt end, and progresses with a square braid. Mr. Owen taught me this braid off the cuff, but it s a 16-tama variation on CK8D. Then, it switches to a 16-tama chevron braid that he is thinking of putting in his next book. After that, it switches back and forth between the chevron braid and a reverse-chevron braid to create the diamond pattern. This braid took me all day, and it is full of awful errors. The last two iterations even get some of the thread order wrong so that the braid inverts front and back for the last few inches. Yuck. That's why it's called a workshop, though, I guess. If everything went well it would be a funshop.
Braid 88 (1'7", April 2010; 4 each of Red, White Pink Cream, Yellow-Green, and Yellow)
 Doubled cotton embroidery floss Makiko Tada "Kyou Kara Gumi" GYCPWRRWPCYG GYCPWRRWPCYG First 24-strand braid ever, plus some new moves.
Here's the braid I did on Sunday in the workshop led by Rodrick Owen. It's a 24-tama braid, with each tama holding a doubled-strand of cotton embroidery floss.
This braid is from Makiko Tada's book, "Kumihimo: The Essence of Japanese Braiding", where it's on page 36. I don't own 24 matching tama, so I had to borrow some from the Tracy, the owner of the store where the wokshop was held, The Lacemaker. This braid basically took me all day. It only has a few minor errors in it.
Each full iteration of the braid has 68 individual steps, though some of those are repeast of earlier steps. I tried to use embroidery floss that was nearly the same color as the illustration, but my selection was limited. I'm sure with some more carefully-chosen colors it would not be as garish.
This pattern has a great 3D texture, and an interesting color pattern. It uses a lot of material, though. I started with more than a yard of floss on each bobbin, but the finished braid is only about 18 inches long!
I finished the braid off by pairing up the colors and making smaller 4-tama braids with them. This is challenging, since you're trying to work six individual braids on top of each other. It's a lot fancier than just gathering all the threads into a single tassel, though.
Braid 89 (7'8", May 2010; 4 Dark Blue, 4 Medium Blue, 4 Light Blue, 4 White)
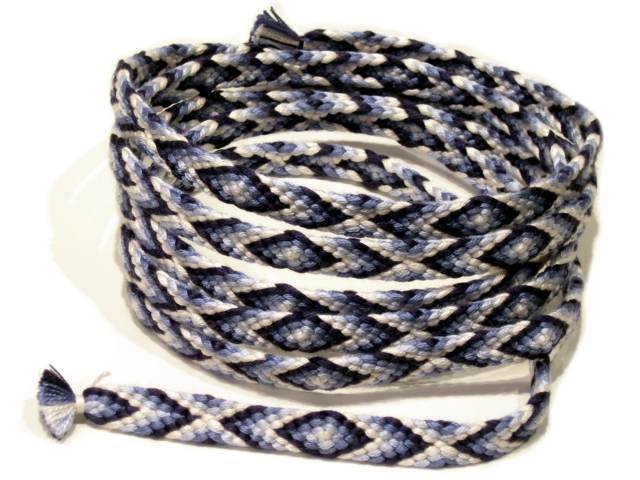 20 ends of silk thread per strand Rodrick Owen "Diamond" Pattern Double done diamonds DMLWWLMD DMLWWLMD Wanted to burn this pattern into my mind
So, I really liked the braiding pattern for braid 87, but I didn't feel that I'd gotten enough experience with it in the workshop, or that I'd used materials that really did it justice.
In addition, I doubled the steps of the pattern, creating this 'doubled diamond' braid. The thread is silk thread I bought at the Lacemaker, bundled to 20 threads per strand. There are 16 strands in the braid, though it's very thick so it's only about a half inch wide. I started with 12 feet of thread on each tama, so the braid is 7 feet 8 inches long. I think I have have plenty of experience with this braiding pattern now. It's a bit difficult getting the tension right, but it's just beautiful.
Braid 90 (4'4", May 2010; 2 Dark Blue, 2 Medium Blue, 2 Light Blue, 2 White)
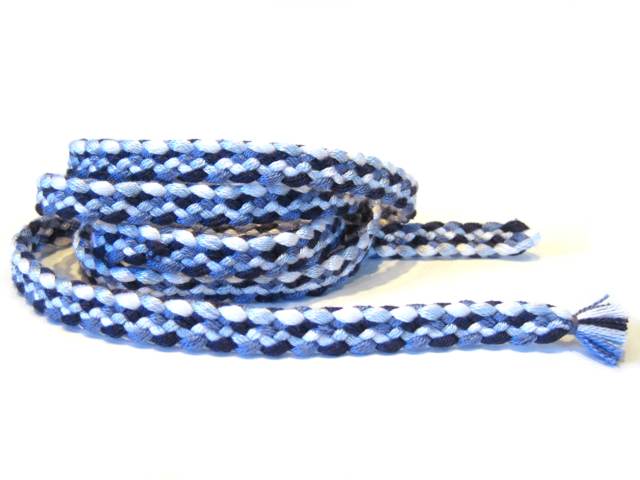 16 ends of silk thread per strand Yatsu Sen Winding Streams WD LM WD LM Using up extra silk with an old favorite
This braid has eight strands braided in the yatsu sen flat braid pattern of eight strands. Each strand of the braid has 16 threads in it. If I'd used this silk in braid 90, it would have had 24 threads per strand instead of just 20. Having only two strands of each color in this braid gives it a nice pebbly pattern. I started with six feet of thread on each bobbin, and the finished braid is about four feet long. You'll also note is has a true blunt end at the start, another trick I learned from Rodrick Owen.
Braid 91 (3'0", May 2010; 2 red, 2 green, 2 black, 2 yellow)
 Eight lengths of telephone wire Creative Kumihimo 8H No named pattern RK YG RK YG Experimenting with materials
Why? Because I was wondering how it would come out. As it happens, I think it's kinda nice. This square braid is very tight, so it curves the wires nicely. The structure of the braid really stands out, and the colors are sharp. The modular plug is glued on, not crimped.
Braid 92 (1'10", June 2010; 4 blue, 4 white)
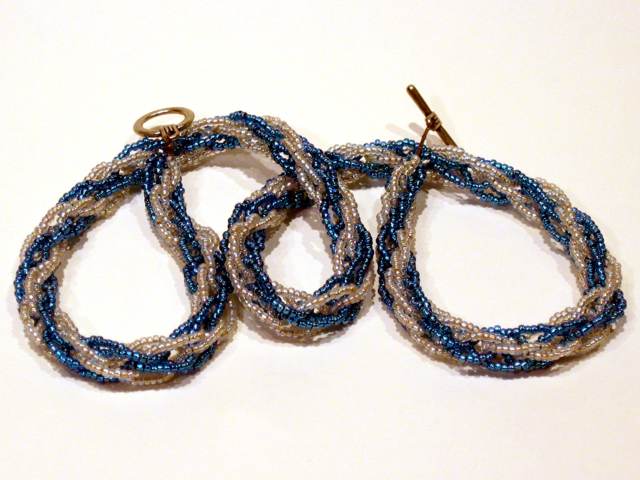 Seed beads on Fireline Kongou Gumi Spiral pattern BB WW BB WW Replacing a bead braid I gifted away
This bead braid is meant to replace the Amethyst Kongou Gumi bead braid in my "stock" pile, which I gave as a birthday present to a good friend. It uses an 8-strand kongou gumi spiralling pattern, which works very well for bead braiding, and is a nice fast and tight braid in general. In the photo, you can't really see the irridescence on both the white and blue beads. Plus the ble beads are really much brighter with some light behind them.
Braid 93 (3'9", August 2010; 4 red, 4 white)
 Bamboo/silk yarn Creative Kumihimo 8H square braid Square S braid Not recorded Demonstration braid
I started this braid so that I could show people at a demo what a braid in progress looks like, and let them try out braiding on the marudai.
As a result, there's an error in there that changes the pattern about halfway through. I can't honestly say if they made the error or if I did, but I'll take responsibility because I didn't unbraid it to remove the error.
The braid istself is the Creative Kumihimo 8H braid I like so much, done up in bamboo/silk yarn, It's only a couple of feet long.
I chose this braid because the movements are identical to a longer braid I'm (still) working on. The braid in progress has 17 strands instead of just 8, though. The 17th strand causes the braid to be a wide, flat braid, though it mintains the twill structure.
Braid 94 (2'2", August 2010; 1 red, 2 white)
 Bamboo/silk yarn Standard 3-strand braid Red on white W R W The most difficult braid is a 3-strand braid done perfectly
One of the younger people in camp at Pennsic this year became interested in the braiding that Sharon and I were doing, and started asking us questions. One series of questions was about the difficulty of various types of braids, and I took the opportunity to toss out a zen parable that you'll inevitably hear if you start studying kumihimo.
The student asked the master, "Master, what is the most difficult braid?" The master responded, "The most difficult braid is a 3-strand braid, done perfectly."One point of that parable is of course that it is most difficult to take care with a task you find trivial, but this student had trouble with it because turned out he'd never done a standard 3-strand braid in his life. I cut off some yarn for him to try, but pretty soon a bunch of us were trying it. I guess it's been at least twenty years since I did this kind of braid. As you can see above, it really is quite difficult to get perfect.
Braid 95 (20'10", October 2010; 8 dark brown, 8 medium brown, 1 light brown)
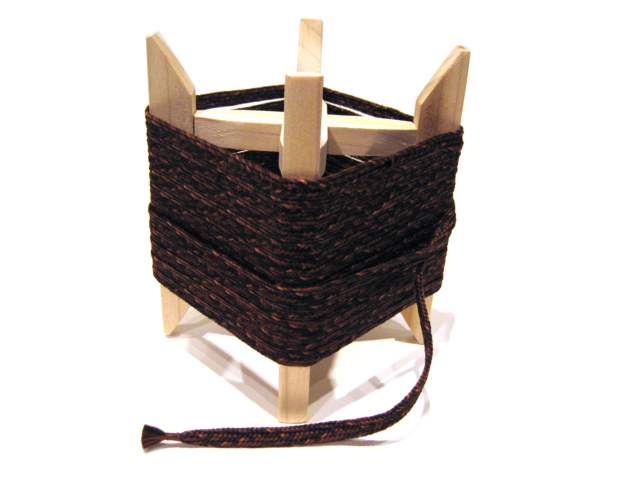 Cotton embroidery floss Roderick Owen's "Taka on Maru" braid Who knows MLD DM DM DM DM DM DM DM An experiment that took way too long to complete
In April 2010, when Sharon and I took a class with Rodrick Owen, I asked him what marudai braid he thought best approximated the type of braids used in Japanese armor. In June, he sent me a pattern for imitating a twill takadai braid on the marudai. I started it soon after, and I finished it up in October.
Yes, I braided this braid (on and off) for five months. It is almost 21 feet long. The braid is a 17 strand braid with a twill structure. I used cotton embroidery floss, in three different colors of brown. I had originally set up the marudai to do a very fast 16 strand braid, but when Mr. Owen sent me this pattern I added one more strand and got going. Wow, now I have a lot of it. I think I have a use for about 12 or 14 feet of it.
The braiding pattern is actually quite simple, much like the square braid pattern I used for braids like braid 93, but the 17th strand allows the braid to open flat. It really should not have taken me this long to complete even this much braid, but I was only working on it part time, and actually did some other braids in between.
I later wound up cutting this braid into three pieces, and using two of them as sleeve lacing in a green linen suikan.
Braid 96 (2'9", January 2011; 4 black, 4 white)
 Bamboo/silk yarn Creative Kumihimo 8H, Kaku Yatsu Vertical stripes KW WK KW WK Example braid for handouts
Braid 97 (2'10", January 2011; 4 black, 4 yellow)
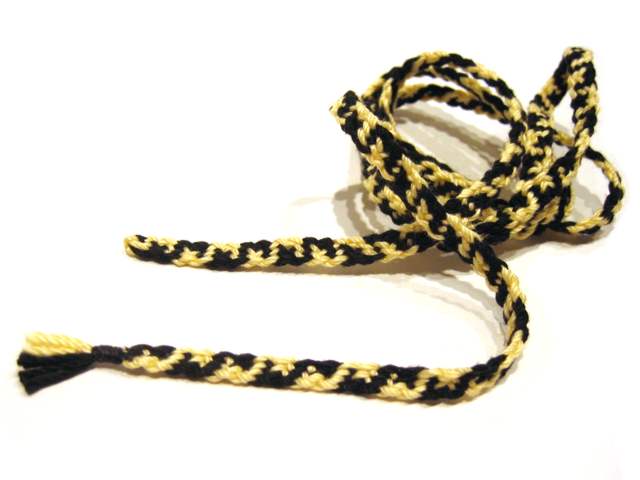 Cotton crochet thread (size 3) Yatsu Rai, Creative Kumihimo 8J S Braid KY YY YK KK Example braid for a class
Braid 98 (2'4", January 2011; 4 red, 4 white)
 Doubled cotton embroidery floss Shige Uchi Shige Nami XX XO OO OX Started as a teaching braid, finished up myself
Braid 99 (3'10", January 2011; 4 red, 4 white)
 Cotton crochet thread (size 3) Shige Uchi, Creative Kumihimo 8G XO XO XO XO More experimenting with this new material
This is more experimentation with cotton crochet thread. I'm not sure I like what it does in a shige uchi braid, the tensions are all wrong and the pattern, which should be nice, gets covered up in places. I don't think this thread is flexible enough for this braid. It should work well for some other braids, though. I just have to find out what those braids are.
Braid 100 (3'0", January 2011; 12 copper, 12 green)
 Combed silk yarn Makiko Tada's Sawagata Gumi (Almost) Copper and green CCCGGGGGGCCC CCCGGGGGGCCC Almost the correct pattern, but I missed some non-illustrated steps.p>I decided to try out Makiko Tada's sawagata gumi using some nice silk yarn I picked up while on vacation in November. The yarn is great. It's more of the "Mulberry Silk" brand I've used before and enjoyed. The braid is a 24-strand monstrosity with five pages of instructions. Unfortunately, those instructions don't actually illustrate all of the movements you're supposed to make. So OK, to begin with it's not right. Next, I did it in installments over the course of three SCA events and four weekends. There are a number of errors. It's difficult to keep track of where you are in five pages of instructions when you're talking to people and packing it up for a week in between sessions. Anyway, so like normal my first try at something isn't perfect. You kind of have to know what you're looking at to know that, so it doesn't bother me too much.
Braid 101 (3'5", March 2011; 8 rust red)
 Polyester embroidery thread, 42 ends per strand Shige Uchi Armor braid (extra heavy) RR RR RR RR Trying out this thread instead of silk thread, used way too much
Braid 102 (3'5", March 2011; 8 rust red)
 Polyester embroidery thread, 24 ends per strand Shige Uchi Armor braid RR RR RR RR More experimentation, closer to silk armor braid.
Braid 103 (3'3", March 2011; 4 red, 4 black)
 20 ends of silk thread per strand Shige uchi Plaid check RB RB RB RB Wanted this for the neck closure of my kariginu
I made this fancy kariginu robe and although I dind't have the time or motivation to make the six yards of lacing needed for the sleeves, I did manage to amke a couple of feet of thick silk braid to make the frog closure at the neck.
Braid 104 (3'2", April 2011; 4 red, 4 black)

4 ends of cotton corchet thread per strand
Creative Kumihimo 8M ("Hira Yatsu")
Solid stripes
WWRR WWRR
First try with this braid. Came out pretty good.
This is an awesome braid, and I'm glad I finally tried it out. I used four threads of cotton crochet thread per strand, so this braid came out nice and hefty. The hira yatsu braid is not as flat as the yatsu sen or hira nami braids. It is much more rectangular in cross-section. Much like the kaku yatsu square braid, it's easy to get vertical stripes running down the braid, and easy to get "rings" or "waves" by using a different arrangement of starting threads.
One of the reasons I took so long to try this braid is that the instructions I have for it make it seem difficult. It's really very easy and fast.
Braid 105 (11'19", April 2011; 4 navy blue, 4 royal blue)
 Thick acrylic yarn Hira Yatsu (CK8M) Rings pattern NR RN NR RN Heavy braid for karabitsu himo
We use the "water karabitsu" quite a bit during the year to haul feast gear and other items to SCA events. As a consequence the decorative cords I bought for it were getting a bit ratty. Luckily, I now know how to make nicer ones.
Both of these are made with a chunky acrylic yarn, so they won't mind getting wet, and are nice and soft. The rectangular braid uses that hira yatsu pattern.
Braid 106 (6'1", April 2011; 4 navy blue, 4 royal blue)
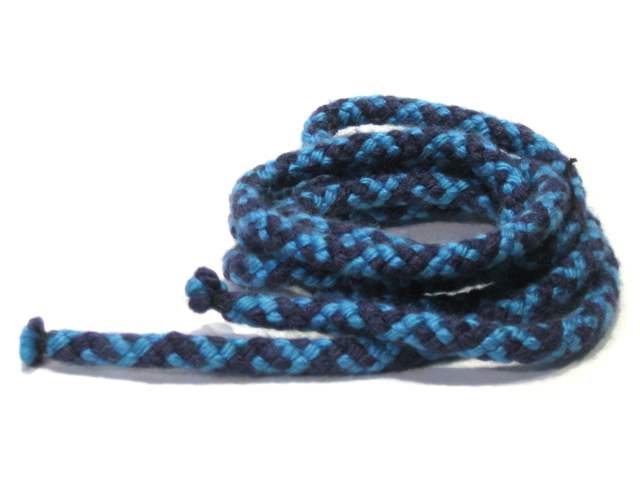 Thick acrylic yarn with a nylon rope core Edo Yatsu "Spiral E" pattern XX XO OX OO Heavy braid for karabitsu handles
The round braid uses that old standby, the edo yatsu pattern, with a core of nylon rope, for strength.
Braid 107 (8'3", April 2011; 4 red, 4 black)
 Nylon paracord Kaku Yatsu (CK8H) Rings RR KK RR KK Two ton kumihimo
After threatening to do this for several years, I actually got around to braiding some paracord. "Parachute Cord" typically has a test weight of 550 pounds, so this 8-strand kaku yatsu braid has a total test weight of around two tons. That should be strong enough to lift the win karabitsu, I should think.
Braid 108 (3'0", May 2011; 4 red, 4 white)
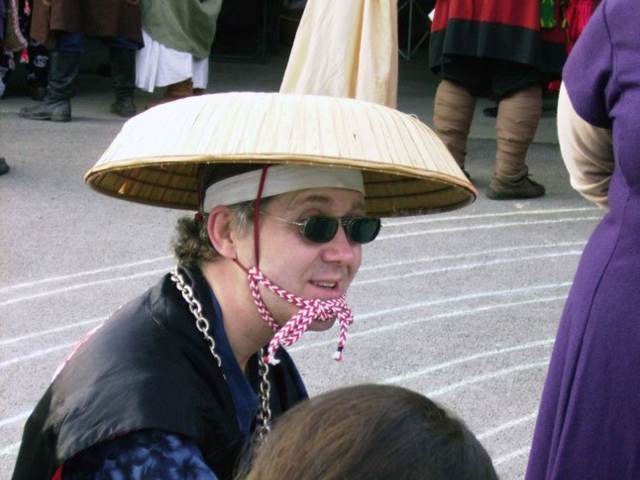 Cotton crochet thread, quadrupled Hira Yatsu (CK8M) Rings RWWR RWWR Gifted to Baron Sir Ogami Akira for use as a chin strap
Sharon and I taught another kumihimo class, this time at Aethelmearc War Practice. I only taught two braids, kaku yatsu and hira kara gumi. Over the course of that weekend, I actually wound up making three braids of kaku yatsu to use up the material I had prepared for class. All three of these are in cotton crochet thread, either three or four threads per strand.
The first one, I wound up gifting to Sir Ogami Akira to use as a chin strap for his hat. He says it's very comfy.
Braid 109 (3'0", May 2011; 4 red, 4 white)
 Cotton crochet thread, tripled Hira Yatsu (CK8M) Rectangular S braid RRRR WWWW THL Cadell discovered this terrific color pattern
THL Cadel Blaidd Dhu tried this color pattern, and I liked it so much that I just had to try it.
Braid 110 (3'0", May 2011; 4 red, 4 white)
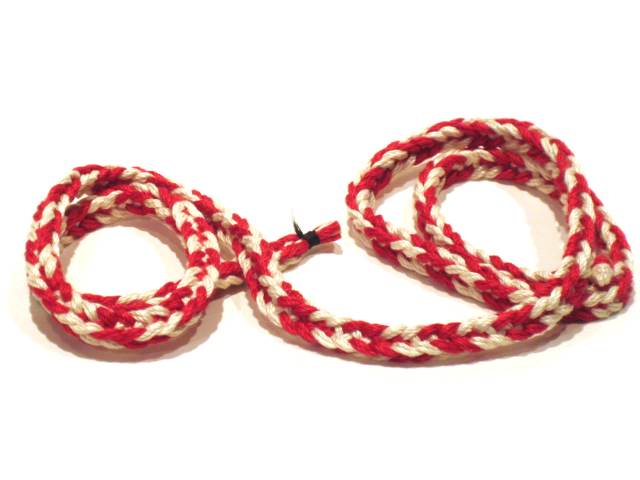 Cotton crochet thread, quadrupled Hira Yatsu (CK8M) Wu-Tang color pattern RRWW WWRR More experimentation with color patterns
I was trying to see if I could get a spiral in this braid, but instead I wound up with this great swoopy figure.
Braid 111 (3'4", from 56"; July 2011; 8 red)
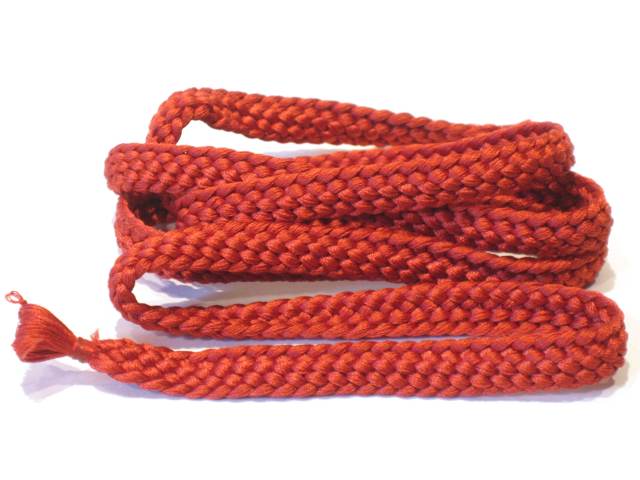 36 threads of polyester embroidery thread per strand Shige Uchi (CK8K) Heavy armor braid RR RR RR RR Perhaps for use in a garb project
I say "perhaps" above, but I knew when I braided this that I wanted to use it for the ties and kotsuyu on my Suoh Sugata project. I also used braid 102, though I cannot remember which was the one that I cut into pieces.
Braid 112 (3'1", from 56"; July 2011; 7 black, 2 white)
 24 threads of rayon embroidery thread per strand True 9-strand Shige Uchi Sageo cord WBB BB BB BW Trying out new material, and this new braid I figured out.
Sageo cords are the cords used to secure the scabbard (saya) of Japanese swords into the waistband of your garment. Looking at photographs, it always seemed like the braids had nine strands, so it took me a while to figure out how to do a flat braid with nine strands. It's essentially the same square braid pattern I used for braid 96 and other braids, but the ninth strand opens up the braid to create a flat braid with the same twill structure.
The material is an intersting embroidery thread that a friend of mine bought off ebay but didn't like. It says "silk" on the package, but the Internet tells me it's actually rayon. It looks good and braids well, so I'm sure I'll find a use for it in future braids.
Braid 113 (3'2", from 56"; July 2011; 7 red, 2 white)
 24 threads of trilobal polyester embroidery thread per strand True 9-strand Shige Uchi Sageo cord WRR RR RR RW Wanted one of these for myself
I gave the first sageo-type braid to the person who gave me the thread, so I wanted one of these for myself. I used polyester embroidery thread, 24 threads per strand.
Braid 114 (3'2", from 56"; July 2011; 7 red, 2 white)
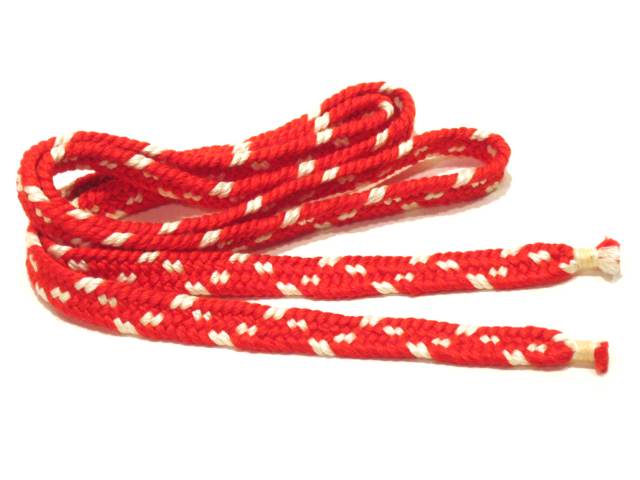 2 plies of combed silk yarn per strand True 9-strand Shige Uchi Sageo cord WRR RR RR RW This time, in silk
I realized that I still had a bunch of this great silk yarn from "Mulberry Silk", so I decided to do another sageo braid, this time in real silk. Since the yarn is thicker, I only had to use two plies of yarn per strand.
Braid 115 (6'6", from 112"; July 2011; 7 red, 2 white)
 3 plies of combed silk yarn per strand True 9-strand Shige Uchi Sageo cord WRR RR RR RW In silk, thicker, and longer
Here's what it looks like if you use three plies of Mulberry Silk yarn per strand. It's also twice as long as the previous braid, since most real sageo appear to be a bit longer than two yards.
Braid 116 (3'6", from 56"; July 2011; 4 red, 13 white)
 1 ply of combed silk yarn per strand Roderick Owen's "Taka on Maru" braid Drips of color RWW WW WW WW WW WW WR RR Only the second time I've done this braid
This braid uses combed silk yarn from "Mulberry Silk" in Rodrick Owen's "Taka on Maru" 17-strand braid. Four red strands twine through 13 white strands. This is the same braid I used for braid 95, but with the higher contrast colors you can see the structure of the braid a little better.
Braid 117 (3'1", from 56"; July 2011; 4 green, 4 gold)
 2 plies of combed silk yarn per strand Kaku Yatsu (CK8H) S Braid NN DD DD NN Trial braid for some gift cords
I wanted to make a gift braid for somebody in SCA's West Kingdom, so I decided to do a silk braid in their kingdom colors of green and gold. I thought this first one came out a little thin with just two plies of yarn per strand.
Braid 118 (3'0", from 56"; July 2011; 4 green, 4 gold)
 4 plies of combed silk yarn per strand Kaku Yatsu (CK8H) S Braid NN DD DD NN Gift cord braid
The second one uses four plies of yarn per strand. Both braids use the kaku yatsu square braid with an S-braid pattern. Both are made of "Mulberry Silk" yarn.
Braid 119 (3'2" from 56"; July 2011; 8 red, 8 white)
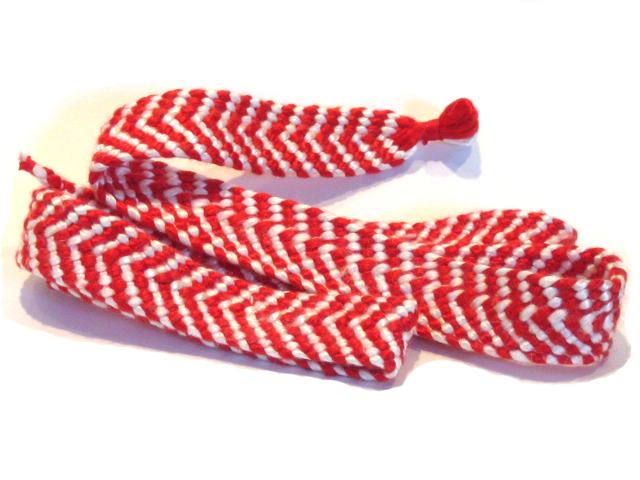 2 plies of crappy silk yarn per strand Hira Nami 16 (CK16L) Wide Chevrons RRRRRRRR WWWWWWWW Wanted to do this braid again, having not since braid 27.
I still have a bunch of the cheap silk yarn that I used for braid 83, so I decided to use a bunch of it up. It's not as smooth as the other silk, it is much fuzzier, so it doesn't make smooth braids. Also, the fibers are shorter so you have to double it up or it untwists and falls apart.
Anyway, I expanded the hira nami braid out to 16 strands, as I haven't done since braid 27. This is actually in Jacqui Carey's Creative Kumihimo as braid 16L, but it's such a straightforward braid that if you know the 8 strand "Flat Braid" from Carey's beginner book, you can figure it out.
Braid 120 (2'4" from 56"; July 2011; 8 red, 8 white)
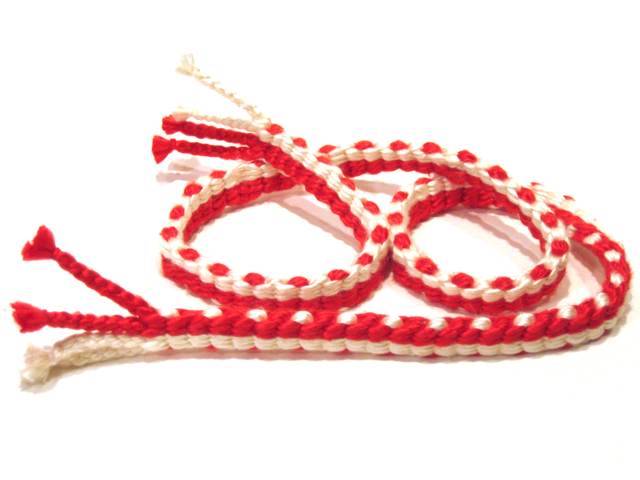 2 plies of crappy silk yarn per strand CK16J Stripes and dots WWWRRR RR RRRWWW WW Not sure I like this braid. It's really more of a weave.
This braid has 16 strands of that cheapo silk yarn again. The structure of this braid is almost a weave; 12 strands go back and forth on the faces, while four strands switch side to side. With the material and weight I used, this makes a heavy silk braid pretty quickly. The fanciest thing I did here was make the braided fringes at both ends.
Braid 121 (3'4" from 56"; August 2011; 8 black, 8 yellow)
 2 plies of cotton crochet thread per strand CK16T One of many houndstooth variations of this braid KKKK YYYY YYYY KKKK Second time trying this braid on this scale
At a recent event, I noticed that the braid I use for the chin strap of my hat was incredibly grimy. A couple of years of use will no doubt do that. I resolved to get a nice, soft braid done by Pennsic for this purpose, and here is what I wound up with. It's a heavy 16 strand round braid that is kind of like two 8 strand braids done on top of each other. I haven't really done this braid since braid 83. It's hollow, so it squishes nicely and stays tied. I made an error part way in that switches the direction of the houndstooth checks. I tried unbraiding to remove the error, but I just couldn't get it.
Braid 122 (2'10" from 48"; August 2011; 8 yellow)
 3 plies of cotton crochet thread per strand Edo Yatsu (CK8F) Solid yellow YY YY YY YY I haven't done this braid in far too long. (Pennsic 40-1)
I did this braid on Saturday night while waiting for Sharon to pick her mom up from the airport. I was going to do this as a black and yellow braid, but I got carried away measuring out the yellow cotton crochet thread and decided to just do that by itself. It's just a simple 8 strand edo yatsu braid.
Braid 123 (Unknown from 72"; August 2011; 4 black, 4 yellow)
3 plies of cotton crochet thread per strand
Hira Yatsu (CK8M)
Wu-Tang color pattern
RRWW WWRR
Gave this away to a kumihimo teacher at Pennsic before I thought to get a picture of it. It is a braid much like Braid 110, only in black and gold instead of red and white. The teacher gave a great class on the history of Kumihimo, including when different styles of braiding were developed. (Pennsic 40-2)
These next two braids were done as part of "Narrow Wares Day" demos on Artisan's Row. We had a bunch of people doing card weaving, whipcording, marudai kumihimo, takadai kumihimo, and the like all day in one of the tents of Pennsic University. I did these two braids because the edo yatsu and yatsu sen braids are so similar in braiding pattern, but produce different shapes. I let people try braiding, but I wound up doing most of them myself.
Braid 124 (3"1" from 56"; August 2011; 4 black, 4 yellow)
 2 plies of cotton crochet thread per strand Edo Yatsu (CK8F) Vertical stripes KY KY KY KY Round demo braid for Narrow Wares Day (Pennsic 40-3)
Braid 125 (3'0" from 56" (also has 2" of edo yatsu at end); August 2011; 4 black, 4 yellow)
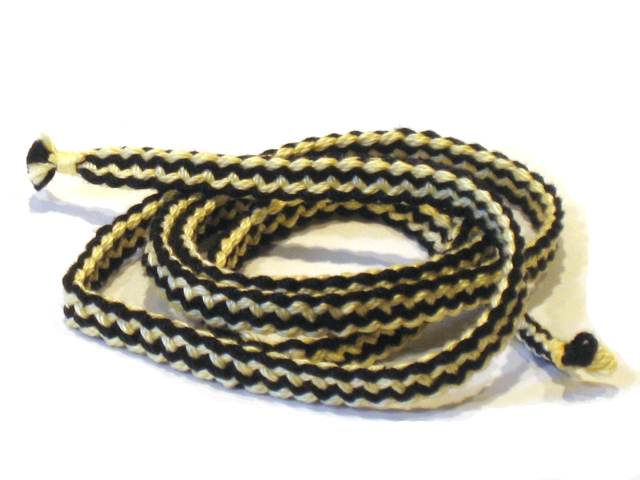 2 plies of cotton crochet thread per strand Yatsu Sen (CK8J) Vertical stripes KY KY KY KY Flat demo braid for Narrow Wares Day (Pennsic 40-4)
Braid 126 (4'0" from 72"; August 2011; 4 red, 4 white)
 3 plies of cotton crochet thread per strand Yatsu Rai (CK8J) S Braid RW WW WR RR Wanted to try a big chunky version of this braid (Pennsic 40-5)
I decided to do this chunky flat braid mostly during Fujinami no Kaede's class. Each strand of this 8 strand yatsu rai braid has four plies of cotton crochet thread in it, so it's fairly heavy. It's not very smooth, but the S pattern is very distinct.
Braid 127 (3'6" from 54"; August 2011; 7 red, 2 white)
 2 plies of cotton crochet thread per strand True shige uchi Sageo cord pattern WRR RR RR RW Let's do another sageo cord! (Pennsic 40-6)
I only had a little bit of the red crochet thread left, so I decided to use it up before the end of Pennsic, and show some people how the 9 strand braid is done.
Braid 128 (3'2" from 56"; August 2011; 7 white, 2 black)
 32 plies of rayon embroidery thread per strand True shige uchi Dots pattern KWK WW WW WW Attempt at scroll suspensory cord
This is another 9 strand "true" shige uchi flat braid, but instead of the color pattern that's common with sageo cords, this one starts the contrasting threads at opposite edges of the braid and has them cross back and forth over each other. I think this might be the braid that I have often seen used to support calligraphy scrolls hanging in museums, but I have not been able to get up close enough to one to be sure. Normally, the scrolls are behind glass and the cords are nine feet off the ground.

I wanted to do a full exploration of all of the possible color patterns of the 8-strand edo yatsu braid. I tried to do them all in similar colors, and identical materials, so that you could actually compare them.
Well OK, so I ran out of yellow thread, and the new thread was a different shade of yellow, and the new thread was a different size, and the tama I used are too light, and the multiple plies of thread made the braid uneven, and I'm not really happy. I put rings at one end, and flattened rings at the other to make simple toggle clasps.
Braid 129 (3'2" from 56"; August 2011; 4 black, 4 yellow)
2 plies of cotton crochet thread per strand
Edo Yatsu
YY YY KK KK
Houndstooth check
Interlacements of Edo Yatsu, Braid A
Braid 130 (3'3" from 56"; August 2011; 4 black, 4 yellow)
2 plies of cotton crochet thread per strand
Edo Yatsu
YK YK YK YK
Vertical stripes
Interlacements of Edo Yatsu, Braid B
Braid 131 (3'3" from 56"; August 2011; 4 black, 4 yellow)
2 plies of cotton crochet thread per strand
Edo Yatsu
YY YK KK KY
Houndstooth check
Interlacements of Edo Yatsu, Braid C
Braid 132 (3'4" from 56"; August 2011; 4 black, 4 yellow)
2 plies of cotton crochet thread per strand
Edo Yatsu
YY KK YY KK
Spiral
Interlacements of Edo Yatsu, Braid D
Braid 133 (3'3" from 56"; August 2011; 4 black, 4 yellow)
2 plies of cotton crochet thread per strand
Edo Yatsu
YY YK KY KK
Sprial E
Interlacements of Edo Yatsu, Braid E
Braid 134 (3'2"; August 2011; 4 black, 4 yellow)
3 plies of cotton crochet thread per strand
Edo Yatsu
YK YK YK KY
Spiral Key
Interlacements of Edo Yatsu, Braid F
Braid 135 (3'4"; August 2011; 4 black, 4 yellow)
2 plies of cotton crochet thread per strand
Edo Yatsu
YK YK KY YK
Spiral Key
Interlacements of Edo Yatsu, Braid G
Braid 136 (3'3"; August 2011; 4 black, 4 yellow)
Edo Yatsu
Not sure now
Houndstooth check
Interlacements of Edo Yatsu, Braid H
Braid 137 (6'0" from 100"; August 2011; 7 black, 2 white)
 2 plies of cotton crochet thread per strand True shige uchi Sageo cord WKK KK KK KW Longer braid, just to practice this braid some more
Most of my work is kind of short. I start out with 56 inches of material because that's a convenient length to measure out for me, and the braid comes out 36 to 45 inches long (depending on the braid). This one's a double-length of material.
Braid 138 (3'2" from 56"; September 2011; 7 red, 2 white)
 2 plies of cotton crochet thread per strand True shige uchi Sageo cord WRR RR RR RW Proposed braid for class. Probably too long.
I was preparing to teach a class on this braid, but many of the tama I have are only about one ounce, so you can't use them to braid lots of material. I tried out making a somewhat light version of this braid with the light tama, and it came out OK. It came out way too long for beginners to finish in one day, though, so when I taught the class I wound up using half-lengths of material.
Braid 139 (3'2" from 56"; September 2011; 3 white, 3 red, 3 black)
 3 plies of cotton crochet thread per strand True shige uchi WRK KR RK WW Want to try this in three colors. I really like it this way.
One interesting thing about this being a 9-strand braid is that it can handle three colors evenly. It took some figuring to get the colors in the right places at the start, but I managed to work it out and I really like the result. This will come in handy, I'm sure.
I had given away most of the bead braids I made in 2010, so my "stock" was running pretty low. I bought a bunch of beads in the spring, but I was too busy doing other things to make braids with them. That problem, at least, was solved by this next stretch of braids.
Braid 140 (2'0"; September 2011; 4 red, 4 black)
 Miyuki 11/0 seed beads (141F and 401F) and 10lb. Fireline Hira Yatsu Rings KR RK KR RK First bead braid in a while
Braid 141 (1'10"; September 2011; 4 red, 4 clear)
 Miyuki 11/0 seed beads (11 and 1001) and 10lb. Fireline Kaku Yatsu Rings RW RW RW RW A little short on the clear beads for some reason.
Braid 142 (2'0"; October 2011; 4 black iridescent, 4 frosted iridescent)
 Miyuki 11/0 seed beads (454 and 135FR) and 10lb. Fireline Maru Yotsu and Edo Yatsu Edo Yatsu is Houndstooth Check II FF II FF New type of closure, with captive donut bead
Braid 144 (2'0"; October 2011; 4 black, 4 gold)
 Miyuki 11/0 seed beads (401F and 457) and 8lb. Fireline Edo Yatsu Spiral E KK KG GK GG These black and gold braids are pretty popular as gifts.
Braid 145 (2'0"; October 2011; 4 transparent violet, 4 transparent yellow)
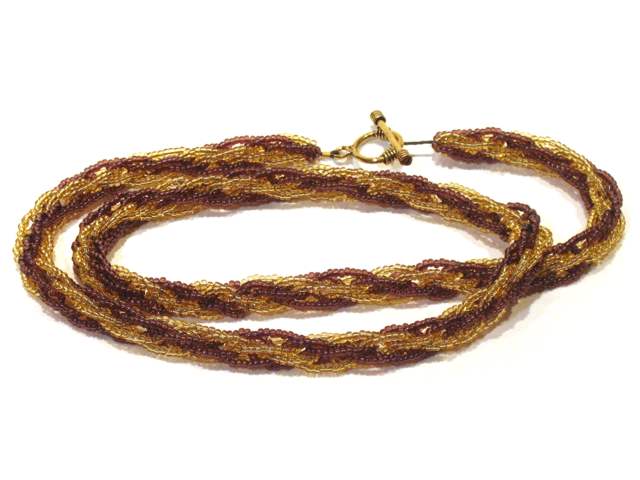 Miyuki 11/0 seed beads (153 and 132) and 8lb. Fireline Kongou Long Spiral VV YY VV YY Another try at red wine / white wine
Braid 146 (2'0"; October 2011; 4 silver-lined violet, 4 silver-lined green)
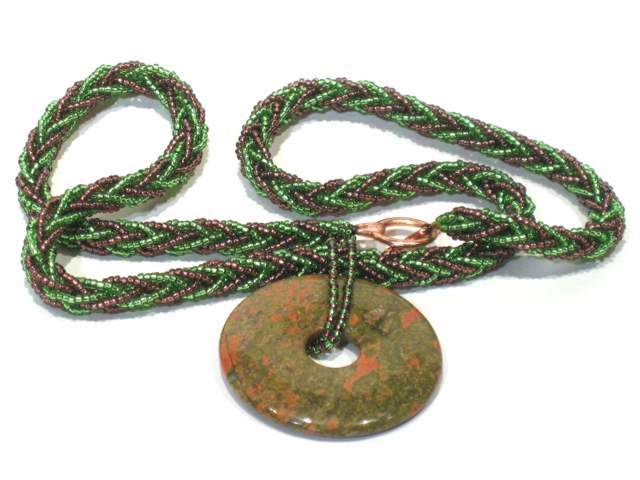 Miyuki 11/0 seed beads (13 and 15) and 8lb. Fireline Kaku Yatsu Rings VV GG VV GG Loved the other one in these colors
Braid 143 (1'6"; October 2011; 8 white, 12 black)
 4 plies of cotton crochet thread per strand 20-strand version of CK 16J Checkerboard WWWWKKKK KK WWWWKKKK KK Trying this out for the kumi2 mailing list
Braid 147 (2'11", from 56"; October 2011; 8 red, 8 white)
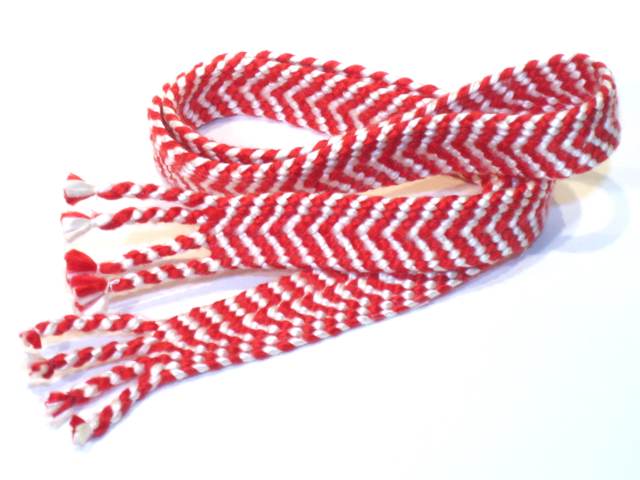 Two plies of silk knitting yarn per strand Hira Nami Chevrons RRRRRRRR WWWWWWWW The sequel to braid 88, this time in 16
Braid 148 (5'9", from 119"; October 2011; 8 gold, 16 green)
 Three plies of silk lace-weight yearn per strand Kyo Kara Laurel leaves YGGYGGGGYGGY YGGYGGGGYGGY Gift braid for a friend receiving her SCA Laurel
I'd been wanting to make a bunch of medallions cords for the local SCA kingdom, and I'd been wanting to work my way through all 13 of the 8-strand braids in Jacqui Carey's book, "Creative Kumihimo", so I decided to combine these two missions. Some of those braids I had done a dozen or more times (probably 6 dozen for 8K), but at least one of them I had only done once before, and maybe two of them never before. It was fun to work my way through all 13 of these braids (in order, naturally), and instructive in a Mr. Miyagi kind of way.
Braid 149 (2'8", from 50"; October 2011; 4 red, 4 white)
 Four plies of #10 cotton crochet thread per strand (CK8A) Vertical stripes R W R W R W R W Braid #1 of the Creative Kumihimo project
Braid 150 (2'9", from 50"; October 2011; 4 red, 4 white)
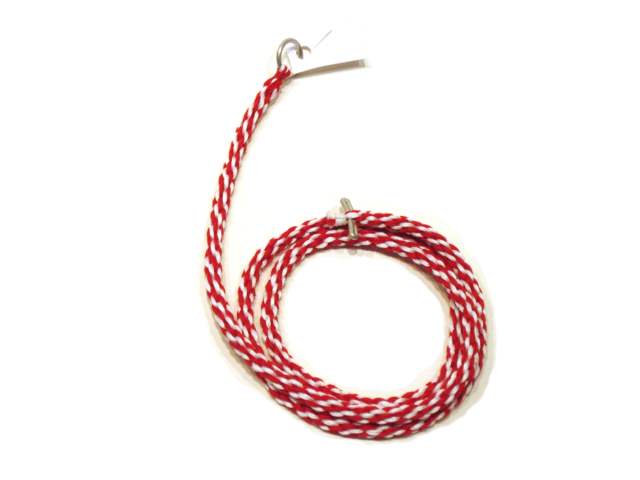 Four plies of #10 cotton crochet thread per strand Kongo (CK8B) No special name RW RW RW RW Braid #2 of the Creative Kumihimo project
Braid 151 (2'11", from 50"; November 2011; 4 red, 4 white)
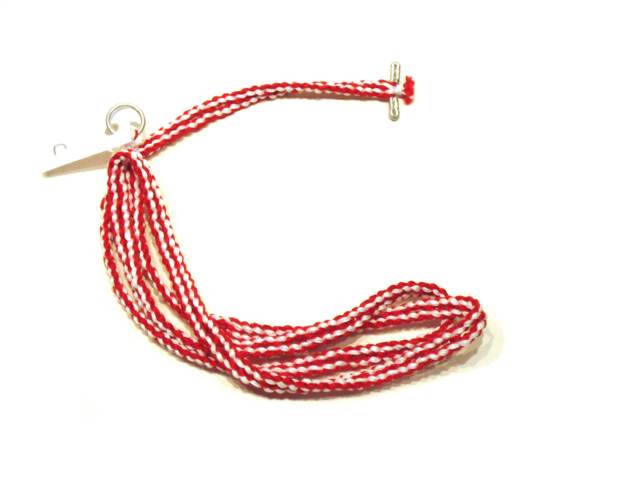 Four plies of #10 cotton crochet thread per strand (CK8C) No special name RW RW RW RW Braid #3 of the Creative Kumihimo project
Braid 152 (2'9", from 50"; November 2011; 4 red, 4 white)
 Four plies of #10 cotton crochet thread per strand (CK8D) No special name RW RW RW RW Braid #4 of the Creative Kumihimo project
Braid 153 (2'10", from 50"; November 2011; 4 red, 4 white)
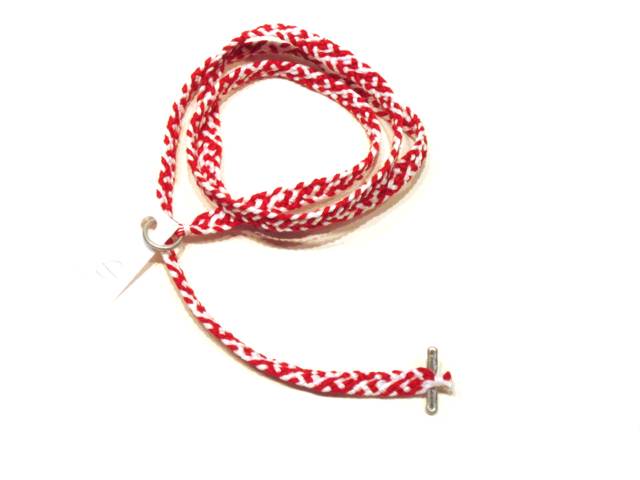 Four plies of #10 cotton crochet thread per strand Hira Nami (CK8E) No special name RWRW RWRW Braid #5 of the Creative Kumihimo project
Braid 156 (2'9", from 50"; November 2011; 4 red, 4 white)
 Four plies of #10 cotton crochet thread per strand Edo Yatsu (CK8F) Vertical stripes RW RW RW RW Braid #6 of the Creative Kumihimo project
Braid 157 (2'11", from 50"; November 2011; 4 red, 4 white)
 Four plies of #10 cotton crochet thread per strand Shige Uchi (CK8G) No special name RW RW RW RW Braid #7 of the Creative Kumihimo project
Braid 158 (2'9", from 50"; November 2011; 4 red, 4 white)
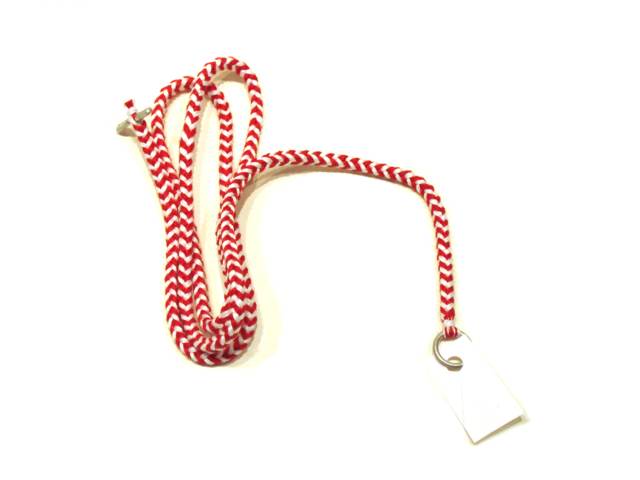 Four plies of #10 cotton crochet thread per strand Kaku Yatsu (CK8H) Rings RW RW RW RW Braid #8 of the Creative Kumihimo project
Braid 159 (2'11", from 50"; November 2011; 4 red, 4 white)
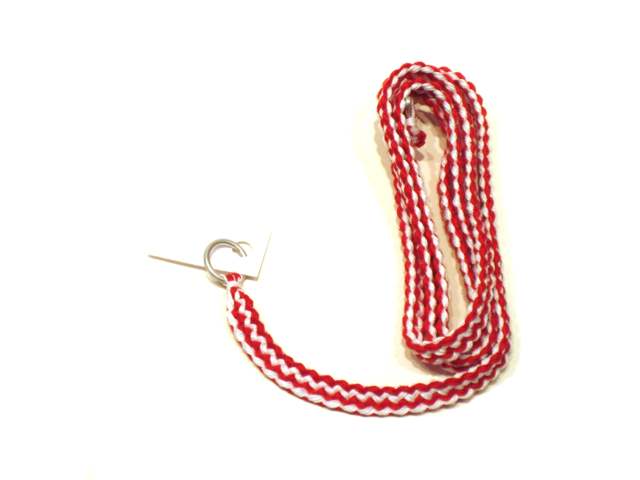 Four plies of #10 cotton crochet thread per strand Yatsu Sen (CK8J) Eight Streams RW RW RW RW Braid #9 of the Creative Kumihimo project
Braid 160 (2'8", from 50"; November 2011; 4 red, 4 white)
 Four plies of #10 cotton crochet thread per strand Hira Kara Gumi (CK8K) No special name RW RW RW RW Braid #10 of the Creative Kumihimo project
Braid 161 (2'10", from 50"; December 2011; 4 red, 4 white)
 Four plies of #10 cotton crochet thread per strand (CK8L) No special name RW RW RW RW Braid #11 of the Creative Kumihimo project
Braid 162 (2'10", from 50"; December 2011; 4 red, 4 white)
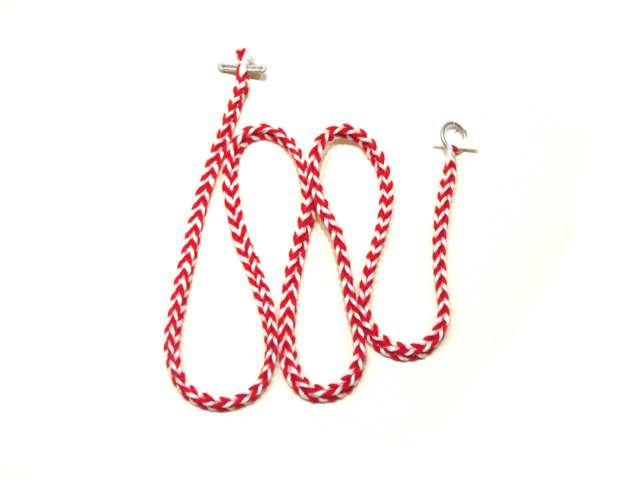 Four plies of #10 cotton crochet thread per strand (CK8M) No special name RW RW RW RW Braid #12 of the Creative Kumihimo project
Braid 163 (2'7", from 50"; December 2011; 4 red, 4 white)
 Four plies of #10 cotton crochet thread per strand (CK8N) No special name RW RW RW RW Braid #13 of the Creative Kumihimo project
Braid 154 (5'3", from 120" and 144"; November 2011; 8 black, 4 red, 8 gold, 4 white)
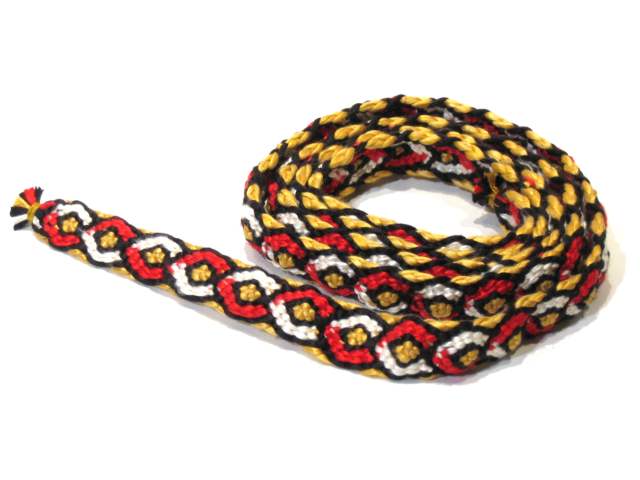 Silk yarn of various types Kyo Kara Twined colors BRRBGGGGBWWB BRRBGGGGBWWB Gift braid for another friend receiving her SCA Laurel
Braid 155 (5'3" from 114"; November 2011; 4 red, 4 white)
 Two plies of silk knitting yarn per strand Hira Nami Chevrons Long story, extra yarn from braid 154
Braid 164 (8'1", from 144"; December 2011; 7 black, 2 yellow)
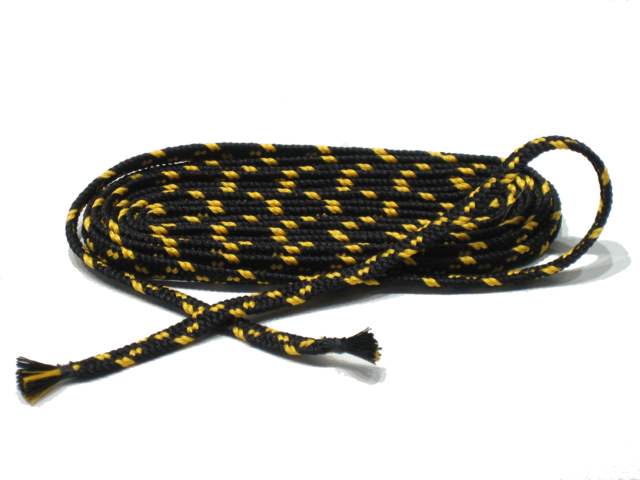 24 plies of polyester machine embroidery thread per strand 9-strand true shige uchi Sageo type KYY KK KK KK 24 plies is not thick enough
Braid 165 (2'9", from 49"; December 2011 ; 7 green, 2 yellow)
 24 plies of lace weight silk yarn per strand 9-strand true shige uchi Sageo type GYY GG GG GG Maybe it's a West Kingdom medallion cord.
Braid 166 (3'0", from 53"; December 2011; 4 green, 4 yellow)
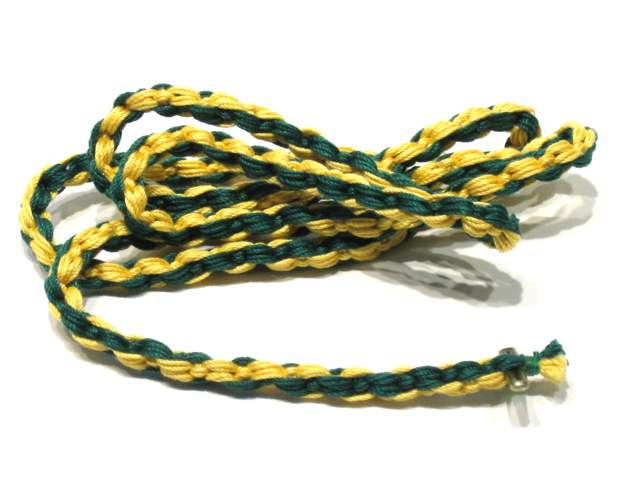 4 plies of #10 cotton crochet thread per strand CK8N No special name YY GG YY GG Third time for this braid, West Kingdom colors.
Braid 167 (3'0" from 53"; December 2011; 4 green, 4 yellow)
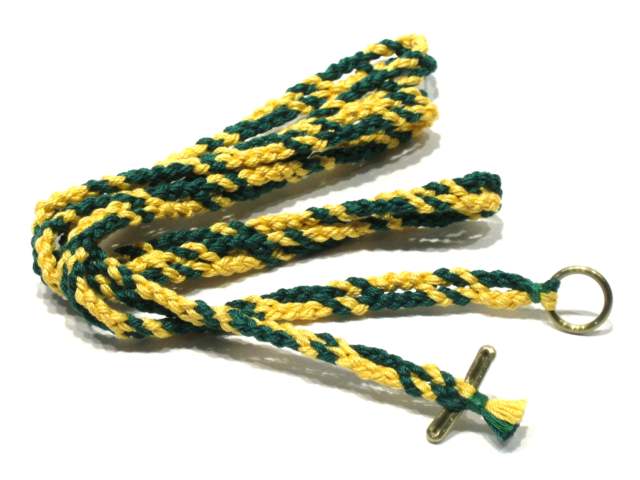 4 plies of #10 cotton crochet thread per strand CK8C Crossing streams YY GG GG YY Second time for this braid, West Kingdom colors.
Braid 168 (3'0" from 53"; December 2011 ; 2 green, 7 yellow)
 4 plies of #10 cotton crochet thread per strand 9-strand true shige uchi Sageo type YGG YY YY YY Maybe another medallion cord
Braid 169 (from 53"; January 2012; 4 black, 4 yellow)
4 plies of #10 cotton crochet thread per strand
CK8G
Spiral E pattern
KK YK KY YY
Striking results from this experimental medallion cord
Gave this one away before getting a picture.
Braid 170 (from 53"; January 2012; 4 green, 4 yellow)
4 plies of #10 cotton crochet thread per strand
Edo Yatsu
Spiral E pattern
KK YK KY YY
So I could show what the previous colorway looks like on a different braid
Gave this one away before getting a picture.
Braid 171 (from 53"; January 2012; 7 green, 2 yellow)
4 plies of #10 cotton crochet thread per strand
9-strand true shige uchi
Sageo type
GYY GG GG GG
Medallion cord for trip to West Kingdom
Gave this one away before getting a picture.
Braid 172 (from 53"; January 2012; 7 yellow, 2 green)
4 plies of #10 cotton crochet thread per strand
9-strand true shige uchi
Sageo type
YGG YY YY YY
Medallion cord for trip to West Kingdom
Gave this one away before getting a picture.
Braid 173 (3'0" from 53"; January 2012; 7 black, 2 yellow)
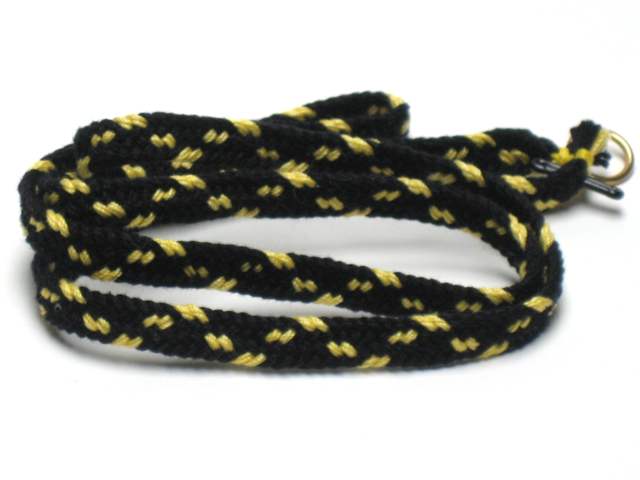 4 plies of #10 cotton crochet thread per strand 9-strand true shige uchi Sageo type KYY KK KK KK Medallion cord
Braid 174 (3'1" from 53"; January 2012; 7 yellow, 2 black)
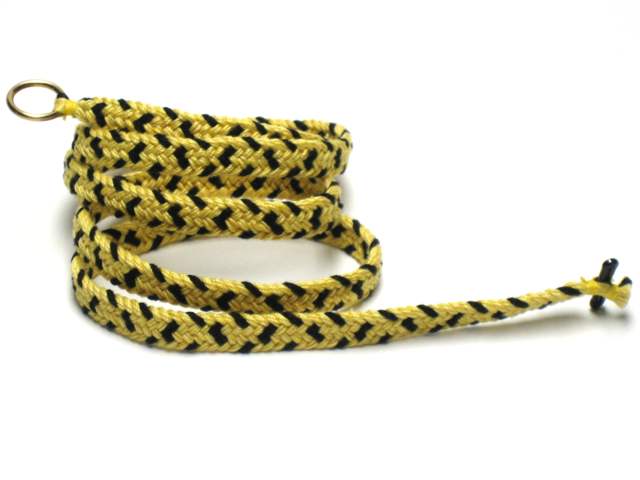 4 plies of #10 cotton crochet thread per strand 9-strand true shige uchi Dots and Vs KKY YY YY YY Medallion cord
Braid 175 (3'0" from 53"; January 2012; 6 green, 2 yellow)
 4 plies of #10 cotton crochet thread per strand CK8C Snakes on vines YGGG GGGY Last of the prepared vacation material
Braid 176 (2'11" from 53"; January 2012; 8 red, 8 white)
 3 plies of #10 cotton crochet thread per strand CK16A Zig-zag spiral RRRR RRRR WWWW WWWW Braid #14 of the Creative Kumihimo project
Braid 177 (2'10" from 53"; February 2012; 8 red, 8 white)
 3 plies of #10 cotton crochet thread per strand CK16B Long Double spiral RR WW WW RR RR WW WW RR Braid #15 of the Creative Kumihimo project
Braid 178 (2'2" from 53"; February 2012; 8 red, 8 white)
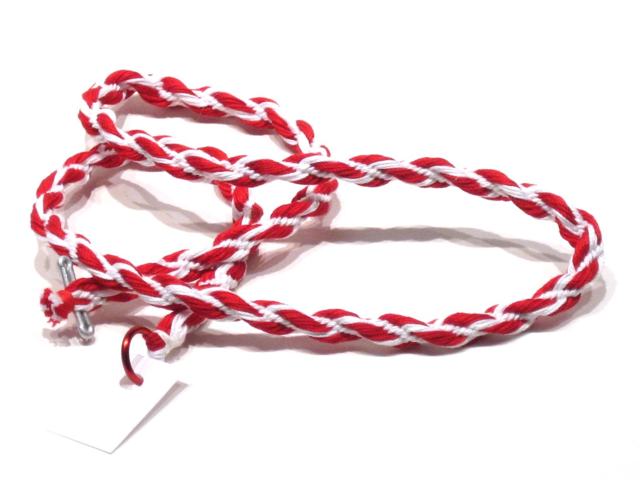 3 plies of #10 cotton crochet thread per strand CK16C . WRRRRW WW WRRRRW WW Braid #16 of the Creative Kumihimo project. Side threads used up much faster. Decreased weight bag by 1.5 ounces.
Braid 179 (2'11" from 53"; February 2012; 8 red, 8 white)
 3 plies of #10 cotton crochet thread per strand CK16D Rings WRRRRW WW WRRRRW WW Braid #17 of the Creative Kumihimo project.
Braid 180 (2'9" from 53"; February 2012; 8 red, 8 white)
 3 plies of #10 cotton crochet thread per strand CK16E Zig zag spiral WW WW RR RR RR RR WW WW Braid #18 of the Creative Kumihimo project.
Braid 181 (2'9" from 53"; February 2012; 8 red, 8 white)
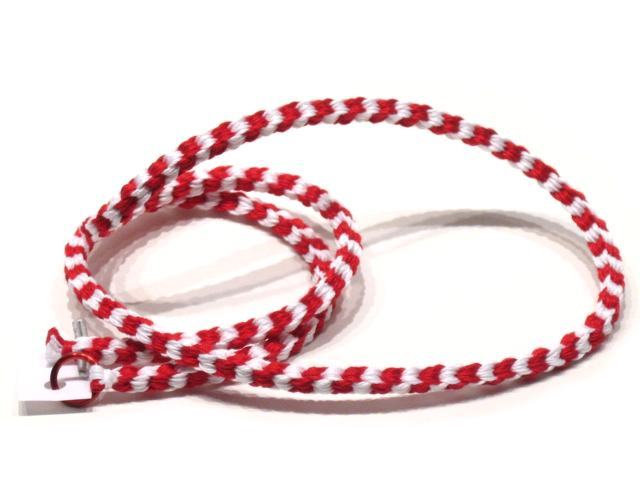 3 plies of #10 cotton crochet thread per strand CK16F Square spiral WW WW RR RR RR RR WW WW Braid #19 of the Creative Kumihimo project.
Braid 182 (2'5" from 53"; February 2012; 8 red, 8 white)
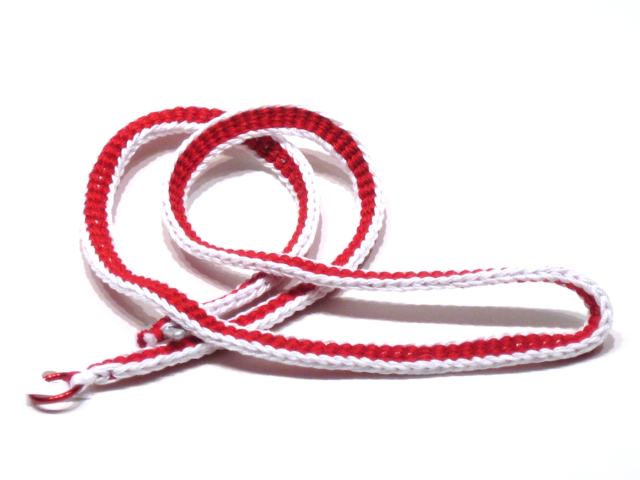 3 plies of #10 cotton crochet thread per strand CK16G Center and edges WW WW RR RR RR RR WW WW Braid #20 of the Creative Kumihimo project.
Braid 183 (3'0" from 53" and 63"; March 2012; 8 red, 8 white)
 3 plies of #10 cotton crochet thread per strand CK16H V-edges and center WRRRRW WW WRRRRW WW Braid #21 of the Creative Kumihimo project.
Braid 184 (3'0" from 53"; March 2012; 4 black, 4 gold)
 4 plies of #10 cotton crochet thread per strand CK8G Shige Uchi Spiral-E KK YK KY YY This color pattern produces an attractive effect in this braid
Braid 185 (2'11" from 53"; March 2012; 4 red, 4 white)
 4 plies of #10 cotton crochet thread per strand Edo Yatsu Vertical stripes RW RW RW RW Filling in time on vacation
Braid 186 (2'10" from 53"; March 2012; 4 black, 4 gold)
 4 plies of #10 cotton crochet thread per strand Hira Nami Plaid-like KKYY YYKK Plaid instead of chevrons is a nice way to use this pattern
Braid 187 (7'0" and 14" from 14' and 16.5'; March 2012; 8 black, 8 gold, 4 white, 4 red)
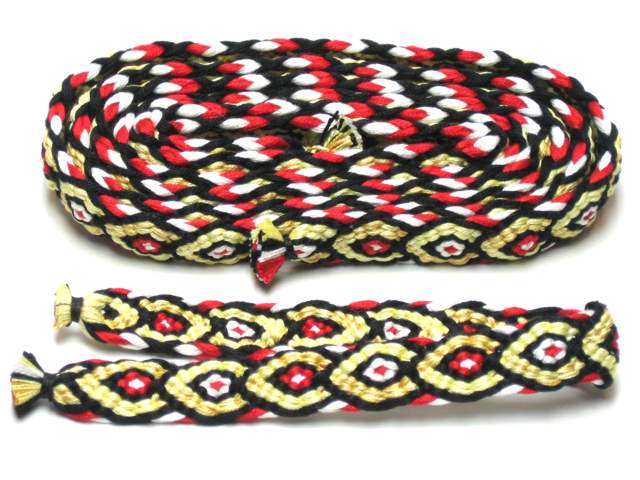 24 plies of 20/2 silk yarn per stand Kyo Kara Knight of Aethelmearc KGGKWRRWKGGK KGGKWRRWKGGK Whites and reds are 20% longer to compensate for uptake
Braid 188 (2'6" from 40"; March 2012; 8 red, 8 white)
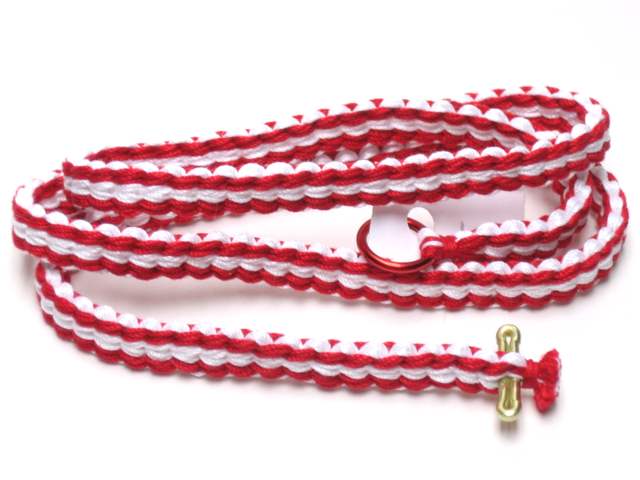 3 plies of #10 cotton crochet thread per strand CK16J Thick vertical stripes RRRRWWRRRR WW RRRRWWRRRR WW Made the side threads long, but still came up short
Braid 189 (3'1" from 53"; April 2012; 8 red, 8 white)
 3 plies of #10 cotton crochet thread per strand CK16K . RRRRWWRRRR WW RRRRWWRRRR WW Took me two tries and the Internet to get this one right
Braid 190 (2'11" from 53"; April 2012; 4 black, 4 yellow)
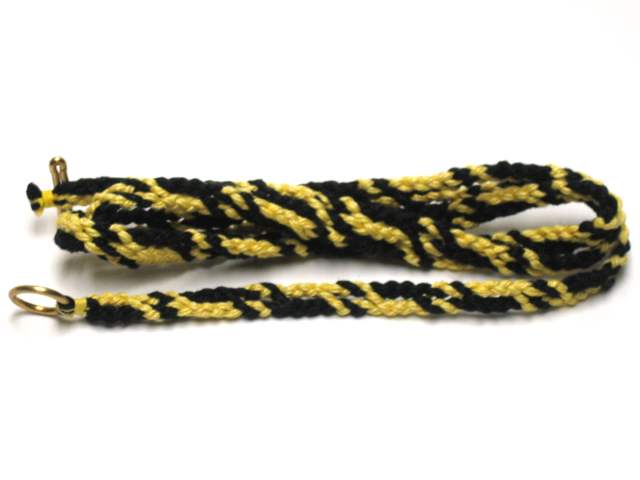 4 plies of #10 cotton crochet thread per strand CK8C Side to side KKYY YYKK Medallion cord or whatever
Braid 191 (1'0" from 36"; April 2012; 16 black, 16 red)
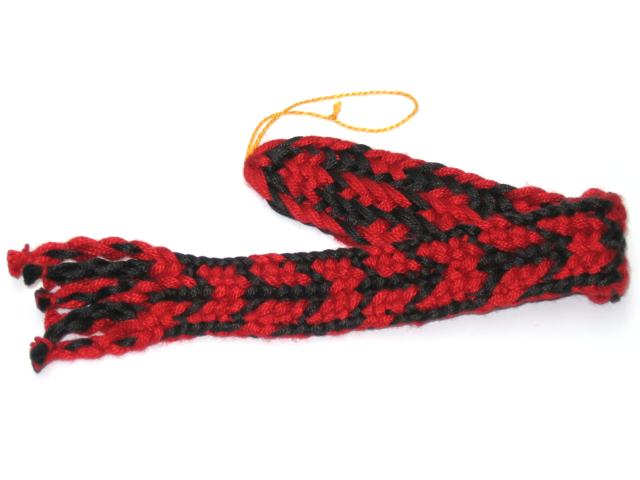 8 plies of tencel weaving yard per strand Rodrick Owen / Michael Hattori kikko gumi pattern Messed up even colors . Third time lucky, short braid for along time braiding
Braid 192 (3'0" from 72"; April 2012; 12 black, 12 gold)
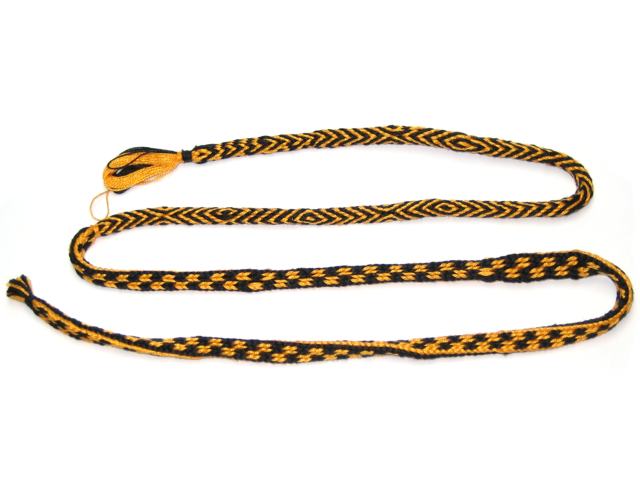 4 plies of tencel weaving yarn per strand Rodrick Owen handout, ROB38, ROB39, ROB31 Various patterns Various color patterns Second class braid for Rodrick Owen workshop.
Braid 193 (2'11" from 53"; April 2012; 4 black, 4 yellow)
 4 plies of #10 cotton crochet thread per strand Hira Nami Hidden quadrants KKYY KKYY Medallion cord, getting back into the swing.
Braid 194 (2'11" from 53"; April 2012; 8 red, 8 white)
 3 plies of #10 cotton crochet thread per strand CK16L Hidden quadrants RRRRWWWW RRRRWWWW A full execution of this color pattern
Braid 195 (2'7" from 53"; May 2012; 8 red, 8 white)
 3 plies of #10 cotton crochet thread per strand CK16M Trapezoidal chevrons RRRR WWWW RRRR WWWW Braid #25 of the Creative Kumihimo project.
Braid 196 (2'0" from 36"; May 2012; 6 black, 3 white)
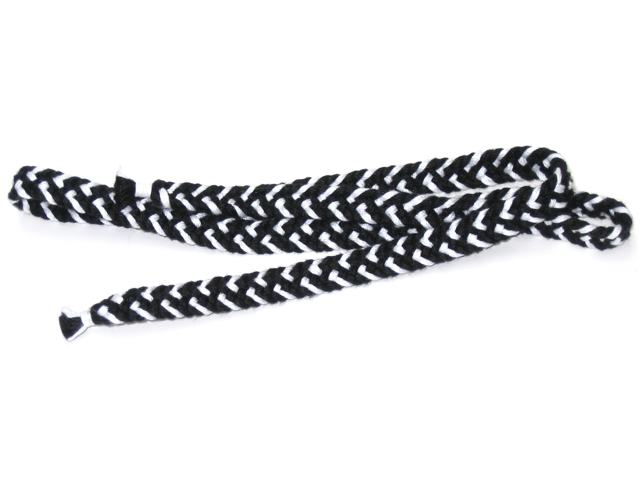 4 plies of #10 cotton crochet thread per strand True Shige Uchi Triple zipper KKW KK wK WK Test braid for this color pattern
Braid 197 (3'0" from 53"; May 2012; 8 red, 8 white)
 3 plies of #10 cotton crochet thread per strand CK16N Vertical stripes WR WR WR WR WR WR WR WR Braid #26 of the Creative Kumihimo project.
Braid 198 (2'7" from 53"; May 2012; 8 red, 8 white)
 3 plies of #10 cotton crochet thread per strand CK16P Inner color WR WR WR WR WR WR WR WR Braid #27 of the Creative Kumihimo project.
Braid 199 (2'8" from 53"; May 2012; 8 red, 8 white)
 3 plies of #10 cotton crochet thread per strand CK16Q . RRWRRR RR WWRWWW WW Braid #28 of the Creative Kumihimo project.
Braid 200 (2'2" from 53"; June 2012; 8 red, 8 white)
 3 plies of #10 cotton crochet thread per strand CK16R Solid with solid edges RRWWWWRR RRWWWWRR Braid #29 of the Creative Kumihimo project.
Braid 201 (7'4" from 122"; June 2012; 7 red, 2 white)
 8 plies of 20/2 silk yarn per strand 9-strand true shige uchi Sageo type RWW RR RR RR Gift braid for a friend
Braid 202 (2'6" from 53"; June 2012; 8 red, 8 white)
 3 plies of #10 cotton crochet thread per strand CK16S Solid with solid edges WRRRRW WW WRRRRW WW Braid #30 of the Creative Kumihimo project.
Braid 203 (3'0" from 53"; July 2012; 8 red, 8 white)
 3 plies of #10 cotton crochet thread per strand CK16T Hurricane diamonds WRWW RRRW RRWW RWRW Braid #31 of the Creative Kumihimo project.
Braid 204 (2'10" from 53"; July 2012; 8 red, 8 white)
 3 plies of #10 cotton crochet thread per strand CK16U RIngs WRRW WRRW WRRW WRRW Braid #32 of the Creative Kumihimo project.
Braid 205 (2'6" from 53"; July 2012; 8 red, 8 white)
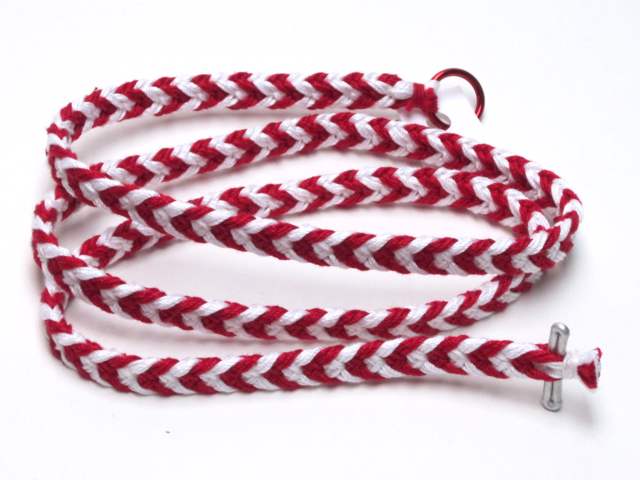 3 plies of #10 cotton crochet thread per strand CK16V Wings WWWW RRRR WWWW RRRR Braid #33 of the Creative Kumihimo project.
Braid 206 (2'11" from 53"; July 2012; 8 red, 8 white)
 3 plies of #10 cotton crochet thread per strand CK16W Wu-Tang WWWW WWRR RRRR RRWW Braid #34 of the Creative Kumihimo project.
Braid 207 (3'1" from 53"; July 2012; 8 red, 8 white)
 3 plies of #10 cotton crochet thread per strand CK16X Long cvevrons WWWW WWRR RRRR RRWW Braid #35 of the Creative Kumihimo project.
Braid 208 (2'11" from 53"; July 2012; 8 red, 8 white)
 3 plies of #10 cotton crochet thread per strand CK16Y Side to Side WWRR RRRR RRWW WWWW Braid #36 of the Creative Kumihimo project.
Braid 209 (2'11" from 53"; July 2012; 8 red, 8 white)
 3 plies of #10 cotton crochet thread per strand CK16Z Space Invaders RRRR WWWW RRRR WWWW Braid #37 of the Creative Kumihimo project.
Braid 210 (2'10" from 53"; July 2012; 8 red, 8 white)
 3 plies of #10 cotton crochet thread per strand CK16AA Side to side RRRR WWWW WWWW RRRR Braid #38 of the Creative Kumihimo project.
Braid 211 (2'11" from 53"; August 2012; 8 red, 8 white)
 3 plies of #10 cotton crochet thread per strand CK16AB Vertical stripes RRWW RRWW RRWW RRWW Braid #39 of the Creative Kumihimo project.
Braid 212 (2'2" from 53"; August 2012; 8 red, 8 white)
 3 plies of #10 cotton crochet thread per strand CK16AC . RRWWRR WR WWRRWW RW Braid #40 of the Creative Kumihimo project.
Braid 213 (2'8" from 53"; August 2012; 8 red, 8 white)
 3 plies of #10 cotton crochet thread per strand CK16AD . W RRR R WWW W RRR R Last braid (#41) of the Creative Kumihimo project.
Braid 214 (2'11" from 53"; August 2012; 4 red, 4 white)
 4 plies of #10 cotton crochet thread per strand Hira Nami Chevrons WWWW RRRR Filling in time during the Pennsic 41 A+S display
Braid 215 (3'1" from 53"; August 2012; 4 black, 4 yellow)
 1 ply of #10 cotton crochet thread per strand Edo Yatsu Spiral key KK YK KY YY Filling in time during the Pennsic 41 A+S display
Braid 216 (10'1" from 192"; September 2012; 7 red, 2 black)
 8 plies of 3/30 silk thread per strand True 9-strand shige uchi Sageo type RKK RR RR RR Braid for sleeve cord on the red kariginu
Braid 217 (10'1" from 192"; September 2012; 7 red, 2 black)
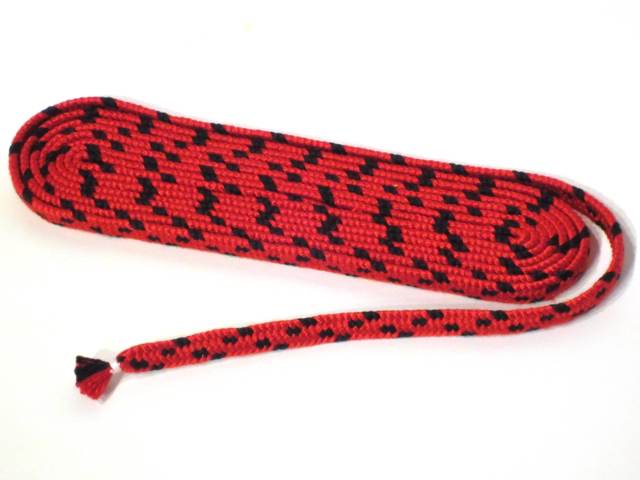 8 plies of 3/30 silk thread per strand True 9-strand shige uchi Sageo type RKK RR RR RR Another braid for sleeve cord on the red kariginu
Braid 218 (2'11" from 53"; October 2012; 7 green, 2 gold)
 24 plies of lace weight silk yarn per strand True 9-strand shige uchi Sageo type GYY GG GG GG A medallion cord for a Laurel
This might be kind of heavy on the thread.
Braid 219 (1'4"; October 2012; 4 violet, 4 lavender, 4 blue, 4 light blue)
 3 plies of cotton crochet thread per strand 16-strand expansion of CK8C Crossing streams BBIIVVAA AAVVIIBB An interesting experiment
Braid 8C is the only 8-strand braid in Jacqui Carey's Creative Kumihimo that is not expanded to 16-strands, so I figured out what I thought that should look like and tried it out. This braid sat on my marudai languishing for weeks until it suffered an unfortunate occurrence and I declared it complete at this short length.
Braid 220 (3'4"; October 2012; 4 red, 4 white)
 1 ply of 1/8 inch suede lace per strand Hira Nami Chevrons RRRR WWWW Trying to meet a 'leatherworking' requirement
Braid 221 (3'11" from 72"; December 2012; 12 gold, 4 green)
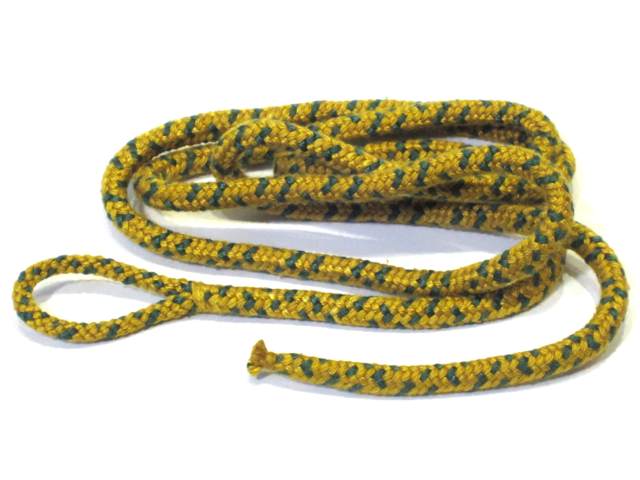 8 ends of silk thread per green strand, 5 ends of silk yarn per gold strand CK16T No special name OGGO OOOO GOOG OOOO Decorative cord for hitatare
Braid 222 (4'0" from 72"; December 2012; 12 gold, 4 green)
 8 ends of silk thread per green strand, 5 ends of silk yarn per gold strand CK16T No special name OGGO OOOO GOOG OOOO Decorative cord for hitatare
Braid 223 (6'5" from 120"; January 2013; 12 gold, 4 green)
 8 ends of silk thread per green strand, 5 ends of silk yarn per gold strand CK16L No special name OOOOOOGG GGOOOOOO Decorative cord for hitatare sleeve end
Braid 224 (3'0"; February 2013; 4 gold, 4 black)
 4 ends of #10 cotton crochet thread per strand Edo Yatsu (CK8F) Spiral E GG KG GK KK Vacation braid #1
Braid 225 (3'0"; February 2013; 4 gold, 4 black)
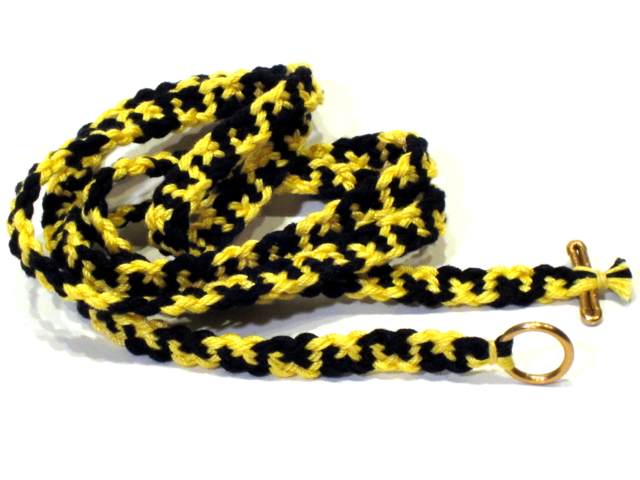 4 ends of #10 cotton crochet thread per strand Yatsu Rai (CK8J) S-braid GK KK KG GG Vacation braid #2
Braid 226 (2'11"; February 2013; 4 gold, 4 black)
 4 ends of #10 cotton crochet thread per strand Hira Nami (CK8E) Chevrons GGGG KKKK Vacation braid #3
Braid 227
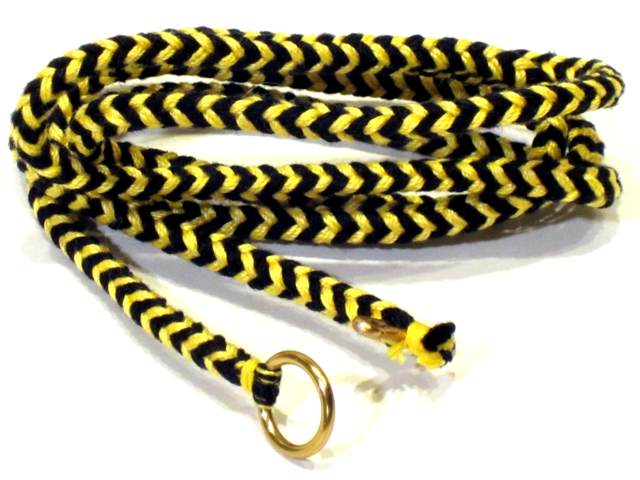 4 ends of #10 cotton crochet thread per strand Kaku Yatsu (CK8H) Rings GG KK GG KK Vacation braid #4
Braid 228 (2'8"; February 2013; 4 gold, 4 black)
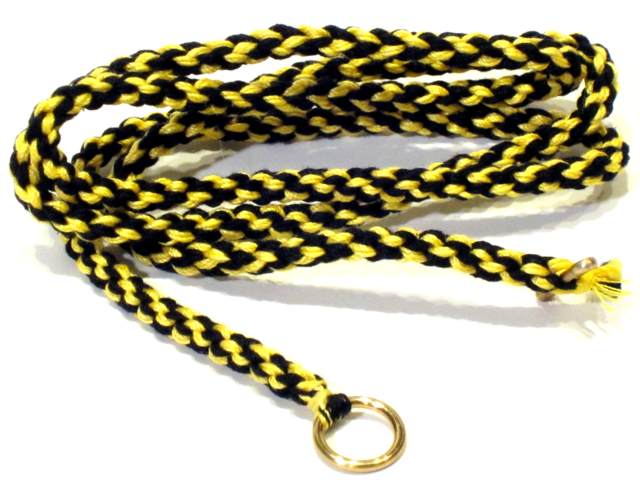 4 ends of #10 cotton crochet thread per strand Maru Genji (CK8D) No special name GK GK GK GK Vacation braid #5
Braid 229 (2'7"; February 2013; 4 gold, 4 black)
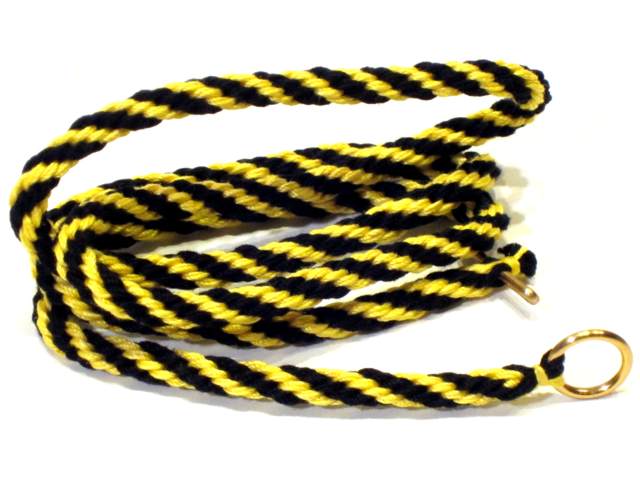 4 ends of #10 cotton crochet thread per strand Kongou (CK8B) Spiral GG KK GG KK Vacation braid #6
Braid 230 (10'4" from 180"; February 2013; 12 gold, 4 green)
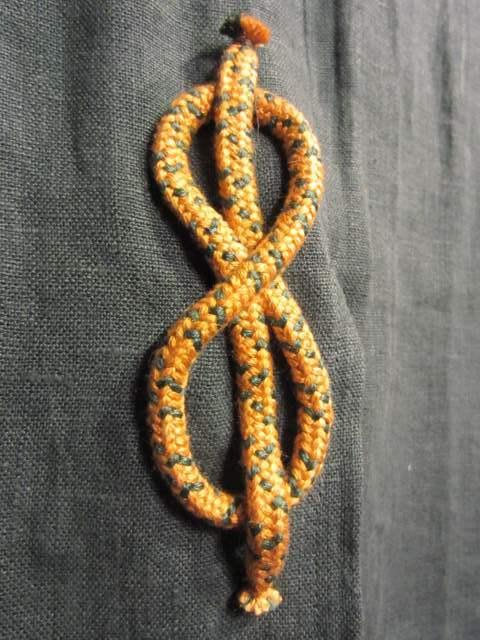 8 ends of silk thread per green strand, 5 ends of silk yarn per gold strand CK16T No special name OGGO OOOO GOOG OOOO Cut up for Hitatare kotsuyu
Braid 231 (7'9" from 144"; March 2013; 12 gold, 4 green)
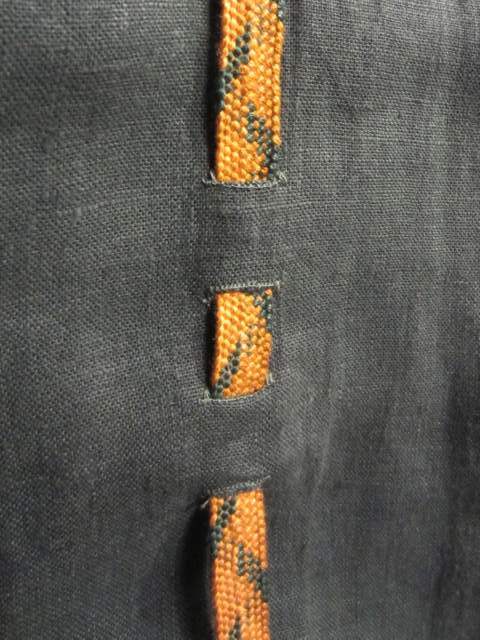 8 ends of silk thread per green strand, 5 ends of silk yarn per gold strand CK16L No special name OOOOOOGG GGOOOOOO Decorative cord for hitatare sleeve end
Braid 232
 0'6" April 2013 Kikko on marudai
Braid 233
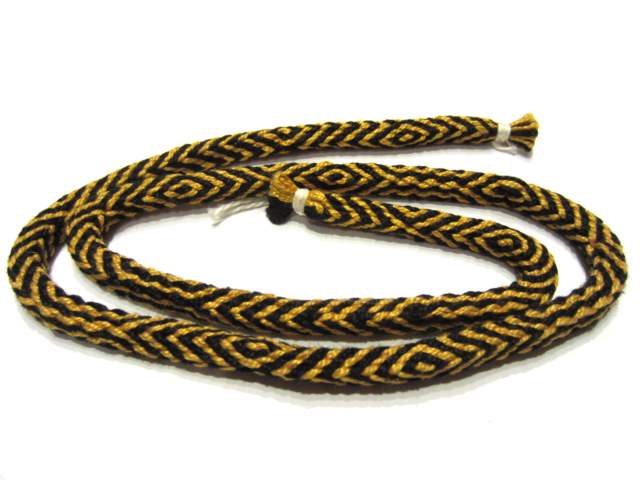 2'1" April 2013 Class braid Rodrick Owen 24-10
Braid 234
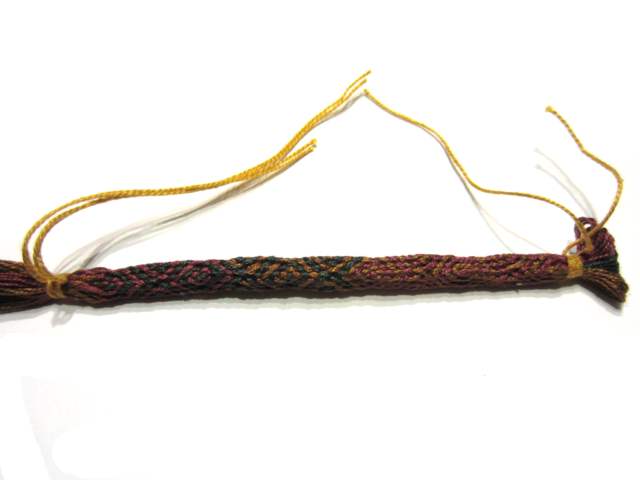 0'5" April 2013 Class braid 24-30
Braid 235
 2'10" April 2013 4 red, 4 white 8 ends of silk weaver's thread per strand Edo Yatsu
Braid 236
 2'09" April 2013 4 red, 4 white 8 ends of silk weaver's thread per strand Kaku Yatsu
Braid 237
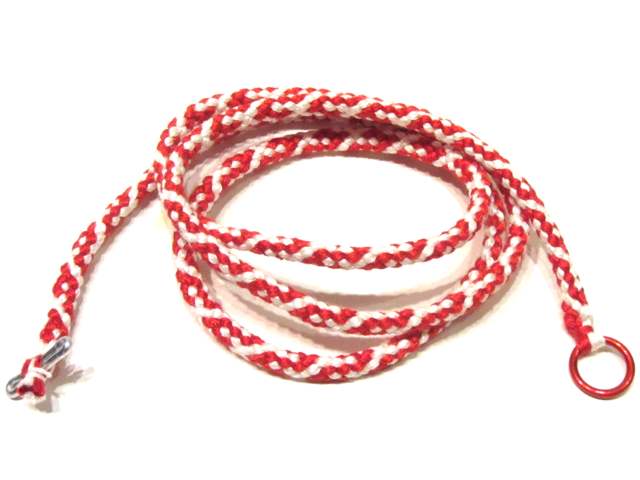 2'09" April 2013 4 red, 4 white 8 ends of silk weaver's thread per strand Edo Yatsu
Braid 238
April 2013
4 red, 4 white
8 ends of silk weaver's thread per strand
Edo Yatsu
Braid 239
 April 2013 4 black, 4 yellow 8 ends of silk weaver's thread per strand Edo Yatsu
Braid 240
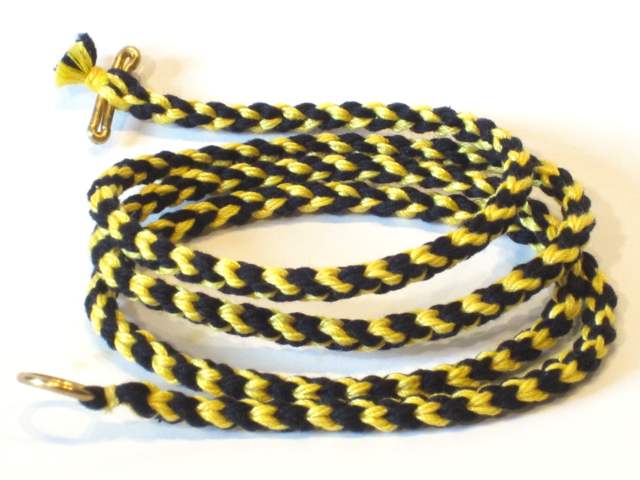 May 2013 4 black, 4 gold 4 ends of #10 cotton crochet thread per strand
Braid 241
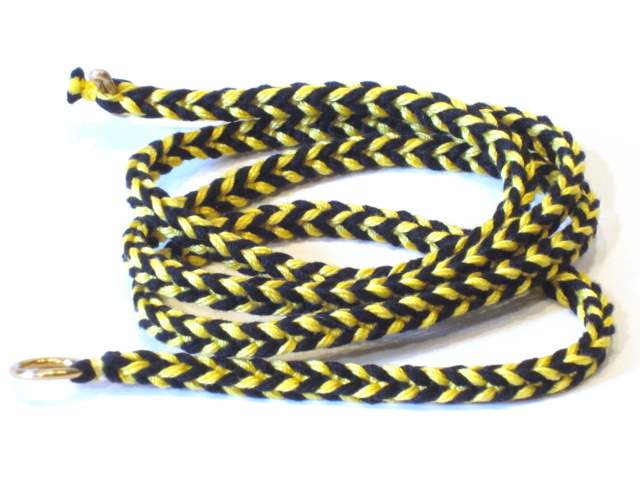 May 2013 4 black, 4 gold 4 ends of #10 cotton crochet thread per strand
Braid 242
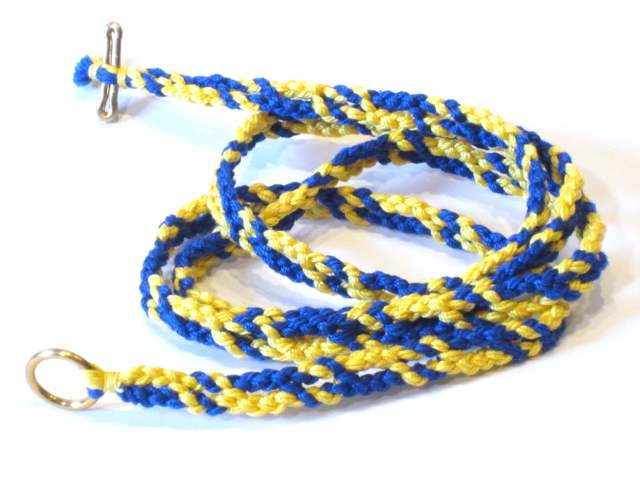 May 2013 4 blue, 4 gold 4 ends of #10 cotton crochet thread per strand Shippou BBGG GGBB
Braid 243
 May 2013 4 blue, 4 gold 4 ends of #10 cotton crochet thread per strand Shippou BBBB GGGG
Braid 244
 June 2013 4 blue, 4 gold 4 ends of #10 cotton crochet thread per strand Shippou BGBG BGBG
Braid 245
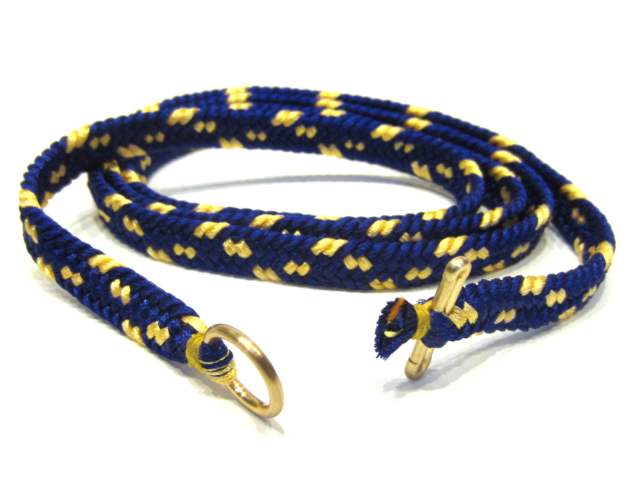 June 2013 7 blue, 2 gold 32 ends of rayon embroidery thread per strand 9-strand shige uchi BGG BB BB BB